

Overview
PayMongo collects payments for 9Pic Checkout in the Philippines. Add one PayMongo configuration for your organisation, then assign it to the event that will sell packages in PHP. You need a secret key from the PayMongo Dashboard. Use a test key while you check the buyer journey, and a live key only when the event is ready to accept real payments.Before You Start
Get Your PayMongo Secret Key
1
Open API keys in PayMongo
Sign in to the PayMongo Dashboard and open Developers -> API keys.
2
Copy the secret key for the mode you need
Copy the secret key for test mode or live mode. Test keys start with
sk_test_. Live keys start with sk_live_.3
Store the key safely
Keep the key in your organisation’s approved password manager until you add it to 9Pic. Do not paste it into a buyer-facing website or app.
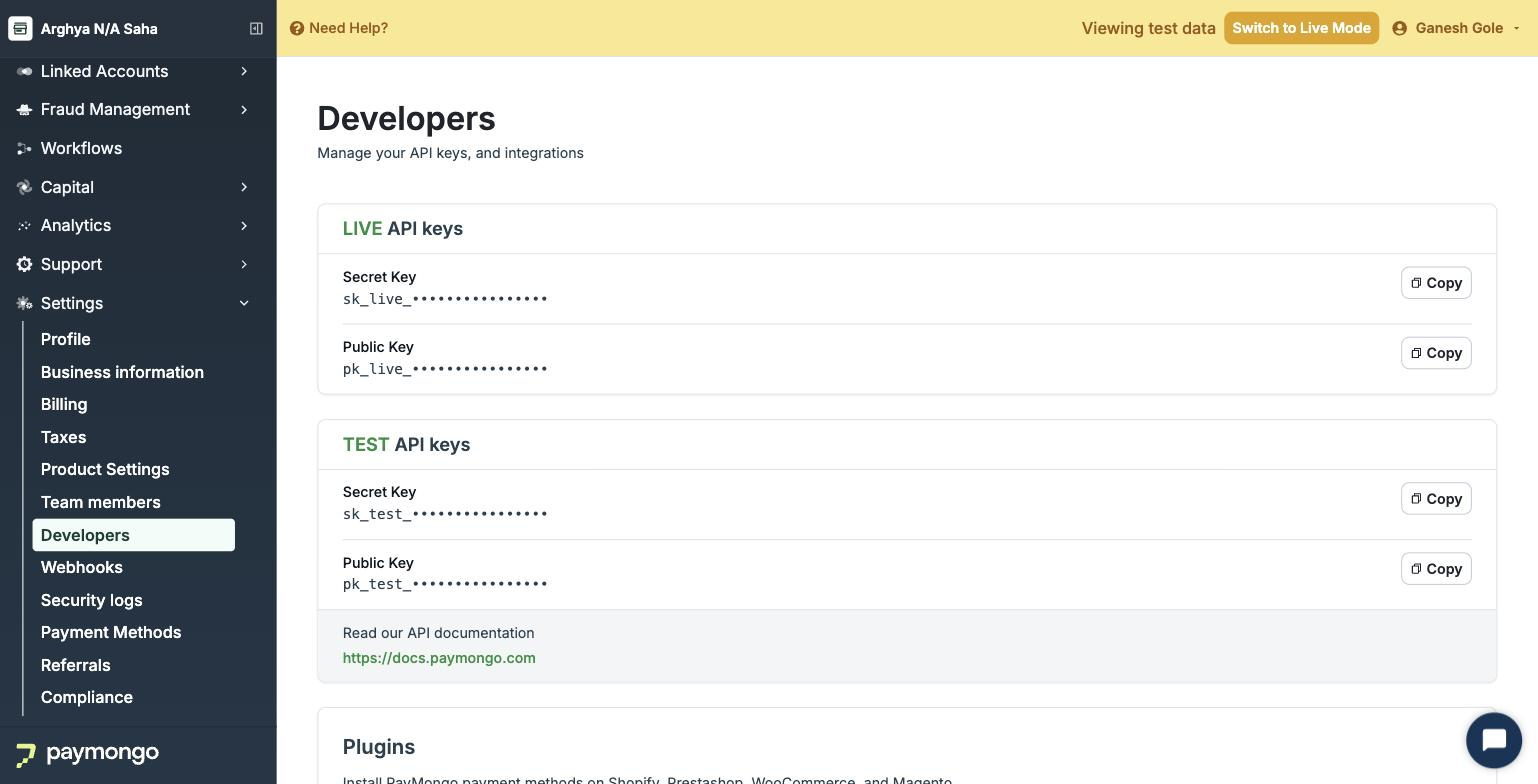
Need help finding the keys in PayMongo? Use the PayMongo API keys guide or contact the PayMongo team that provisioned your merchant account.
Add PayMongo to 9Pic
1
Open Payment Config
In the dashboard sidebar, select Payment Config.
2
Start a new gateway
In Payment Gateway Configurations, click Add Gateway, then select PayMongo.
3
Name the configuration
Enter an optional Label that makes the configuration easy to recognise, such as
PayMongo Test or PayMongo Live Philippines.4
Enter an optional Account ID
Account ID is optional for PayMongo. Use it only if your team wants a reminder of which PayMongo account the key belongs to.
5
Enter the secret key
Paste the key into PayMongo Secret Key. This required value is stored as a protected credential for your organisation.
6
Create the gateway
Click Create Gateway. The new PayMongo configuration appears in the organisation’s gateway list.
Assign PayMongo to an Event
1
Open the event Checkout configuration
Open the event, then open its Checkout configuration.
2
Assign the PayMongo configuration
In the Payment gateway card, select Assign (or Edit if a gateway is already assigned), choose the PayMongo configuration, and save.
3
Decide whether buyers pay provider fees
When PayMongo is selected, the Pass on fees switch is available. Leave it off to keep the listed package price as the charged amount. Turn it on if buyers should pay the payment-provider fee on the PayMongo page. Package prices stay the same; the total shown on the payment page may increase depending on the payment method.
4
Set package prices in PHP
Create or update Checkout packages in PHP. Other currencies cannot be used with PayMongo. Each package must be at least PHP 1.00.
5
Publish and test
Publish the packages and run a complete buyer journey with a
sk_test_ configuration before you switch the event to a live key.Verify the Setup
Troubleshooting
9Pic says the PayMongo secret key is not configured.
9Pic says the PayMongo secret key is not configured.
Edit the PayMongo configuration in Payment Config and confirm that PayMongo Secret Key has a value. Then assign that configuration on the event’s Payment gateway card.
My test key does not work for a public event.
My test key does not work for a public event.
A
sk_test_ key is only for setup checks and cannot complete public checkout. Add or update the configuration with a sk_live_ key from PayMongo live mode.I cannot select PHP, or another currency is blocked.
I cannot select PHP, or another currency is blocked.
Events assigned to PayMongo can only sell PHP packages. Choose PHP, or assign a gateway that supports the currency you need.
The buyer does not see GCash, Maya, GrabPay, or QR Ph.
The buyer does not see GCash, Maya, GrabPay, or QR Ph.
9Pic requests those methods when they are available on your PayMongo account. Enable the method in PayMongo, then retry a test purchase.
The payment page total is higher than the package price.
The payment page total is higher than the package price.
Check whether Pass on fees is on for the event. When that switch is on, buyers pay the payment-provider fee and the PayMongo page total can be higher than the listed package price.
Next Steps
Payment Config
Manage the payment gateways saved for your organisation.
Checkout Setup
Assign a gateway, publish packages, and enable Checkout for an event.