Why This Matters
The Setup Wizard is the single highest-leverage thing you can do on day one of your Pro plan. It walks you through every website-customisation step in the right order, with the right Settings tab opened automatically. Skipping the wizard is the most common reason Pro customers feel like they’re “missing” features that are actually waiting on a five-minute config.Before You Begin
- You’re on the Pro or Enterprise plan. (On Trial or Pay As You Go, the Setup Guide shows “The setup guide is available for Pro and Enterprise plans” and is read-only.)
- You’ve decided on:
- A brand color (a hex code, e.g.
#2E6F40). - A logo (transparent PNG, ≤ 300 KB).
- A favicon (32×32 PNG, ≤ 100 KB).
- Your social media profile URLs.
- A brand color (a hex code, e.g.
- (Optional) A custom domain you want to connect — see Domain.
Steps
Open the Setup Guide
From the sidebar, click Setup Guide. On Pro, the page header reads “Finish setting up your website” with a progress bar showing how many of the website-customisation steps you’ve completed.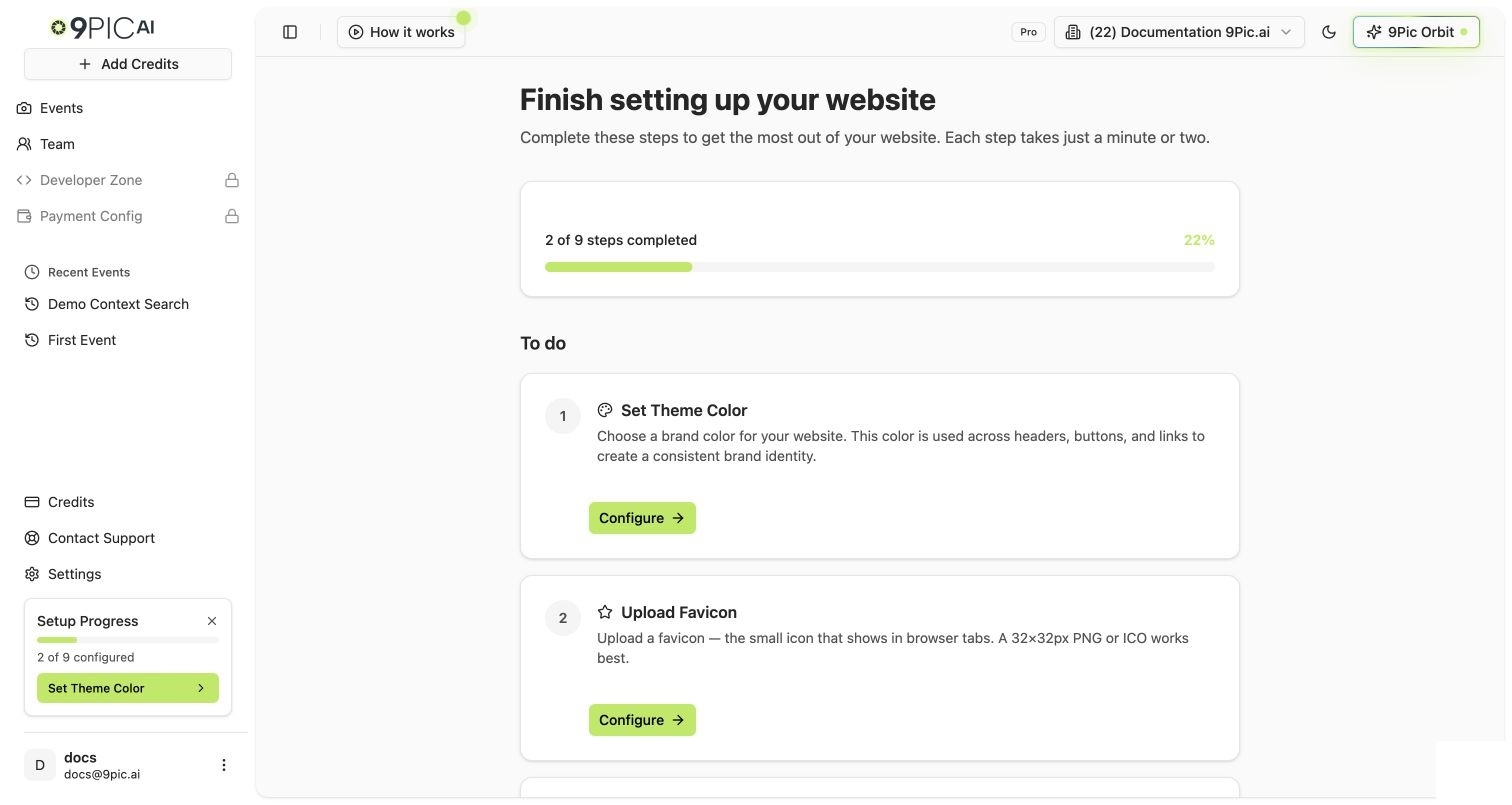
Work through the To-do list in order
The Setup Guide groups steps into To do and Completed. Click Configure on any pending step — the wizard navigates you to the right Settings tab and pre-selects the matching field.Recommended order (matches the order the wizard typically lists them in):
- Theme color → Branding & Theme tab.
- Logo → Branding & Theme tab.
- Favicon → Branding & Theme tab.
- Header CTA → Branding & Theme tab. (Optional but high-impact — see Advanced Settings.)
- Footer text → Footer & Social tab.
- Social media → Footer & Social tab.
- Contact form → Contact & About tab.
- Google Tag Manager → Advanced tab. (Optional, has a tradeoff — read the warning below.)
- Invite team member → Team page.
Save each tab before switching
Each Settings tab has its own Save button at the bottom of the page. Settings are not auto-saved across tabs — if you switch tabs with unsaved changes, the dashboard shows an “Unsaved changes” dialog so you don’t lose your work.
Connect a custom domain (optional but recommended)
Open the Domain & Region tab from Setup Guide or directly via Settings. You can either:
- Add a
yourname.9pic.aiplatform subdomain (instant). - Connect a
photos.yourbrand.comcustom domain (requires a CNAME record at your DNS provider; SSL provisioning takes up to 48 hours).
Invite at least one teammate
From the Setup Guide, click Invite member on the Invite team member step. You’ll be taken to the Team page where you can invite an admin or operator.Why this is in the wizard: a single-person account is a single point of failure on event day. See Team Setup.
Dismiss the wizard when everything is green
Once all steps show Completed, the wizard shows an “All done!” confirmation. Click Dismiss setup guide to hide the progress card from your sidebar. You can still change any setting from the Settings page anytime.
Dismissing is optional. Most Pro customers leave the wizard visible until they’re confident they won’t add a new social link or footer note in the next week.
What Each Step Does
| Wizard step | Settings tab opened | What it controls |
|---|---|---|
| Theme color | Branding & Theme | Brand color used across buttons, links, and accents on your gallery. |
| Logo | Branding & Theme | Logo image shown in the website header. Transparent PNG works best. |
| Favicon | Branding & Theme | The small icon that shows in browser tabs. |
| Header CTA | Branding & Theme | Optional call-to-action button in the header (registration, donations, “Book Now”). |
| Footer text | Footer & Social | Footer copy on every page (copyright, tagline, legal). |
| Social media | Footer & Social | Links to your Facebook, Instagram, X, YouTube, etc. |
| Contact form | Contact & About | Embedded contact form so participants can reach you directly. |
| Google Tag Manager | Advanced | Your own GTM container (advanced — see the warning below). |
| Invite team member | Team | Add an admin or operator. |
Common Questions
The Setup Guide says 'unavailable' for me. Why?
The Setup Guide says 'unavailable' for me. Why?
I dismissed the wizard. Can I bring it back?
I dismissed the wizard. Can I bring it back?
The Setup Guide page itself is always available from the sidebar — dismissing only hides the progress card, not the page. Click Setup Guide in the sidebar to re-open the wizard at any time.
Can I skip social media or contact form if I do not need them?
Can I skip social media or contact form if I do not need them?
Do my Setup Wizard choices apply to every event?
Do my Setup Wizard choices apply to every event?
Yes. Theme color, logo, favicon, footer, social, contact form, header CTA, and GTM all apply globally to your gallery website. Per-event overrides happen on the event’s own settings tabs, not in the global Setup Wizard.
What if I change my mind on a setting later?
What if I change my mind on a setting later?
Open Settings in the sidebar and pick the tab you want. Edit any field, then click Save at the bottom of that tab. Your change goes live on the gallery within seconds.
Next Steps
Branding & Theme
Logo, favicon, theme color, header style, and CTA button.
Custom Domain
Connect a platform subdomain or your own apex domain.
Footer & Contact
Footer copy, social links, and embedded contact form.
Advanced Settings
Google Tag Manager and advanced toggles.