Go live from the trial, or upgrade to Pro or Business, from Credits & Billing
Overview
Every plan change starts on Credits & Billing → Plan. What happens next depends on where you’re going:
Pay As You Go from the trial is free: you send a switch request and our team makes the change.
Pro and Business are a one-page checkout you complete yourself. Your plan changes as soon as the payment is confirmed.
Enterprise starts with a conversation. See Talk to Us.
Not sure which plan you need? Start with Compare Plans.
Changing plan never deletes anything. Events, team members, settings and your credit balance all carry over. Tools your new plan doesn’t include switch off with their settings saved, and come back if you move to a plan that has them.
Step 1: Open the Plan Tab
From Trial
From Pay As You Go
From Pro
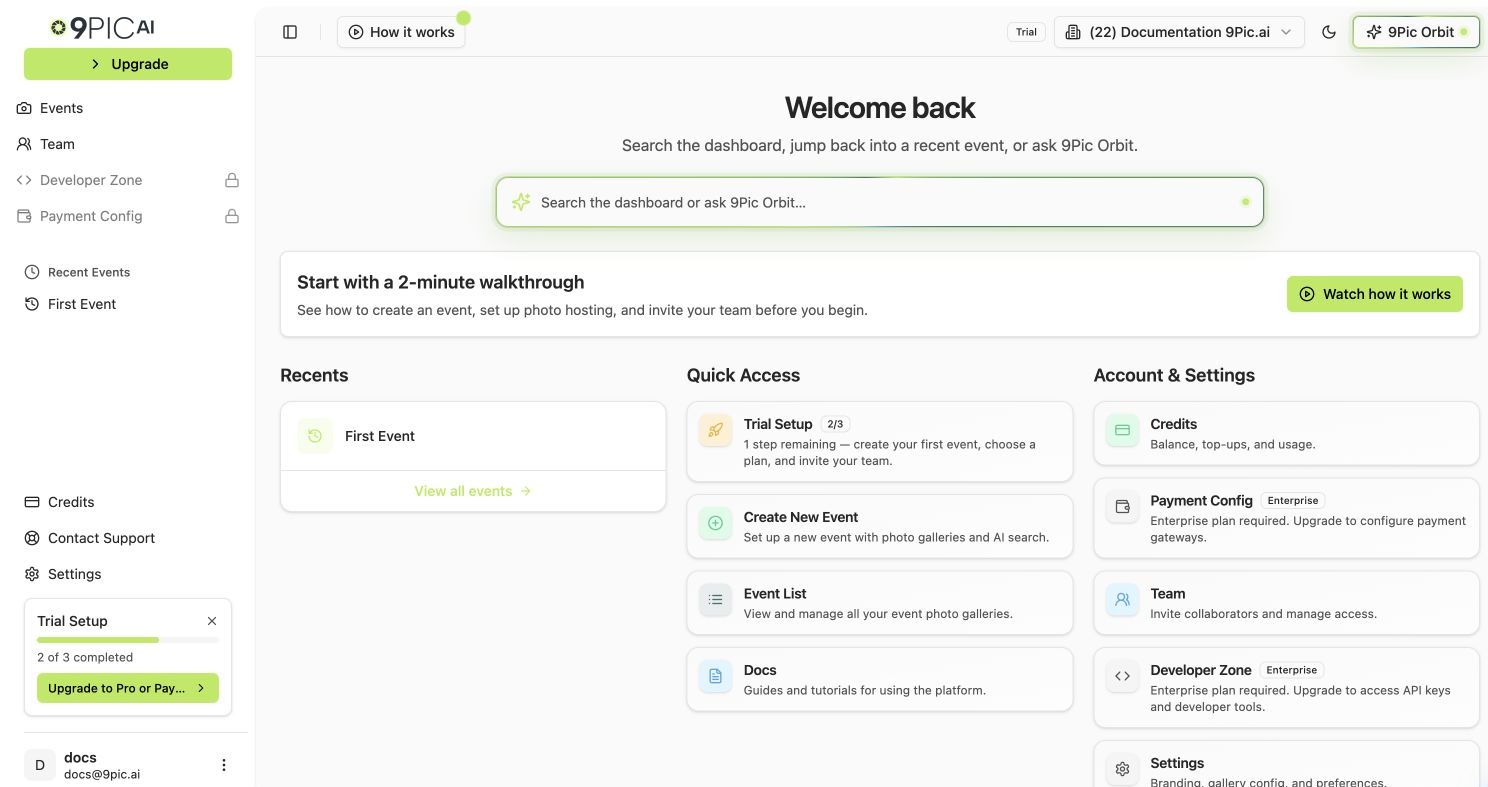
Click the highlighted Upgrade button in the sidebar. It opens Credits & Billing → Plan.
Trial sidebar upgrade button
You can also open Credits & Billing: the You’re on Trial banner has Go live for free (switch to Pay As You Go without paying) and See plans (open the Plan tab).
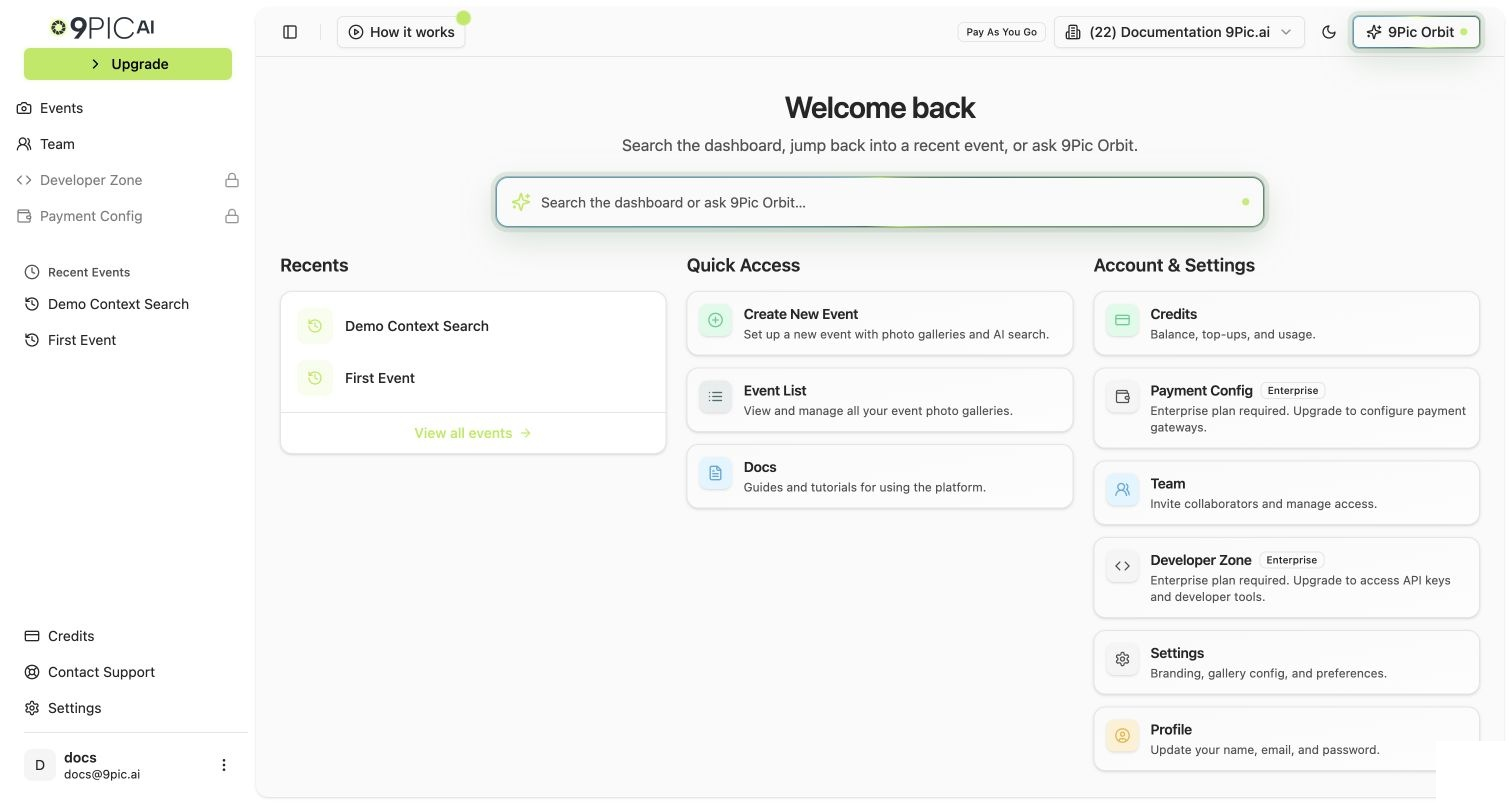
Click the highlighted Upgrade button in the sidebar. It opens Credits & Billing → Plan and doesn’t take a payment by itself.
Pay As You Go Upgrade button
You can also click Compare and change plan on the Your plan card of the Overview tab.
Open Credits & Billing → Plan, or click Compare and change plan on the Overview tab. A locked Business feature’s Upgrade to Business button opens the Business checkout directly.
Step 2: Choose a Plan
The Plan tab shows your Current plan at the top, then a card for Pay As You Go, Pro (tagged Most popular), Business (tagged Sell photos online) and Enterprise. Each card shows the price and the per-photo rate, and has exactly one button. Expand Compare all features to see every feature side by side.
Card
Button
Price
Pay As You Go
Switch to Pay As You Go · free on the trial
No annual fee. $0.03 / ₹1.5 per photo.
Pro
Upgrade to Pro
$200 / ₹10,000 per year, plus $0.02 / ₹1.5 per photo.
Business
Upgrade to Business
$350 / ₹20,000 per year, plus $0.02 / ₹1.5 per photo.
Enterprise
Talk to us
Custom pricing. Opens Contact Support.
INR prices add 18% GST. Your own plan’s card reads Your current plan.
From Trial
From Pay As You Go
From Pro
Pay As You Go: go live with no yearly fee. Certify, Buzz, test-mode Checkout, original photo storage and API keys switch off, with their settings saved. See Go Live on Pay As You Go for Free.
Pro: keeps Certify and Buzz and adds Flow, Select, Motion, a custom domain and more. Test-mode Checkout, original photo storage and API keys switch off; they need Business.
Business: keeps everything you tried, and photo sales go live once you add your own payment account.
Pro: unlocks Certify, Buzz, Select, Motion and Flow on every event, a custom domain, your branding and the Setup Guide.
Business: everything in Pro, plus live photo sales, original photo storage, sales tax settings, purchase webhook, white-label emails and Developer API keys. 9Pic takes no cut of your photo sales.
The Pro card reads Your current plan; click Upgrade to Business on the Business card.
Pro to Business is a fresh term, not a top-up. You pay the full Business price, and the checkout confirms that your Pro term is replaced by a new 1-year Business term starting today. Unused Pro time isn’t credited back.
On a Custom plan, the Business card offers Switch to Business. The checkout confirms that your Custom plan is replaced by a new 1-year Business term starting today, with no event limit.
Go Live on Pay As You Go for Free
On the trial, switching to Pay As You Go costs nothing and you keep your trial credits.
1
Open the switch dialog
Click Go live for free on the Overview tab, or Switch to Pay As You Go · free on the Plan tab. A dialog opens titled Switch to Pay As You Go? with Trial → Pay As You Go · no payment needed underneath.
2
Check what changes
The dialog says your account goes live once switched, events can be made public and your trial credits stay, and shows the new per-photo rate. These switch off lists the trial tools Pay As You Go doesn’t include; their settings are kept. Your credits shows how many credits stay on your account.
3
Send the switch request
Tick I understand what changes when I switch to Pay As You Go. and click Send switch request. Your email app opens with a message to support@9pic.ai already filled in: your organisation name and ID, your current plan and the plan you want. Send that email. Click Keep Trial instead if you change your mind.
4
Wait for our confirmation
The dashboard doesn’t change your plan by itself. Our team switches your account and confirms by email. Until then you stay on the trial.
If no email app opens, email support@9pic.ai yourself with your organisation name and the plan you want.
Want credits straight away? Buy credits on the Overview tab opens the checkout. On the trial, buying credits also moves your account to Pay As You Go and makes it live once the payment is confirmed. The checkout reminds you that you can switch for free instead. See Buy Credits.
Upgrade to Pro or Business
Upgrade to Pro and Upgrade to Business open the same one-page checkout: your choices on the left and the Order summary on the right.
1
Check the plan
The page is headed Upgrade to Pro (or Upgrade to Business) with the yearly price and the per-photo rate. On the trial and on Pay As You Go, a Pro / Business toggle at the top lets you change which plan you’re buying. What you get on Pro (or Business) lists the plan’s features. On the trial, a note confirms that your account goes live as soon as the payment is confirmed.
2
Check your API keys (trial only)
If you created API keys on the trial and you’re buying Pro, the checkout shows Your API keys after this purchase: keys stop working on Pro but aren’t deleted. Choose Business to keep them working.
3
Add credits if you want them
Under Add credits now? (Optional), No credits now is selected by default; you can buy credits later at any time. Or add 1,000, 5,000 or 10,000 credits at the Pro and Business rate ($0.02 or ₹1.5 per photo). Pro and Business include no credits, and your existing balance carries over.
The Order summary shows the plan line (for example Pro plan · 1 year, Starts today), any credits you added, GST @ 18% for INR payments, and Total due.
5
Accept the Refund Policy and pay
Tick the Refund Policy checkbox. The pay button stays disabled until you do. Click Pay and upgrade (it shows the total) and complete the payment in the secure payment window. Payments are processed securely by our payment partners; 9Pic does not see or store your card details.
6
See the success page
9Pic verifies the payment, usually within a few seconds. The success page confirms your new plan and any credits added. The plan name in the sidebar’s organisation switcher updates straight away.
Your Pro or Business term runs for 1 year from the day you pay. You can renew it yourself from 30 days before it ends. See Renewal. For an invoice, open Credits & Billing → Billing & Transactions; see Invoices.
What Changes Right After
The changes below apply as soon as your new plan is active: once the payment is confirmed for Pro or Business, or once our team confirms a free switch to Pay As You Go.
From Trial
From Pay As You Go
From Pro
Change
Detail
Your event domain moves from trial.9pic.ai to app.9pic.ai
From now on your event links work for real participants. Copy fresh links from the event header before you share them.
Platform Visibility unlocks
Events can be made public.
Certify and Buzz
Keep working on Pro and Business. Switched off, with settings saved, on Pay As You Go.
Test-mode Checkout, original photo storage, API keys
Keep working on Business; photo sales go live once you add your own payment account on Payment Configuration. Switched off, with settings saved, on Pay As You Go and Pro.
Credits
Trial credits stay and combine with any you bought.
Your existing trial events stay Private. The domain moves automatically, but you switch each event’s Platform Visibility from Private to Public yourself, on the events you want to publish.
Change
Detail
Sidebar Upgrade button
Replaced by Add Credits, which opens the Buy credits checkout.
Event products
Certify, Buzz, Select, Motion and Flow become available on every event. Switch them on per event in Event Config → Products; nothing is applied automatically.
Available for website customisation. See Setup Wizard.
Per-photo rate
In USD it drops to $0.02 from $0.03 for credits you buy from now on. In INR both rates are ₹1.5.
Existing events and credits
Unchanged. Your event links stay on app.9pic.ai until you connect a custom domain.
Change
Detail
Plan term
A new 1-year Business term starts today and replaces your Pro term.
Photo sales
Open Payment Configuration, add your own live payment account, then switch on Checkout for the events you want to sell. See Checkout and Payment Gateways.
Business features
Original photo storage, sales tax settings, purchase webhook, white-label emails and Developer API keys become available.
Everything else
Events, branding, custom domain, team and credits carry over unchanged.
If Payment Fails
What happened
What to do
Card declined
Click Retry payment, try another card, or contact your bank. You’re not charged again automatically.
Window closed before paying
The order is marked Abandoned. Open the checkout again; nothing was charged.
Charged, but the plan didn’t change
Open Credits & Billing → Billing & Transactions, find the payment and click Recheck. If it’s still stuck, email support@9pic.ai with the Payment ID and a screenshot of the payment confirmation.
Common Questions
Do I have to pay to go live?
No. Switching from the trial to Pay As You Go is free: click Go live for free and send the switch request. Buy credits when you’re ready to process photos.
Do I lose my credits when I change plan?
No. Credits stay on your account on every plan and combine with any you buy.
Can I upgrade in the middle of an event?
Yes. A plan change applies straight away to every event in the organisation. Check that the new plan keeps every tool the event relies on; see Compare Plans.
I set up Certify on the trial. Is it lost if I choose Pay As You Go?
No. It switches off with its settings saved, and its page says the setup is saved but not active. Upgrade to Pro later and it works again with the same settings.
Can I move down a plan?
Yes, through our team. On Credits & Billing → Plan, click Switch to Pay As You Go or Switch to Pro, review what switches off, tick the confirmation and click Send switch request. We confirm by email once your plan has changed. Remaining paid time or the price difference isn’t refunded.
Connect your own domain on Pro, Business or Enterprise.
Your First Event
Run an event on your new plan.
Contact Support
Problems with the upgrade or an invoice.
{"docsConfig":{"theme":"mint","$schema":"https://mintlify.com/docs.json","name":"9Pic AI Documentation","colors":{"primary":"#155DFC","light":"#3080FF","dark":"#0B4AD2"},"logo":{"light":"https://mintcdn.com/9picai/S5EcjfSqjwpORHEo/logo/light.png?fit=max\u0026auto=format\u0026n=S5EcjfSqjwpORHEo\u0026q=85\u0026s=a14647e1552cad86363bd3dfe32ec208","dark":"https://mintcdn.com/9picai/S5EcjfSqjwpORHEo/logo/dark.png?fit=max\u0026auto=format\u0026n=S5EcjfSqjwpORHEo\u0026q=85\u0026s=025984d2e88c0cccd1a0567ad7488357"},"favicon":"https://mintcdn.com/9picai/S5EcjfSqjwpORHEo/favicon.svg?fit=max\u0026auto=format\u0026n=S5EcjfSqjwpORHEo\u0026q=85\u0026s=65125317ce120b5f2cb637eaa6cde837","navbar":{"links":[{"href":"mailto:support@9pic.ai","label":"Support"}]},"footer":{"socials":{"x":"https://x.com/9picai","linkedin":"https://linkedin.com/company/9pic-ai"}},"integrations":{"clarity":{"projectId":"vahau6obj9"}},"contextual":{"options":["copy","view","chatgpt","claude"],"display":"header"},"styling":{"latex":false},"navigation":{"global":{},"pages":[]}},"deployment":{"deploymentMetadataValue":{"subdomain":"9picai","hasAudioNarration":false,"actualSubdomain":"9picai","customDomains":["docs.9pic.ai"],"gitSource":{"type":"github","owner":"theargofactory","repo":"bhaago_india","deployBranch":"master","contentDirectory":"9pic-docs","isPrivate":true,"mountPath":"","label":""},"entitlements":{},"buildId":"6afd4d39edadaaf94a621dad","clientVersion":"0.0.4177","searchFilterCounts":[{"language":"default","tag":"API Reference","count":37},{"language":"default","tag":"Products","count":37},{"language":"default","tag":"Account \u0026 Billing","count":31},{"language":"default","tag":"Get Started","count":23},{"language":"default","tag":"Troubleshooting","count":14},{"language":"default","tag":"Events","count":12},{"language":"default","tag":"AI \u0026 Automation","count":11},{"language":"default","tag":"Events \u0026 Photos","count":11},{"language":"default","tag":"Plans","count":8},{"language":"default","tag":"AI Assistants","count":8}]},"assistantConfig":{"enableAskAiButton":false,"enableStarterQuestions":false,"enableAskAiSearchBar":true},"basePath":"","hasChatPermissions":false,"hasWebMcpPermissions":false,"toggles":[{"name":"kill-isr","enabled":true,"variant":{"name":"disabled","enabled":false,"feature_enabled":true},"impressionData":false},{"name":"custom-rbac-roles","enabled":true,"variant":{"name":"disabled","enabled":false,"feature_enabled":true},"impressionData":false},{"name":"agent-mintlify-slack","enabled":true,"variant":{"name":"disabled","enabled":false,"feature_enabled":true},"impressionData":false},{"name":"agent-integrations-settings","enabled":true,"variant":{"name":"disabled","enabled":false,"feature_enabled":true},"impressionData":false},{"name":"rbac-expansion","enabled":true,"variant":{"name":"disabled","enabled":false,"feature_enabled":true},"impressionData":false},{"name":"automations-pr-grouping","enabled":true,"variant":{"name":"disabled","enabled":false,"feature_enabled":true},"impressionData":false},{"name":"custom-prefix","enabled":true,"variant":{"name":"disabled","enabled":false,"feature_enabled":true},"impressionData":false},{"name":"analytics-v7","enabled":true,"variant":{"name":"disabled","enabled":false,"feature_enabled":true},"impressionData":false},{"name":"user-flows-analytics","enabled":true,"variant":{"name":"disabled","enabled":false,"feature_enabled":true},"impressionData":false},{"name":"no-publish-flow","enabled":true,"variant":{"name":"disabled","enabled":false,"feature_enabled":true},"impressionData":false},{"name":"workos-onboarding","enabled":true,"variant":{"name":"disabled","enabled":false,"feature_enabled":true},"impressionData":false},{"name":"snapshot-serving-live","enabled":true,"variant":{"name":"disabled","enabled":false,"feature_enabled":true},"impressionData":false},{"name":"stripTemperatureMiddleware","enabled":true,"variant":{"name":"disabled","enabled":false,"feature_enabled":true},"impressionData":false},{"name":"support-platform-pylon-zendesk","enabled":true,"variant":{"name":"disabled","enabled":false,"feature_enabled":true},"impressionData":false},{"name":"snapshot-serving","enabled":true,"variant":{"name":"disabled","enabled":false,"feature_enabled":true},"impressionData":false},{"name":"instant-rollback","enabled":true,"variant":{"name":"disabled","enabled":false,"feature_enabled":true},"impressionData":false},{"name":"granular-notifications-server","enabled":true,"variant":{"name":"disabled","enabled":false,"feature_enabled":true},"impressionData":false},{"name":"granular-notifications","enabled":true,"variant":{"name":"disabled","enabled":false,"feature_enabled":true},"impressionData":false},{"name":"automations-fable","enabled":true,"variant":{"name":"disabled","enabled":false,"feature_enabled":true},"impressionData":false},{"name":"fixed-ai-action-pricing","enabled":true,"variant":{"name":"disabled","enabled":false,"feature_enabled":true},"impressionData":false},{"name":"automation-resolve-merge-conflict","enabled":true,"variant":{"name":"disabled","enabled":false,"feature_enabled":true},"impressionData":false},{"name":"scoped-publishing","enabled":true,"variant":{"name":"disabled","enabled":false,"feature_enabled":true},"impressionData":false},{"name":"mintql","enabled":true,"variant":{"name":"disabled","enabled":false,"feature_enabled":true},"impressionData":false},{"name":"page-level-analytics","enabled":true,"variant":{"name":"disabled","enabled":false,"feature_enabled":true},"impressionData":false},{"name":"editor-version-history-v2","enabled":true,"variant":{"name":"disabled","enabled":false,"feature_enabled":true},"impressionData":false},{"name":"billing-page-v2","enabled":true,"variant":{"name":"disabled","enabled":false,"feature_enabled":true},"impressionData":false},{"name":"full-page-search","enabled":true,"variant":{"name":"disabled","enabled":false,"feature_enabled":true},"impressionData":false},{"name":"workspace-projects","enabled":true,"variant":{"name":"disabled","enabled":false,"feature_enabled":true},"impressionData":false},{"name":"assistant-v5","enabled":true,"variant":{"name":"disabled","enabled":false,"feature_enabled":true},"impressionData":false},{"name":"fork-pr-previews","enabled":true,"variant":{"name":"disabled","enabled":false,"feature_enabled":true},"impressionData":false},{"name":"revalidation-jwt","enabled":true,"variant":{"name":"disabled","enabled":false,"feature_enabled":true},"impressionData":false},{"name":"workos-sso-scim","enabled":true,"variant":{"name":"disabled","enabled":false,"feature_enabled":true},"impressionData":false},{"name":"hobby-abuse-scan","enabled":true,"variant":{"name":"disabled","enabled":false,"feature_enabled":true},"impressionData":false},{"name":"dashboard-inbox","enabled":true,"variant":{"name":"disabled","enabled":false,"feature_enabled":true},"impressionData":false},{"name":"workos-signup","enabled":true,"variant":{"name":"disabled","enabled":false,"feature_enabled":true},"impressionData":false},{"name":"turbopuffer-dual-write","enabled":true,"variant":{"name":"disabled","enabled":false,"feature_enabled":true},"impressionData":false},{"name":"workos-enabled","enabled":true,"variant":{"name":"disabled","enabled":false,"feature_enabled":true},"impressionData":false},{"name":"approve-review-flow","enabled":true,"variant":{"name":"disabled","enabled":false,"feature_enabled":true},"impressionData":false},{"name":"editor-metadata","enabled":true,"variant":{"name":"disabled","enabled":false,"feature_enabled":true},"impressionData":false},{"name":"sso-setup-deadline-banner","enabled":true,"variant":{"name":"disabled","enabled":false,"feature_enabled":true},"impressionData":false},{"name":"turbopuffer-serve","enabled":true,"variant":{"name":"disabled","enabled":false,"feature_enabled":true},"impressionData":false},{"name":"live-agents","enabled":true,"variant":{"name":"disabled","enabled":false,"feature_enabled":true},"impressionData":false},{"name":"starter-pricing","enabled":true,"variant":{"name":"control","enabled":true,"payload":{"type":"string","value":"control"},"feature_enabled":true},"impressionData":false},{"name":"llms-txt-v2","enabled":true,"variant":{"name":"disabled","enabled":false,"feature_enabled":true},"impressionData":false},{"name":"wildcard-email-auth","enabled":true,"variant":{"name":"disabled","enabled":false,"feature_enabled":true},"impressionData":false}],"googleFontsInlined":false},"customCss":[],"page":{"pagePath":"account/plans/upgrade","slug":"/account/plans/upgrade","pageMetadata":{"title":"Change Your Plan","description":"Go live from the trial, or upgrade to Pro or Business, from Credits \u0026 Billing","icon":"arrow-up-right-from-square","href":"/account/plans/upgrade"},"description":{"compiledSource":"\"use strict\";\nconst {jsx: _jsx} = arguments[0];\nconst {useMDXComponents: _provideComponents} = arguments[0];\nfunction _createMdxContent(props) {\n const _components = {\n p: \"p\",\n ..._provideComponents(),\n ...props.components\n };\n return _jsx(_components.p, {\n children: \"Go live from the trial, or upgrade to Pro or Business, from Credits \u0026 Billing\"\n });\n}\nfunction MDXContent(props = {}) {\n const {wrapper: MDXLayout} = {\n ..._provideComponents(),\n ...props.components\n };\n return MDXLayout ? _jsx(MDXLayout, {\n ...props,\n children: _jsx(_createMdxContent, {\n ...props\n })\n }) : _createMdxContent(props);\n}\nreturn {\n default: MDXContent\n};\n","frontmatter":{},"scope":{}},"pageType":"default","mdx":{"mdxSource":{"compiledSource":"\"use strict\";const{Fragment:_Fragment,jsx:_jsx,jsxs:_jsxs}=arguments[0];const{useMDXComponents:_provideComponents}=arguments[0];function _createMdxContent(props){const _components={a:`a`,code:`code`,em:`em`,li:`li`,p:`p`,strong:`strong`,tbody:`tbody`,td:`td`,th:`th`,thead:`thead`,tr:`tr`,ul:`ul`,..._provideComponents(),...props.components},{Accordion,AccordionGroup,Card,CardGroup,Frame,Heading,Note,OptimizedImage,Step,Steps,Tab,Table,Tabs,Tip,Warning}=_components;if(!Accordion)_missingMdxReference(`Accordion`,true);if(!AccordionGroup)_missingMdxReference(`AccordionGroup`,true);if(!Card)_missingMdxReference(`Card`,true);if(!CardGroup)_missingMdxReference(`CardGroup`,true);if(!Frame)_missingMdxReference(`Frame`,true);if(!Heading)_missingMdxReference(`Heading`,true);if(!Note)_missingMdxReference(`Note`,true);if(!OptimizedImage)_missingMdxReference(`OptimizedImage`,true);if(!Step)_missingMdxReference(`Step`,true);if(!Steps)_missingMdxReference(`Steps`,true);if(!Tab)_missingMdxReference(`Tab`,true);if(!Table)_missingMdxReference(`Table`,true);if(!Tabs)_missingMdxReference(`Tabs`,true);if(!Tip)_missingMdxReference(`Tip`,true);if(!Warning)_missingMdxReference(`Warning`,true);return _jsxs(_Fragment,{children:[_jsx(Heading,{level:`2`,id:`overview`,children:`Overview`}),`\n`,_jsxs(_components.p,{children:[`Every plan change starts on `,_jsx(_components.strong,{children:`Credits \u0026 Billing → Plan`}),`. What happens next depends on where you’re going:`]}),`\n`,_jsxs(_components.ul,{children:[`\n`,_jsxs(_components.li,{children:[_jsx(_components.strong,{children:`Pay As You Go`}),` from the trial is free: you send a switch request and our team makes the change.`]}),`\n`,_jsxs(_components.li,{children:[_jsx(_components.strong,{children:`Pro`}),` and `,_jsx(_components.strong,{children:`Business`}),` are a one-page checkout you complete yourself. Your plan changes as soon as the payment is confirmed.`]}),`\n`,_jsxs(_components.li,{children:[_jsx(_components.strong,{children:`Enterprise`}),` starts with a conversation. See `,_jsx(_components.a,{href:`/account/talk-to-us`,children:`Talk to Us`}),`.`]}),`\n`]}),`\n`,_jsxs(_components.p,{children:[`Not sure which plan you need? Start with `,_jsx(_components.a,{href:`/account/plans/compare`,children:`Compare Plans`}),`.`]}),`\n`,_jsx(Note,{children:_jsx(_components.p,{children:`Changing plan never deletes anything. Events, team members, settings and your credit balance all carry over. Tools your new plan doesn’t include switch off with their settings saved, and come back if you move to a plan that has them.`})}),`\n`,_jsx(Heading,{level:`2`,id:`step-1-open-the-plan-tab`,children:`Step 1: Open the Plan Tab`}),`\n`,_jsxs(Tabs,{children:[_jsxs(Tab,{title:`From Trial`,id:`from-trial`,children:[_jsxs(_components.p,{children:[`Click the highlighted `,_jsx(_components.strong,{children:`Upgrade`}),` button in the sidebar. It opens `,_jsx(_components.strong,{children:`Credits \u0026 Billing → Plan`}),`.`]}),_jsx(Frame,{caption:`Trial sidebar upgrade button`,children:_jsx(OptimizedImage,{src:`https://assets.9pic.ai/docs/trial-guide/upgrade-sidebar.webp`,alt:`Trial dashboard sidebar showing the highlighted Upgrade button and Trial Setup progress widget`})}),_jsxs(_components.p,{children:[`You can also open `,_jsx(_components.strong,{children:`Credits \u0026 Billing`}),`: the `,_jsx(_components.strong,{children:`You’re on Trial`}),` banner has `,_jsx(_components.strong,{children:`Go live for free`}),` (switch to Pay As You Go without paying) and `,_jsx(_components.strong,{children:`See plans`}),` (open the `,_jsx(_components.strong,{children:`Plan`}),` tab).`]})]}),_jsxs(Tab,{title:`From Pay As You Go`,id:`from-pay-as-you-go`,children:[_jsxs(_components.p,{children:[`Click the highlighted `,_jsx(_components.strong,{children:`Upgrade`}),` button in the sidebar. It opens `,_jsx(_components.strong,{children:`Credits \u0026 Billing → Plan`}),` and doesn’t take a payment by itself.`]}),_jsx(Frame,{caption:`Pay As You Go Upgrade button`,children:_jsx(OptimizedImage,{src:`https://assets.9pic.ai/docs/pay-as-you-go-guide/upgrade-sidebar.webp`,alt:`Pay As You Go dashboard home showing the highlighted Upgrade button in the sidebar`})}),_jsxs(_components.p,{children:[`You can also click `,_jsx(_components.strong,{children:`Compare and change plan`}),` on the `,_jsx(_components.strong,{children:`Your plan`}),` card of the `,_jsx(_components.strong,{children:`Overview`}),` tab.`]})]}),_jsx(Tab,{title:`From Pro`,id:`from-pro`,children:_jsxs(_components.p,{children:[`Open `,_jsx(_components.strong,{children:`Credits \u0026 Billing → Plan`}),`, or click `,_jsx(_components.strong,{children:`Compare and change plan`}),` on the `,_jsx(_components.strong,{children:`Overview`}),` tab. A locked Business feature’s `,_jsx(_components.strong,{children:`Upgrade to Business`}),` button opens the Business checkout directly.`]})})]}),`\n`,_jsx(Heading,{level:`2`,id:`step-2-choose-a-plan`,children:`Step 2: Choose a Plan`}),`\n`,_jsxs(_components.p,{children:[`The `,_jsx(_components.strong,{children:`Plan`}),` tab shows your `,_jsx(_components.strong,{children:`Current plan`}),` at the top, then a card for `,_jsx(_components.strong,{children:`Pay As You Go`}),`, `,_jsx(_components.strong,{children:`Pro`}),` (tagged `,_jsx(_components.strong,{children:`Most popular`}),`), `,_jsx(_components.strong,{children:`Business`}),` (tagged `,_jsx(_components.strong,{children:`Sell photos online`}),`) and `,_jsx(_components.strong,{children:`Enterprise`}),`. Each card shows the price and the per-photo rate, and has exactly one button. Expand `,_jsx(_components.strong,{children:`Compare all features`}),` to see every feature side by side.`]}),`\n`,_jsxs(Table,{children:[_jsx(_components.thead,{children:_jsxs(_components.tr,{children:[_jsx(_components.th,{children:`Card`}),_jsx(_components.th,{children:`Button`}),_jsx(_components.th,{children:`Price`})]})}),_jsxs(_components.tbody,{children:[_jsxs(_components.tr,{children:[_jsx(_components.td,{children:_jsx(_components.strong,{children:`Pay As You Go`})}),_jsxs(_components.td,{children:[_jsx(_components.strong,{children:`Switch to Pay As You Go · free`}),` on the trial`]}),_jsx(_components.td,{children:`No annual fee. $0.03 / ₹1.5 per photo.`})]}),_jsxs(_components.tr,{children:[_jsx(_components.td,{children:_jsx(_components.strong,{children:`Pro`})}),_jsx(_components.td,{children:_jsx(_components.strong,{children:`Upgrade to Pro`})}),_jsx(_components.td,{children:`$200 / ₹10,000 per year, plus $0.02 / ₹1.5 per photo.`})]}),_jsxs(_components.tr,{children:[_jsx(_components.td,{children:_jsx(_components.strong,{children:`Business`})}),_jsx(_components.td,{children:_jsx(_components.strong,{children:`Upgrade to Business`})}),_jsx(_components.td,{children:`$350 / ₹20,000 per year, plus $0.02 / ₹1.5 per photo.`})]}),_jsxs(_components.tr,{children:[_jsx(_components.td,{children:_jsx(_components.strong,{children:`Enterprise`})}),_jsx(_components.td,{children:_jsx(_components.strong,{children:`Talk to us`})}),_jsxs(_components.td,{children:[`Custom pricing. Opens `,_jsx(_components.strong,{children:`Contact Support`}),`.`]})]})]})]}),`\n`,_jsxs(_components.p,{children:[`INR prices add 18% GST. Your own plan’s card reads `,_jsx(_components.strong,{children:`Your current plan`}),`.`]}),`\n`,_jsxs(Tabs,{children:[_jsx(Tab,{title:`From Trial`,id:`from-trial-2`,children:_jsxs(_components.ul,{children:[`\n`,_jsxs(_components.li,{children:[_jsx(_components.strong,{children:`Pay As You Go`}),`: go live with no yearly fee. Certify, Buzz, test-mode Checkout, original photo storage and API keys switch off, with their settings saved. See `,_jsx(_components.a,{href:`#go-live-on-pay-as-you-go-for-free`,children:`Go Live on Pay As You Go for Free`}),`.`]}),`\n`,_jsxs(_components.li,{children:[_jsx(_components.strong,{children:`Pro`}),`: keeps Certify and Buzz and adds Flow, Select, Motion, a custom domain and more. Test-mode Checkout, original photo storage and API keys switch off; they need Business.`]}),`\n`,_jsxs(_components.li,{children:[_jsx(_components.strong,{children:`Business`}),`: keeps everything you tried, and photo sales go live once you add your own payment account.`]}),`\n`]})}),_jsx(Tab,{title:`From Pay As You Go`,id:`from-pay-as-you-go-2`,children:_jsxs(_components.ul,{children:[`\n`,_jsxs(_components.li,{children:[_jsx(_components.strong,{children:`Pro`}),`: unlocks Certify, Buzz, Select, Motion and Flow on every event, a custom domain, your branding and the Setup Guide.`]}),`\n`,_jsxs(_components.li,{children:[_jsx(_components.strong,{children:`Business`}),`: everything in Pro, plus live photo sales, original photo storage, sales tax settings, purchase webhook, white-label emails and Developer API keys. 9Pic takes no cut of your photo sales.`]}),`\n`]})}),_jsxs(Tab,{title:`From Pro`,id:`from-pro-2`,children:[_jsxs(_components.p,{children:[`The Pro card reads `,_jsx(_components.strong,{children:`Your current plan`}),`; click `,_jsx(_components.strong,{children:`Upgrade to Business`}),` on the Business card.`]}),_jsx(Warning,{children:_jsxs(_components.p,{children:[_jsx(_components.strong,{children:`Pro to Business is a fresh term, not a top-up.`}),` You pay the full Business price, and the checkout confirms that your Pro term is replaced by a new 1-year Business term starting today. Unused Pro time isn’t credited back.`]})})]})]}),`\n`,_jsx(Note,{children:_jsxs(_components.p,{children:[`On a `,_jsx(_components.strong,{children:`Custom`}),` plan, the Business card offers `,_jsx(_components.strong,{children:`Switch to Business`}),`. The checkout confirms that your Custom plan is replaced by a new 1-year Business term starting today, with no event limit.`]})}),`\n`,_jsx(Heading,{level:`2`,id:`go-live-on-pay-as-you-go-for-free`,children:`Go Live on Pay As You Go for Free`}),`\n`,_jsx(_components.p,{children:`On the trial, switching to Pay As You Go costs nothing and you keep your trial credits.`}),`\n`,_jsxs(Steps,{children:[_jsx(Step,{title:`Open the switch dialog`,children:_jsxs(_components.p,{children:[`Click `,_jsx(_components.strong,{children:`Go live for free`}),` on the Overview tab, or `,_jsx(_components.strong,{children:`Switch to Pay As You Go · free`}),` on the `,_jsx(_components.strong,{children:`Plan`}),` tab. A dialog opens titled `,_jsx(_components.strong,{children:`Switch to Pay As You Go?`}),` with `,_jsx(_components.strong,{children:`Trial → Pay As You Go · no payment needed`}),` underneath.`]})}),_jsx(Step,{title:`Check what changes`,children:_jsxs(_components.p,{children:[`The dialog says your account goes live once switched, events can be made public and your trial credits stay, and shows the new per-photo rate. `,_jsx(_components.strong,{children:`These switch off`}),` lists the trial tools Pay As You Go doesn’t include; their settings are kept. `,_jsx(_components.strong,{children:`Your credits`}),` shows how many credits stay on your account.`]})}),_jsx(Step,{title:`Send the switch request`,children:_jsxs(_components.p,{children:[`Tick `,_jsx(_components.strong,{children:`I understand what changes when I switch to Pay As You Go.`}),` and click `,_jsx(_components.strong,{children:`Send switch request`}),`. Your email app opens with a message to `,_jsx(_components.a,{href:`mailto:support@9pic.ai`,children:`support@9pic.ai`}),` already filled in: your organisation name and ID, your current plan and the plan you want. Send that email. Click `,_jsx(_components.strong,{children:`Keep Trial`}),` instead if you change your mind.`]})}),_jsx(Step,{title:`Wait for our confirmation`,children:_jsx(_components.p,{children:`The dashboard doesn’t change your plan by itself. Our team switches your account and confirms by email. Until then you stay on the trial.`})})]}),`\n`,_jsxs(_components.p,{children:[`If no email app opens, email `,_jsx(_components.a,{href:`mailto:support@9pic.ai`,children:`support@9pic.ai`}),` yourself with your organisation name and the plan you want.`]}),`\n`,_jsx(Tip,{children:_jsxs(_components.p,{children:[`Want credits straight away? `,_jsx(_components.strong,{children:`Buy credits`}),` on the Overview tab opens the checkout. On the trial, buying credits also moves your account to Pay As You Go and makes it live once the payment is confirmed. The checkout reminds you that you can `,_jsx(_components.strong,{children:`switch for free`}),` instead. See `,_jsx(_components.a,{href:`/account/credits/buy`,children:`Buy Credits`}),`.`]})}),`\n`,_jsx(Heading,{level:`2`,id:`upgrade-to-pro-or-business`,children:`Upgrade to Pro or Business`}),`\n`,_jsxs(_components.p,{children:[_jsx(_components.strong,{children:`Upgrade to Pro`}),` and `,_jsx(_components.strong,{children:`Upgrade to Business`}),` open the same one-page checkout: your choices on the left and the `,_jsx(_components.strong,{children:`Order summary`}),` on the right.`]}),`\n`,_jsxs(Steps,{children:[_jsx(Step,{title:`Check the plan`,children:_jsxs(_components.p,{children:[`The page is headed `,_jsx(_components.strong,{children:`Upgrade to Pro`}),` (or `,_jsx(_components.strong,{children:`Upgrade to Business`}),`) with the yearly price and the per-photo rate. On the trial and on Pay As You Go, a `,_jsx(_components.strong,{children:`Pro`}),` / `,_jsx(_components.strong,{children:`Business`}),` toggle at the top lets you change which plan you’re buying. `,_jsx(_components.strong,{children:`What you get on Pro`}),` (or `,_jsx(_components.strong,{children:`Business`}),`) lists the plan’s features. On the trial, a note confirms that your account goes live as soon as the payment is confirmed.`]})}),_jsx(Step,{title:`Check your API keys (trial only)`,children:_jsxs(_components.p,{children:[`If you created API keys on the trial and you’re buying Pro, the checkout shows `,_jsx(_components.strong,{children:`Your API keys after this purchase`}),`: keys stop working on Pro but aren’t deleted. Choose `,_jsx(_components.strong,{children:`Business`}),` to keep them working.`]})}),_jsxs(Step,{title:`Add credits if you want them`,children:[_jsxs(_components.p,{children:[`Under `,_jsx(_components.strong,{children:`Add credits now? (Optional)`}),`, `,_jsx(_components.strong,{children:`No credits now`}),` is selected by default; you can buy credits later at any time. Or add `,_jsx(_components.strong,{children:`1,000`}),`, `,_jsx(_components.strong,{children:`5,000`}),` or `,_jsx(_components.strong,{children:`10,000`}),` credits at the Pro and Business rate ($0.02 or ₹1.5 per photo). Pro and Business include no credits, and your existing balance carries over.`]}),_jsxs(Table,{children:[_jsx(_components.thead,{children:_jsxs(_components.tr,{children:[_jsx(_components.th,{children:`Your next event`}),_jsx(_components.th,{children:`Suggested credits`})]})}),_jsxs(_components.tbody,{children:[_jsxs(_components.tr,{children:[_jsx(_components.td,{children:`Your current balance already covers it`}),_jsx(_components.td,{children:_jsx(_components.strong,{children:`No credits now`})})]}),_jsxs(_components.tr,{children:[_jsx(_components.td,{children:`Up to 1,000 photos`}),_jsx(_components.td,{children:`1,000 credits`})]}),_jsxs(_components.tr,{children:[_jsx(_components.td,{children:`1,000 to 5,000 photos`}),_jsx(_components.td,{children:`5,000 credits`})]}),_jsxs(_components.tr,{children:[_jsx(_components.td,{children:`5,000 to 10,000 photos`}),_jsx(_components.td,{children:`10,000 credits`})]}),_jsxs(_components.tr,{children:[_jsx(_components.td,{children:`Over 10,000 photos`}),_jsxs(_components.td,{children:[`10,000 credits, then `,_jsx(_components.a,{href:`/account/credits/buy`,children:`buy more`}),` as needed`]})]})]})]})]}),_jsx(Step,{title:`Review the Order summary`,children:_jsxs(_components.p,{children:[`The `,_jsx(_components.strong,{children:`Order summary`}),` shows the plan line (for example `,_jsx(_components.strong,{children:`Pro plan · 1 year`}),`, `,_jsx(_components.em,{children:`Starts today`}),`), any credits you added, `,_jsx(_components.strong,{children:`GST @ 18%`}),` for INR payments, and `,_jsx(_components.strong,{children:`Total due`}),`.`]})}),_jsx(Step,{title:`Accept the Refund Policy and pay`,children:_jsxs(_components.p,{children:[`Tick the `,_jsx(_components.strong,{children:`Refund Policy`}),` checkbox. The pay button stays disabled until you do. Click `,_jsx(_components.strong,{children:`Pay and upgrade`}),` (it shows the total) and complete the payment in the secure payment window. Payments are processed securely by our payment partners; 9Pic does not see or store your card details.`]})}),_jsx(Step,{title:`See the success page`,children:_jsx(_components.p,{children:`9Pic verifies the payment, usually within a few seconds. The success page confirms your new plan and any credits added. The plan name in the sidebar’s organisation switcher updates straight away.`})})]}),`\n`,_jsxs(_components.p,{children:[`Your Pro or Business term runs for `,_jsx(_components.strong,{children:`1 year`}),` from the day you pay. You can renew it yourself from 30 days before it ends. See `,_jsx(_components.a,{href:`/account/plans/renewal`,children:`Renewal`}),`. For an invoice, open `,_jsx(_components.strong,{children:`Credits \u0026 Billing → Billing \u0026 Transactions`}),`; see `,_jsx(_components.a,{href:`/account/credits/invoices`,children:`Invoices`}),`.`]}),`\n`,_jsx(Heading,{level:`2`,id:`what-changes-right-after`,children:`What Changes Right After`}),`\n`,_jsx(_components.p,{children:`The changes below apply as soon as your new plan is active: once the payment is confirmed for Pro or Business, or once our team confirms a free switch to Pay As You Go.`}),`\n`,_jsxs(Tabs,{children:[_jsxs(Tab,{title:`From Trial`,id:`from-trial-3`,children:[_jsxs(Table,{children:[_jsx(_components.thead,{children:_jsxs(_components.tr,{children:[_jsx(_components.th,{children:`Change`}),_jsx(_components.th,{children:`Detail`})]})}),_jsxs(_components.tbody,{children:[_jsxs(_components.tr,{children:[_jsxs(_components.td,{children:[`Your event domain moves from `,_jsx(_components.code,{children:`trial.9pic.ai`}),` to `,_jsx(_components.code,{children:`app.9pic.ai`})]}),_jsx(_components.td,{children:`From now on your event links work for real participants. Copy fresh links from the event header before you share them.`})]}),_jsxs(_components.tr,{children:[_jsxs(_components.td,{children:[_jsx(_components.strong,{children:`Platform Visibility`}),` unlocks`]}),_jsx(_components.td,{children:`Events can be made public.`})]}),_jsxs(_components.tr,{children:[_jsx(_components.td,{children:`Certify and Buzz`}),_jsx(_components.td,{children:`Keep working on Pro and Business. Switched off, with settings saved, on Pay As You Go.`})]}),_jsxs(_components.tr,{children:[_jsx(_components.td,{children:`Test-mode Checkout, original photo storage, API keys`}),_jsxs(_components.td,{children:[`Keep working on Business; photo sales go live once you add your own payment account on `,_jsx(_components.strong,{children:`Payment Configuration`}),`. Switched off, with settings saved, on Pay As You Go and Pro.`]})]}),_jsxs(_components.tr,{children:[_jsx(_components.td,{children:`Credits`}),_jsx(_components.td,{children:`Trial credits stay and combine with any you bought.`})]})]})]}),_jsx(Warning,{children:_jsxs(_components.p,{children:[`Your `,_jsx(_components.strong,{children:`existing trial events stay Private`}),`. The domain moves automatically, but you switch each event’s `,_jsx(_components.strong,{children:`Platform Visibility`}),` from Private to Public yourself, on the events you want to publish.`]})})]}),_jsx(Tab,{title:`From Pay As You Go`,id:`from-pay-as-you-go-3`,children:_jsxs(Table,{children:[_jsx(_components.thead,{children:_jsxs(_components.tr,{children:[_jsx(_components.th,{children:`Change`}),_jsx(_components.th,{children:`Detail`})]})}),_jsxs(_components.tbody,{children:[_jsxs(_components.tr,{children:[_jsxs(_components.td,{children:[`Sidebar `,_jsx(_components.strong,{children:`Upgrade`}),` button`]}),_jsxs(_components.td,{children:[`Replaced by `,_jsx(_components.strong,{children:`Add Credits`}),`, which opens the Buy credits checkout.`]})]}),_jsxs(_components.tr,{children:[_jsx(_components.td,{children:`Event products`}),_jsxs(_components.td,{children:[`Certify, Buzz, Select, Motion and Flow become available on every event. Switch them on per event in `,_jsx(_components.strong,{children:`Event Config → Products`}),`; nothing is applied automatically.`]})]}),_jsxs(_components.tr,{children:[_jsx(_components.td,{children:`Custom domain`}),_jsxs(_components.td,{children:[`Available in `,_jsx(_components.strong,{children:`Settings`}),`. See `,_jsx(_components.a,{href:`/account/site/domain`,children:`Custom Domain`}),`.`]})]}),_jsxs(_components.tr,{children:[_jsx(_components.td,{children:`Setup Guide`}),_jsxs(_components.td,{children:[`Available for website customisation. See `,_jsx(_components.a,{href:`/account/site/setup-wizard`,children:`Setup Wizard`}),`.`]})]}),_jsxs(_components.tr,{children:[_jsx(_components.td,{children:`Per-photo rate`}),_jsx(_components.td,{children:`In USD it drops to $0.02 from $0.03 for credits you buy from now on. In INR both rates are ₹1.5.`})]}),_jsxs(_components.tr,{children:[_jsx(_components.td,{children:`Existing events and credits`}),_jsxs(_components.td,{children:[`Unchanged. Your event links stay on `,_jsx(_components.code,{children:`app.9pic.ai`}),` until you connect a custom domain.`]})]})]})]})}),_jsx(Tab,{title:`From Pro`,id:`from-pro-3`,children:_jsxs(Table,{children:[_jsx(_components.thead,{children:_jsxs(_components.tr,{children:[_jsx(_components.th,{children:`Change`}),_jsx(_components.th,{children:`Detail`})]})}),_jsxs(_components.tbody,{children:[_jsxs(_components.tr,{children:[_jsx(_components.td,{children:`Plan term`}),_jsx(_components.td,{children:`A new 1-year Business term starts today and replaces your Pro term.`})]}),_jsxs(_components.tr,{children:[_jsx(_components.td,{children:`Photo sales`}),_jsxs(_components.td,{children:[`Open `,_jsx(_components.strong,{children:`Payment Configuration`}),`, add your own live payment account, then switch on Checkout for the events you want to sell. See `,_jsx(_components.a,{href:`/products/checkout/overview`,children:`Checkout`}),` and `,_jsx(_components.a,{href:`/account/payment-gateways`,children:`Payment Gateways`}),`.`]})]}),_jsxs(_components.tr,{children:[_jsx(_components.td,{children:`Business features`}),_jsx(_components.td,{children:`Original photo storage, sales tax settings, purchase webhook, white-label emails and Developer API keys become available.`})]}),_jsxs(_components.tr,{children:[_jsx(_components.td,{children:`Everything else`}),_jsx(_components.td,{children:`Events, branding, custom domain, team and credits carry over unchanged.`})]})]})]})})]}),`\n`,_jsx(Heading,{level:`2`,id:`if-payment-fails`,children:`If Payment Fails`}),`\n`,_jsxs(Table,{children:[_jsx(_components.thead,{children:_jsxs(_components.tr,{children:[_jsx(_components.th,{children:`What happened`}),_jsx(_components.th,{children:`What to do`})]})}),_jsxs(_components.tbody,{children:[_jsxs(_components.tr,{children:[_jsx(_components.td,{children:`Card declined`}),_jsxs(_components.td,{children:[`Click `,_jsx(_components.strong,{children:`Retry payment`}),`, try another card, or contact your bank. You’re not charged again automatically.`]})]}),_jsxs(_components.tr,{children:[_jsx(_components.td,{children:`Window closed before paying`}),_jsxs(_components.td,{children:[`The order is marked `,_jsx(_components.strong,{children:`Abandoned`}),`. Open the checkout again; nothing was charged.`]})]}),_jsxs(_components.tr,{children:[_jsx(_components.td,{children:`Charged, but the plan didn’t change`}),_jsxs(_components.td,{children:[`Open `,_jsx(_components.strong,{children:`Credits \u0026 Billing → Billing \u0026 Transactions`}),`, find the payment and click `,_jsx(_components.strong,{children:`Recheck`}),`. If it’s still stuck, email `,_jsx(_components.a,{href:`mailto:support@9pic.ai`,children:`support@9pic.ai`}),` with the `,_jsx(_components.strong,{children:`Payment ID`}),` and a screenshot of the payment confirmation.`]})]})]})]}),`\n`,_jsx(Heading,{level:`2`,id:`common-questions`,children:`Common Questions`}),`\n`,_jsxs(AccordionGroup,{children:[_jsx(Accordion,{title:`Do I have to pay to go live?`,id:`do-i-have-to-pay-to-go-live`,children:_jsxs(_components.p,{children:[`No. Switching from the trial to Pay As You Go is free: click `,_jsx(_components.strong,{children:`Go live for free`}),` and send the switch request. Buy credits when you’re ready to process photos.`]})}),_jsx(Accordion,{title:`Do I lose my credits when I change plan?`,id:`do-i-lose-my-credits-when-i-change-plan`,children:_jsx(_components.p,{children:`No. Credits stay on your account on every plan and combine with any you buy.`})}),_jsx(Accordion,{title:`Can I upgrade in the middle of an event?`,id:`can-i-upgrade-in-the-middle-of-an-event`,children:_jsxs(_components.p,{children:[`Yes. A plan change applies straight away to every event in the organisation. Check that the new plan keeps every tool the event relies on; see `,_jsx(_components.a,{href:`/account/plans/compare`,children:`Compare Plans`}),`.`]})}),_jsx(Accordion,{title:`I set up Certify on the trial. Is it lost if I choose Pay As You Go?`,id:`i-set-up-certify-on-the-trial-is-it-lost-if-i-choose-pay-as-you-go`,children:_jsx(_components.p,{children:`No. It switches off with its settings saved, and its page says the setup is saved but not active. Upgrade to Pro later and it works again with the same settings.`})}),_jsx(Accordion,{title:`Can I move down a plan?`,id:`can-i-move-down-a-plan`,children:_jsxs(_components.p,{children:[`Yes, through our team. On `,_jsx(_components.strong,{children:`Credits \u0026 Billing → Plan`}),`, click `,_jsx(_components.strong,{children:`Switch to Pay As You Go`}),` or `,_jsx(_components.strong,{children:`Switch to Pro`}),`, review what switches off, tick the confirmation and click `,_jsx(_components.strong,{children:`Send switch request`}),`. We confirm by email once your plan has changed. Remaining paid time or the price difference isn’t refunded.`]})}),_jsx(Accordion,{title:`Can I get a refund if I change my mind?`,id:`can-i-get-a-refund-if-i-change-my-mind`,children:_jsxs(_components.p,{children:[`Refunds follow the `,_jsx(_components.a,{href:`https://9pic.ai/refund-policy/`,children:`Refund Policy`}),` you accept at checkout. For special cases, email `,_jsx(_components.a,{href:`mailto:support@9pic.ai`,children:`support@9pic.ai`}),`.`]})})]}),`\n`,_jsx(Heading,{level:`2`,id:`next-steps`,children:`Next Steps`}),`\n`,_jsxs(CardGroup,{cols:2,children:[_jsx(Card,{title:`Compare Plans`,icon:`scale-balanced`,href:`/account/plans/compare`,children:_jsx(_components.p,{children:`Every plan side by side, and when to move up.`})}),_jsx(Card,{title:`Custom Domain`,icon:`globe`,href:`/account/site/domain`,children:_jsx(_components.p,{children:`Connect your own domain on Pro, Business or Enterprise.`})}),_jsx(Card,{title:`Your First Event`,icon:`rocket`,href:`/get-started/first-event`,children:_jsx(_components.p,{children:`Run an event on your new plan.`})}),_jsx(Card,{title:`Contact Support`,icon:`life-ring`,href:`/account/support`,children:_jsx(_components.p,{children:`Problems with the upgrade or an invoice.`})})]})]})}function MDXContent(props={}){const{wrapper:MDXLayout}={..._provideComponents(),...props.components};return MDXLayout?_jsx(MDXLayout,{...props,children:_jsx(_createMdxContent,{...props})}):_createMdxContent(props)}return{default:MDXContent};function _missingMdxReference(id,component){throw new Error(`Expected `+(component?`component`:`object`)+\" `\"+id+\"` to be defined: you likely forgot to import, pass, or provide it.\")}","frontmatter":{},"scope":{"config":{},"pageMetadata":{"title":"Change Your Plan","description":"Go live from the trial, or upgrade to Pro or Business, from Credits \u0026 Billing","icon":"arrow-up-right-from-square","href":"/account/plans/upgrade"}}},"mdxSourceWithNoJs":null},"mdxExtracts":{"tableOfContents":[{"title":"Overview","slug":"overview","depth":2,"children":[]},{"title":"Step 1: Open the Plan Tab","slug":"step-1-open-the-plan-tab","depth":2,"children":[]},{"title":"Step 2: Choose a Plan","slug":"step-2-choose-a-plan","depth":2,"children":[]},{"title":"Go Live on Pay As You Go for Free","slug":"go-live-on-pay-as-you-go-for-free","depth":2,"children":[]},{"title":"Upgrade to Pro or Business","slug":"upgrade-to-pro-or-business","depth":2,"children":[]},{"title":"What Changes Right After","slug":"what-changes-right-after","depth":2,"children":[]},{"title":"If Payment Fails","slug":"if-payment-fails","depth":2,"children":[]},{"title":"Common Questions","slug":"common-questions","depth":2,"children":[]},{"title":"Next Steps","slug":"next-steps","depth":2,"children":[]}],"codeExamples":{}},"jsLinks":[],"subdomain":"9picai","siteName":"9Pic AI Documentation","title":"Change Your Plan - 9Pic AI Documentation","navMaps":{"firstHrefInVersion":{},"firstHrefInLanguage":{}},"lastModified":"2026-11-17T19:15:49.302Z","originalFileLocation":"account/plans/upgrade.mdx"},"headHtml":"\u003cscript data-mint-head>(function(){var d=document.documentElement,p=null;if(!p){try{p=localStorage.getItem(\"isDarkMode\")}catch(e){}if(p==='true')p='dark';else if(p==='false')p='light';if(p!=='light'\u0026\u0026p!=='dark'\u0026\u0026p!=='system')p=\"system\"}var r=p==='system'?(matchMedia(\"(prefers-color-scheme: dark)\").matches?'dark':'light'):p;d.classList.remove(r==='dark'?'light':'dark');d.classList.add(r);d.setAttribute(\"data-theme-preference\",p)})();\u003c/script>\u003cmeta data-mint-head name=\"description\" content=\"Go live from the trial, or upgrade to Pro or Business, from Credits \u0026amp; Billing\">\u003cmeta data-mint-head name=\"application-name\" content=\"9Pic AI Documentation\">\u003cmeta data-mint-head name=\"generator\" content=\"Mintlify\">\u003clink data-mint-head rel=\"icon\" type=\"image/png\" sizes=\"192x192\" href=\"/mintlify-assets/_mintlify/favicons/9picai/9qO0Knt0dMOPX3DE/_generated/favicon/android-chrome-192x192.png\" media=\"(prefers-color-scheme: light)\">\u003clink data-mint-head rel=\"apple-touch-icon\" type=\"image/png\" sizes=\"180x180\" href=\"/mintlify-assets/_mintlify/favicons/9picai/9qO0Knt0dMOPX3DE/_generated/favicon/apple-touch-icon.png\">\u003clink data-mint-head rel=\"icon\" type=\"image/png\" sizes=\"16x16\" href=\"/mintlify-assets/_mintlify/favicons/9picai/9qO0Knt0dMOPX3DE/_generated/favicon/favicon-16x16.png\" media=\"(prefers-color-scheme: light)\">\u003clink data-mint-head rel=\"icon\" type=\"image/png\" sizes=\"32x32\" href=\"/mintlify-assets/_mintlify/favicons/9picai/9qO0Knt0dMOPX3DE/_generated/favicon/favicon-32x32.png\" media=\"(prefers-color-scheme: light)\">\u003clink data-mint-head rel=\"shortcut icon\" type=\"image/x-icon\" href=\"/mintlify-assets/_mintlify/favicons/9picai/9qO0Knt0dMOPX3DE/_generated/favicon/favicon.ico\" media=\"(prefers-color-scheme: light)\">\u003clink data-mint-head rel=\"icon\" type=\"image/png\" sizes=\"192x192\" href=\"/mintlify-assets/_mintlify/favicons/9picai/9qO0Knt0dMOPX3DE/_generated/favicon-dark/android-chrome-192x192.png\" media=\"(prefers-color-scheme: dark)\">\u003clink data-mint-head rel=\"icon\" type=\"image/png\" sizes=\"16x16\" href=\"/mintlify-assets/_mintlify/favicons/9picai/9qO0Knt0dMOPX3DE/_generated/favicon-dark/favicon-16x16.png\" media=\"(prefers-color-scheme: dark)\">\u003clink data-mint-head rel=\"icon\" type=\"image/png\" sizes=\"32x32\" href=\"/mintlify-assets/_mintlify/favicons/9picai/9qO0Knt0dMOPX3DE/_generated/favicon-dark/favicon-32x32.png\" media=\"(prefers-color-scheme: dark)\">\u003clink data-mint-head rel=\"shortcut icon\" type=\"image/x-icon\" href=\"/mintlify-assets/_mintlify/favicons/9picai/9qO0Knt0dMOPX3DE/_generated/favicon-dark/favicon.ico\" media=\"(prefers-color-scheme: dark)\">\u003cmeta data-mint-head property=\"og:title\" content=\"Change Your Plan - 9Pic AI Documentation\">\u003cmeta data-mint-head property=\"og:description\" content=\"Go live from the trial, or upgrade to Pro or Business, from Credits \u0026amp; Billing\">\u003cmeta data-mint-head property=\"og:site_name\" content=\"9Pic AI Documentation\">\u003cmeta data-mint-head property=\"og:url\" content=\"https://docs.9pic.ai/account/plans/upgrade\">\u003cmeta data-mint-head property=\"og:type\" content=\"website\">\u003cmeta data-mint-head property=\"og:image\" content=\"https://9picai.mintlify.site/_mintlify/api/og/v2?division=Plans\u0026amp;title=Change+Your+Plan\u0026amp;description=Go+live+from+the+trial%2C+or+upgrade+to+Pro+or+Business%2C+from+Credits+%26+Billing\u0026amp;theme=b5a7382b9996fec4070d7961\u0026amp;signature=c491886f3e8822f568afd9b13d2c6003d5b282dc88f86ec14a6aa698851f2600\">\u003cmeta data-mint-head property=\"og:image:width\" content=\"1200\">\u003cmeta data-mint-head property=\"og:image:height\" content=\"630\">\u003cmeta data-mint-head name=\"twitter:card\" content=\"summary_large_image\">\u003cmeta data-mint-head name=\"twitter:title\" content=\"Change Your Plan - 9Pic AI Documentation\">\u003cmeta data-mint-head name=\"twitter:description\" content=\"Go live from the trial, or upgrade to Pro or Business, from Credits \u0026amp; Billing\">\u003cmeta data-mint-head name=\"twitter:image\" content=\"https://9picai.mintlify.site/_mintlify/api/og/v2?division=Plans\u0026amp;title=Change+Your+Plan\u0026amp;description=Go+live+from+the+trial%2C+or+upgrade+to+Pro+or+Business%2C+from+Credits+%26+Billing\u0026amp;theme=b5a7382b9996fec4070d7961\u0026amp;signature=c491886f3e8822f568afd9b13d2c6003d5b282dc88f86ec14a6aa698851f2600\">\u003cmeta data-mint-head name=\"twitter:image:width\" content=\"1200\">\u003cmeta data-mint-head name=\"twitter:image:height\" content=\"630\">\u003cmeta data-mint-head name=\"msapplication-config\" content=\"/mintlify-assets/_mintlify/favicons/9picai/9qO0Knt0dMOPX3DE/_generated/favicon/browserconfig.xml\">\u003cmeta data-mint-head name=\"apple-mobile-web-app-title\" content=\"9Pic AI Documentation\">\u003cmeta data-mint-head name=\"msapplication-TileColor\" content=\"#155DFC\">\u003clink data-mint-head rel=\"canonical\" href=\"https://docs.9pic.ai/account/plans/upgrade\">\u003clink data-mint-head rel=\"alternate\" type=\"application/xml\" href=\"/sitemap.xml\">\u003clink data-mint-head rel=\"alternate\" type=\"text/markdown\" href=\"/account/plans/upgrade.md\">\u003cscript data-mint-head type=\"application/ld+json\">{\"@context\":\"https://schema.org\",\"@graph\":[{\"@type\":\"Organization\",\"@id\":\"https://docs.9pic.ai/#organization\",\"name\":\"9Pic AI Documentation\",\"url\":\"https://docs.9pic.ai\",\"logo\":{\"@type\":\"ImageObject\",\"url\":\"https://mintcdn.com/9picai/S5EcjfSqjwpORHEo/logo/light.png?fit=max\u0026auto=format\u0026n=S5EcjfSqjwpORHEo\u0026q=85\u0026s=a14647e1552cad86363bd3dfe32ec208\"}},{\"@type\":\"WebSite\",\"@id\":\"https://docs.9pic.ai#website\",\"name\":\"9Pic AI Documentation\",\"url\":\"https://docs.9pic.ai\",\"publisher\":{\"@id\":\"https://docs.9pic.ai/#organization\"}},{\"@type\":\"WebPage\",\"@id\":\"https://docs.9pic.ai/account/plans/upgrade#webpage\",\"url\":\"https://docs.9pic.ai/account/plans/upgrade\",\"name\":\"Change Your Plan\",\"description\":\"Go live from the trial, or upgrade to Pro or Business, from Credits \u0026 Billing\",\"dateModified\":\"2026-11-17T19:15:49.302Z\",\"isPartOf\":{\"@id\":\"https://docs.9pic.ai#website\"},\"breadcrumb\":{\"@id\":\"https://docs.9pic.ai/account/plans/upgrade#breadcrumb\"}},{\"@type\":\"BreadcrumbList\",\"@id\":\"https://docs.9pic.ai/account/plans/upgrade#breadcrumb\",\"itemListElement\":[{\"@type\":\"ListItem\",\"position\":1,\"name\":\"Plans\",\"item\":\"https://docs.9pic.ai/account/plans/compare\"},{\"@type\":\"ListItem\",\"position\":2,\"name\":\"Change Your Plan\",\"item\":\"https://docs.9pic.ai/account/plans/upgrade\"}]},{\"@type\":[\"Article\",\"TechArticle\"],\"@id\":\"https://docs.9pic.ai/account/plans/upgrade#article\",\"headline\":\"Change Your Plan\",\"name\":\"Change Your Plan\",\"description\":\"Go live from the trial, or upgrade to Pro or Business, from Credits \u0026 Billing\",\"url\":\"https://docs.9pic.ai/account/plans/upgrade\",\"mainEntityOfPage\":{\"@id\":\"https://docs.9pic.ai/account/plans/upgrade#webpage\"},\"dateModified\":\"2026-11-17T19:15:49.302Z\",\"publisher\":{\"@id\":\"https://docs.9pic.ai/#organization\"},\"isPartOf\":{\"@id\":\"https://docs.9pic.ai#website\"}}]}\u003c/script>\u003cscript data-mint-head type=\"application/ld+json\">{\"@context\":\"https://schema.org\",\"@type\":\"WebSite\",\"name\":\"9Pic AI Documentation\",\"publisher\":{\"@type\":\"Organization\",\"name\":\"9Pic AI Documentation\"},\"provider\":{\"@type\":\"Organization\",\"name\":\"Mintlify\",\"url\":\"https://mintlify.com\"}}\u003c/script>","agentPointerHref":"/account/plans/upgrade.md","siteName":"9Pic AI Documentation","nav":{"global":{},"tabs":[{"tab":"Get Started","pages":[{"title":"Get Started","href":"/get-started"}]},{"tab":"Products","pages":[{"title":"Products","href":"/products/events/list"}]},{"tab":"Account \u0026 Billing","groups":[{"group":"Plans","pages":[{"title":"Compare Plans","icon":"scale-balanced","href":"/account/plans/compare"},{"title":"Trial","icon":"rocket","href":"/account/plans/trial"},{"title":"Pay As You Go","icon":"coins","href":"/account/plans/pay-as-you-go"},{"title":"Pro","icon":"crown","href":"/account/plans/pro"},{"title":"Business","description":"Everything in Pro plus live photo sales, original photo storage, white-label buyer emails and Developer API keys","icon":"briefcase","href":"/account/plans/business"},{"title":"Change Your Plan","icon":"arrow-up-right-from-square","href":"/account/plans/upgrade"},{"title":"Renewal","description":"Renew Pro or Business from 30 days before your plan ends, and what happens if it ends","icon":"arrows-rotate","href":"/account/plans/renewal"},{"title":"Fair Usage Policy","icon":"scale-balanced","href":"/account/plans/fair-usage"}]},{"group":"Credits","pages":[{"title":"Credits \u0026 Billing","icon":"coins","href":"/account/credits/overview"},{"title":"Photo Processing Costs","icon":"gauge","href":"/account/credits/costs"},{"title":"Buy More Credits","icon":"cart-shopping","href":"/account/credits/buy"},{"title":"Invoices \u0026 Transactions","icon":"file-invoice","href":"/account/credits/invoices"},{"title":"Avoid Wasting Credits","icon":"triangle-exclamation","href":"/account/credits/avoid-waste"}]},{"group":"Your Site","pages":[{"title":"Settings Overview","icon":"gear","href":"/account/site/index"},{"title":"Run the Setup Wizard","icon":"wand-magic-sparkles","href":"/account/site/setup-wizard"},{"title":"Branding \u0026 Theme","icon":"palette","href":"/account/site/branding"},{"title":"Domain \u0026 Region","icon":"globe","href":"/account/site/domain"},{"title":"Footer \u0026 Social","icon":"share-nodes","href":"/account/site/footer"},{"title":"Contact Us Page","icon":"address-card","href":"/account/site/contact"},{"title":"Advanced Settings","icon":"sliders","href":"/account/site/advanced"}]},{"group":"Team \u0026 Account","pages":[{"title":"Account","icon":"user","href":"/account/profile"},{"title":"Team","icon":"users","href":"/account/team"}]},{"group":"Payment Gateways","pages":[{"title":"Payment Configuration","icon":"wallet","href":"/account/payment-gateways/index"},{"title":"Stripe Key Setup","icon":"key","href":"/account/payment-gateways/stripe-restricted-key"},{"title":"Stripe Invoice Setup","icon":"file-invoice-dollar","href":"/account/payment-gateways/stripe-invoices"},{"title":"AFS Gateway Setup","icon":"credit-card","href":"/account/payment-gateways/afs-gateway"},{"title":"BENEFIT Setup","icon":"credit-card","href":"/account/payment-gateways/benefit-gateway"},{"title":"PayMongo Setup","icon":"credit-card","href":"/account/payment-gateways/paymongo"},{"title":"Xendit Setup","icon":"credit-card","href":"/account/payment-gateways/xendit"}]},{"group":"Get Help","pages":[{"title":"Contact Support","icon":"life-ring","href":"/account/support"},{"title":"Talk to Us","icon":"comments","href":"/account/talk-to-us"}]}]},{"tab":"Troubleshooting","pages":[{"title":"Troubleshooting","href":"/troubleshooting"}]},{"tab":"AI \u0026 Automation","pages":[{"title":"AI \u0026 Automation","href":"/integrations/ai-assistants"}]},{"tab":"API Reference","pages":[{"title":"API Reference","href":"/api-reference"}]}]},"basePath":"","title":"Change Your Plan - 9Pic AI Documentation","deploymentId":"dpl_HhUetB7eHHDAmK9T1Teip38TgFx9","buildId":"dpl_HhUetB7eHHDAmK9T1Teip38TgFx9","dynamics":["07c022d89b","a74be98ba7"],"chunks":["Frame-DevImLcx.js","DynamicMarkdown-BGHukeRM.js","zoom-image-lightbox-DQG3o8Eu.js","lightbox-handle-r17bVUz3.js"]}