Create a Stripe restricted key for 9Pic Checkout and add it to Payment Configuration.
9Pic Checkout is a Business plan feature. Create Stripe keys only in the Stripe account and mode you intend to use for the event.
Overview
A Stripe restricted key lets 9Pic Checkout use only the Stripe permissions it needs instead of a full-access secret key. Create the key in Stripe first, then paste it into Payment Config -> Add Gateway -> Stripe in 9Pic.Use the downloadable Stripe Restricted API Key Setup Guide as your external checklist while following this dashboard guide.
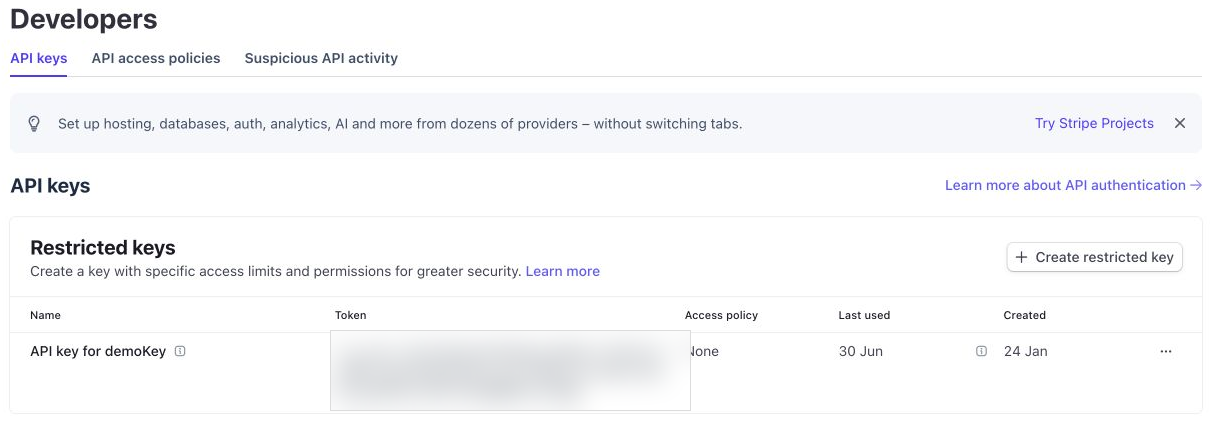
Stripe API keys page
Before You Start
Make sure you have:
Requirement
Why it matters
Stripe admin access
You need permission to create restricted keys.
Correct Stripe account
Keys belong to one Stripe account. Check the account switcher before creating one.
Correct mode
Use test mode for setup checks and live mode only when you are ready to accept real payments.
A secure storage plan
Stripe shows the new key value once. Store it in your team’s approved password manager or secret store before adding it to 9Pic.
Never place restricted keys in a public repository, frontend/mobile app, browser script, email, or chat message. Treat them like passwords.
Create the Restricted Key in Stripe
1
Open API keys
Sign in to Stripe and open Developers -> API keys. In the Restricted keys section, click Create restricted key.
2
Choose the purpose
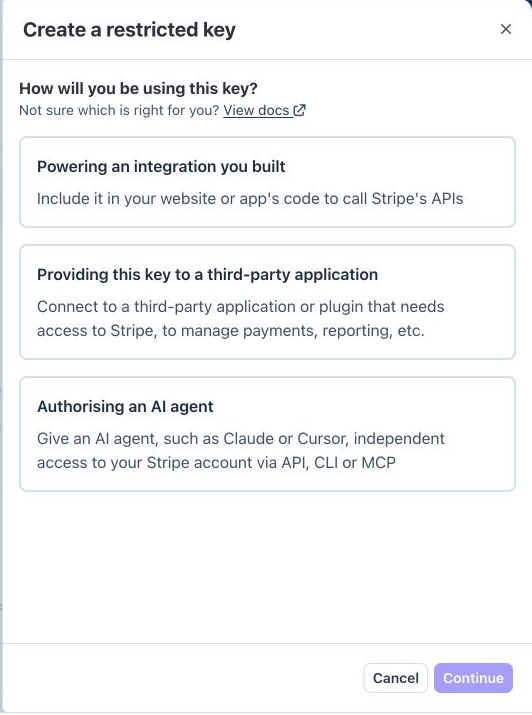
When Stripe asks how you will use the key, select Powering an integration you built, then click Continue.
Choose how the restricted key will be used
1
Choose your own permissions
Select Choose your own so you can grant only the permissions 9Pic Checkout needs.
2
Name the key
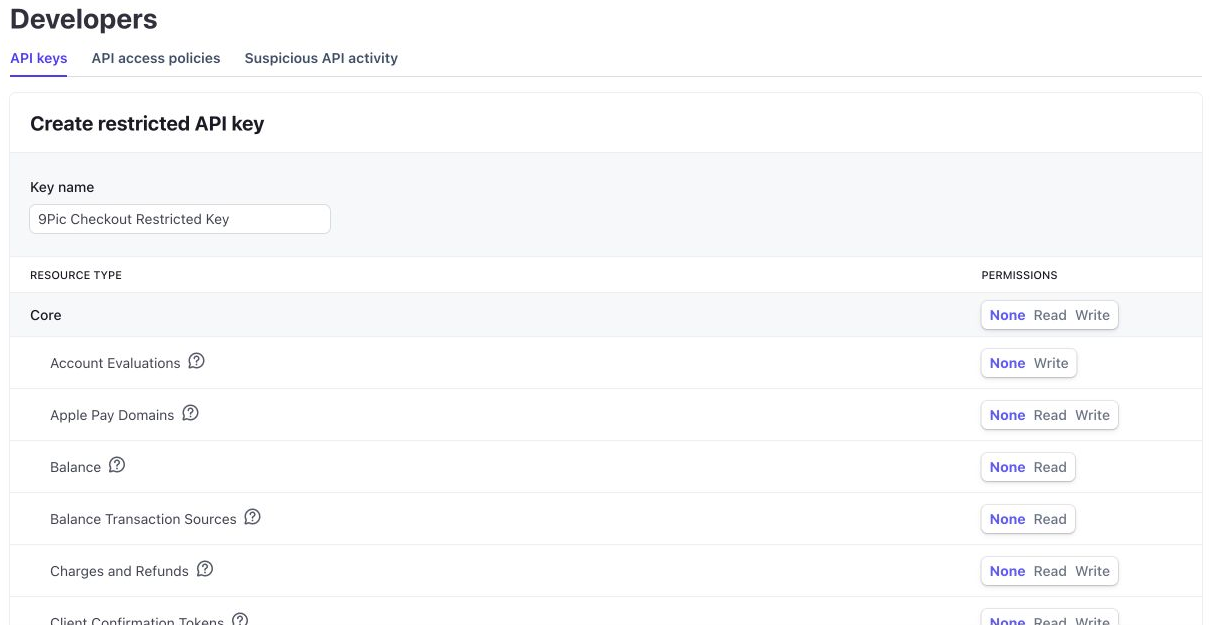
Use a clear name such as 9Pic Checkout Restricted Key. If you maintain separate test and live keys, include that in the name.
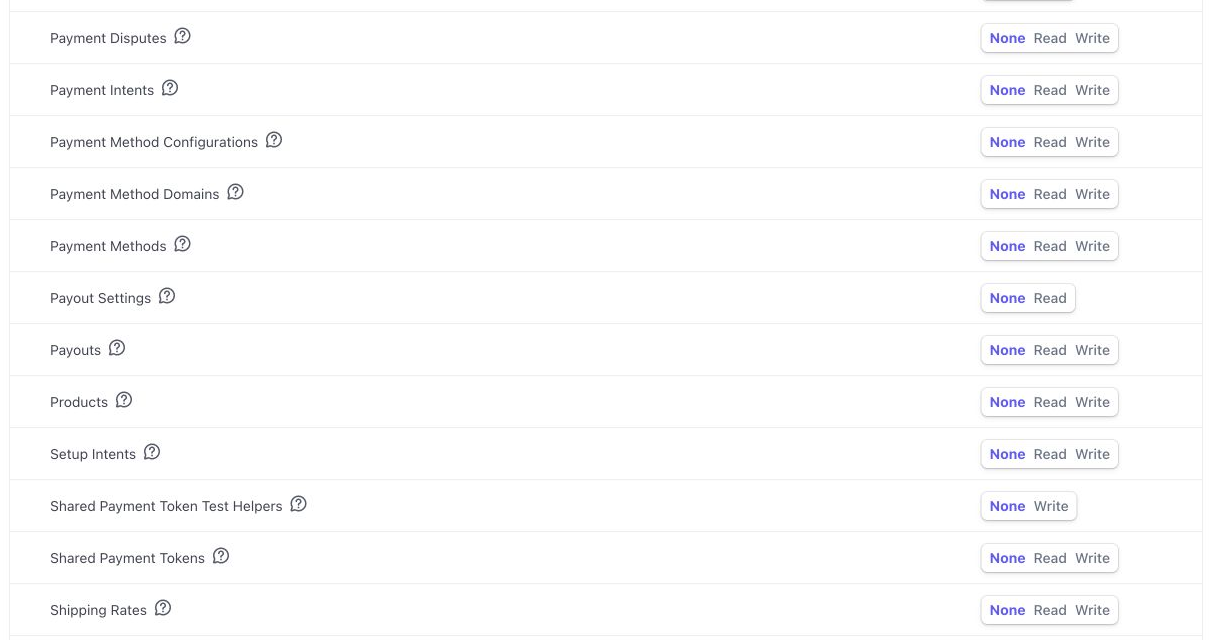
Restricted key name and permission table
Required Stripe Permissions
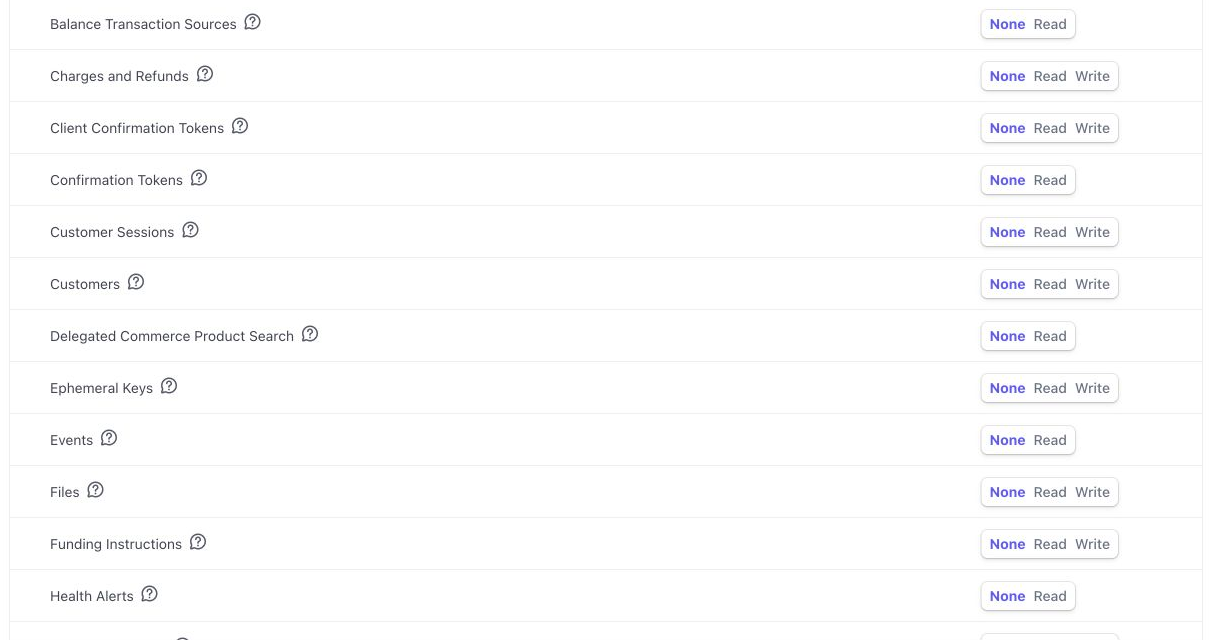
Set only the rows 9Pic needs, and leave unrelated resources on None.
Stripe resource
Permission
Used for
Checkout Sessions
Write
Opening Stripe Checkout for buyers and checking session status.
Customers
Write
Creating or updating buyer customer records for checkout and invoices.
Payment Intents
Write
Completing and checking card payments created through Checkout.
Payment Methods
Write
Supporting payment methods used by Stripe Checkout.
Charges and Refunds
Write
Stripe groups these together in the permission table. Choose Write so charge-related checkout workflows are not blocked.
Balance
Read
Reading balance-related Stripe information when needed for payment checks.
Events
Read
Reading Stripe event information for payment status checks.
Files
Read
Supporting Stripe-hosted payment or invoice file references when Stripe returns them.
Invoices
Read (Write also works)
Reading the invoice Stripe issues with each payment when Include Stripe invoice is on. Earlier invoices created by 9Pic used Write.
Tax Rates
Read
Listing your active Stripe tax rates for A tax rate from your Stripe account. Needed only if you use Stripe gateway tax.
Tax Settings
Read
Checking that Stripe Tax is set up for Stripe Tax (automatic). Needed only if you use Stripe Tax.
Tax Registrations
Read (optional)
Showing how many active Stripe tax registrations you have. Stripe Tax works without it.
New Stripe invoices are created by Stripe as part of the payment page, so 9Pic no longer uses Invoice Items for them. If your existing key already grants it, you can leave it.
Exact permission labels can vary by Stripe account and change over time, and 9Pic hasn’t confirmed every label above on a live account. 9Pic flags a missing permission where it’s found: Payment Configuration for checkout and invoice reads, and Tax Configuration → Stripe gateway tax for tax reads. Stripe may also rename or combine rows over time. For example, some accounts show Charges and Refunds as one row. If Stripe shows a permission-denied message later, edit the restricted key, add the missing resource permission, save, and test again.
Core permissions in Stripe
Payment permissions in Stripe
Set Up Participant Invoices
After setting up your key, follow Stripe Invoice Setup to review your business details, invoice currency, tax rate, and invoice PDF layout. The guide includes a 10% inclusive GST example in Australian dollars (AUD) and explains what to change for your country.
Creating a tax rate in Stripe doesn’t apply it to 9Pic purchases by itself. Choose it for the gateway in Payment Configuration → Tax Configuration → Stripe gateway tax, then set Package prices and, if participants need a Stripe invoice, Include Stripe invoice in the event’s Checkout → Configuration → Payments → Stripe purchases. Stripe charges a fee for each invoice it creates. See Using this with 9Pic Checkout in the guide.
Save the Key Safely
1
Review before creating
Confirm the key name, Stripe account, test/live mode, and permissions before you click Create key.
2
Create and copy once
Click Create key. Stripe shows the restricted key value only once. Copy it immediately and store it securely.
3
Do not share it casually
Do not paste the key into email, chat, screenshots, task tickets, public documents, or browser-side code.
Do not create a live key until the Stripe account is ready for real payments. Test the setup with an rk_test_ key first, then create a separate rk_live_ key for production.
Add the Key to 9Pic
1
Open Payment Config
In 9Pic, open Payment Config from the dashboard sidebar.
2
Add a Stripe gateway
Click Add Gateway, choose Stripe, and paste the restricted key into the Stripe Secret Key field. The field stores the protected Stripe credential for your organisation, even when the key starts with rk_test_ or rk_live_.
3
Create the gateway
Click Create Gateway. 9Pic checks the key with Stripe straight away. The message after saving tells you the result, and the gateway list shows it under Secrets. When everything is in place, you see Key accepted.
4
Assign Stripe to your events
For each event that should use Stripe, open the event’s Checkout product, go to the Configuration tab and, in Payments, assign the Stripe gateway on the Payment gateways row.
Key Check After Saving
When you save the key, 9Pic asks Stripe whether it accepts the key and whether the key can read Checkout Sessions, Customers, Payment Intents and Invoices. The check only reads from your Stripe account, so nothing is created and nobody is charged. It runs again whenever you save a new key in Edit.
Secrets shows
What it means
Key accepted
Stripe accepted the key, and it can read all four. Checked and the date appear under it.
Missing permissions
The key can’t use one or more of those rows. A note above the list names them, for example Checkout Sessions, Invoices.
Key not accepted
Stripe refused the key. Buyers can’t pay through this gateway until you save a working key.
Configured, with Couldn’t check the key
9Pic couldn’t reach Stripe. Select Check key to try again.
9Pic can’t check whether a key can write without creating a payment, so your first test payment confirms write access. If a row is set to Read instead of Write, you can still see Key accepted, and the first payment or invoice then shows Payments blocked or Invoices blocked. Set every row in the table above to the access it lists.
After you change the key’s permissions in Stripe, select Check key next to Edit on the gateway to check it again. The check is for your information only: the gateway is saved whatever the result, and it never stops buyers paying.
Verify the Setup
Before using Stripe for a live event:
Check
What to confirm
Key accepted
The Stripe gateway shows Key accepted under Secrets in Payment Config.
Test payment opens
A buyer can open Stripe Checkout from a test event.
Payment completes
A test payment returns to 9Pic and marks the order as paid.
Invoice support works
If buyers need invoices, turn on Include Stripe invoice and make a test purchase with your own Stripe test key; the purchase shows Download invoice.
Stripe gateway tax works
If you use Stripe gateway tax, the choice saves without a permission message and the test payment page shows the expected tax.
Blocked access stays blocked
Unrelated Stripe resources should remain inaccessible to this restricted key.
Logs look normal
Review Stripe logs for permission errors after the test run.
Troubleshooting
Stripe says the key does not have permission.
Open the restricted key in Stripe, find the resource named in the error message, set the needed permission, save, and retry the test payment. For an invoice, ask the participant to select Check again on their purchase.
Payment Config says Key missing permissions on my Stripe gateway.
When 9Pic checked the key, Stripe said it can’t use some of the rows 9Pic Checkout needs. The note above the gateway list names them, for example Checkout Sessions, Invoices, and the Secrets column shows Missing permissions. Buyers may not be able to pay or get invoices through this gateway.In Stripe, open Developers -> API keys, edit the restricted key, set those rows to Write and save. You don’t need a new key. Then select Check key on the gateway in Payment Config. Secrets shows Key accepted once Stripe allows it.
Payment Config says Key not accepted on my Stripe gateway.
When 9Pic checked the saved key, Stripe didn’t accept it. The key may have been copied incompletely, or deleted, rolled or expired in Stripe. Buyers can’t pay through this gateway until you save a working key.Paste the key again from where you stored it, or create a new restricted key with the permissions above. Select Edit on the gateway in Payment Config, paste the key and save. 9Pic checks it again when you save. If a buyer’s payment was already refused, you see Key rejected instead (see below).
Payment Config shows Payments blocked on my Stripe gateway.
Stripe refused to open a payment page for a buyer because the restricted key is missing a permission, usually Checkout Sessions: Write. The buyer was told payment isn’t set up correctly for the event and wasn’t charged. The warning on Payment Config (and on the event’s Payment gateways card in Checkout configuration) names the permission, when it was last refused and the purchase number.In Stripe, open Developers -> API keys, edit the restricted key, set the named resource to Write (Write includes Read), and save. You don’t need a new key. The warning clears after the next payment page opens on that gateway, or when you save a new key in 9Pic.
Payment Config shows Payment checks blocked on my Stripe gateway.
Stripe refused to check or cancel a buyer’s existing payment because the restricted key is missing a permission, usually Checkout Sessions. Nothing is lost: those orders stay pending and are never marked failed or paid because of this. Buyers are told the payment can’t be checked right now and that you’ve been told.Set the named resource to Write on the restricted key in Stripe and save. Pending orders update the next time they are checked, and the warning clears after the next successful check.
Payment Config says Key rejected on my Stripe gateway.
Stripe no longer accepts the saved key, usually because it was deleted, rolled or expired in Stripe. Buyers can’t pay through this gateway (they are told payment isn’t set up and aren’t charged), and pending payments can’t be checked until the key is replaced. The gateway shows Key rejected and New key needed.Create a new restricted key in Stripe with the permissions above, then select Edit on the gateway in Payment Config, paste the new key and save. The warning clears when you save it, and pending orders update the next time they are checked.
Payment Config shows Invoices blocked on my Stripe gateway.
9Pic tried to read the invoice Stripe issued with a buyer’s payment, and Stripe refused because the restricted key is missing a permission, usually Invoices (Read). The buyer’s payment is complete and their downloads work; their purchase keeps saying the invoice is being prepared. The warning on Payment Config (and on the event’s Payment gateways card in Checkout configuration) names the missing permission. The warning text may still mention Get invoice, which buyers no longer use for Stripe purchases.In Stripe, open Developers -> API keys, edit the restricted key, set the named resource to the shown access level, and save. You don’t need a new key. 9Pic checks pending invoices again automatically, or the buyer can select Check again; the warning clears after the next invoice is read on that gateway, or when you save a new key in 9Pic.
Stripe gateway tax says my Stripe key needs another permission.
The key can’t read your tax rates (Tax Rates: Read) or your Stripe Tax settings (Tax Settings: Read). Add the named permission to the restricted key in Stripe and save. If you replaced the key instead, save the new key in Payment Config. Then select Check again in Payment Configuration → Tax Configuration → Stripe gateway tax.
I copied the key but lost it before adding it to 9Pic.
Create a new restricted key, store it securely, add the new value to 9Pic, then revoke the unused key in Stripe.
Should I use the same key for test and live payments?
No. Keep separate keys for test mode and live mode. This reduces mistakes and makes rotation easier.
The 9Pic field says Stripe Secret Key. Can I paste a restricted key?
Yes. Paste the restricted key value there. Stripe restricted keys start with rk_test_ in test mode and rk_live_ in live mode.
Next Steps
Payment Config
Create and manage organisation-level gateway configurations.
Checkout Setup
Assign a gateway to an event, publish plans, and enable Checkout.
{"docsConfig":{"theme":"mint","$schema":"https://mintlify.com/docs.json","name":"9Pic AI Documentation","colors":{"primary":"#155DFC","light":"#3080FF","dark":"#0B4AD2"},"logo":{"light":"https://mintcdn.com/9picai/S5EcjfSqjwpORHEo/logo/light.png?fit=max\u0026auto=format\u0026n=S5EcjfSqjwpORHEo\u0026q=85\u0026s=a14647e1552cad86363bd3dfe32ec208","dark":"https://mintcdn.com/9picai/S5EcjfSqjwpORHEo/logo/dark.png?fit=max\u0026auto=format\u0026n=S5EcjfSqjwpORHEo\u0026q=85\u0026s=025984d2e88c0cccd1a0567ad7488357"},"favicon":"https://mintcdn.com/9picai/S5EcjfSqjwpORHEo/favicon.svg?fit=max\u0026auto=format\u0026n=S5EcjfSqjwpORHEo\u0026q=85\u0026s=65125317ce120b5f2cb637eaa6cde837","navbar":{"links":[{"href":"mailto:support@9pic.ai","label":"Support"}]},"footer":{"socials":{"x":"https://x.com/9picai","linkedin":"https://linkedin.com/company/9pic-ai"}},"integrations":{"clarity":{"projectId":"vahau6obj9"}},"contextual":{"options":["copy","view","chatgpt","claude"],"display":"header"},"styling":{"latex":false},"navigation":{"global":{},"pages":[]}},"deployment":{"deploymentMetadataValue":{"subdomain":"9picai","hasAudioNarration":false,"actualSubdomain":"9picai","customDomains":["docs.9pic.ai"],"gitSource":{"type":"github","owner":"theargofactory","repo":"bhaago_india","deployBranch":"master","contentDirectory":"9pic-docs","isPrivate":true,"mountPath":"","label":""},"entitlements":{},"buildId":"6afd4d39edadaaf94a621dad","clientVersion":"0.0.4177","searchFilterCounts":[{"language":"default","tag":"API Reference","count":37},{"language":"default","tag":"Products","count":37},{"language":"default","tag":"Account \u0026 Billing","count":31},{"language":"default","tag":"Get Started","count":23},{"language":"default","tag":"Troubleshooting","count":14},{"language":"default","tag":"Events","count":12},{"language":"default","tag":"AI \u0026 Automation","count":11},{"language":"default","tag":"Events \u0026 Photos","count":11},{"language":"default","tag":"Plans","count":8},{"language":"default","tag":"AI Assistants","count":8}]},"assistantConfig":{"enableAskAiButton":false,"enableStarterQuestions":false,"enableAskAiSearchBar":true},"basePath":"","hasChatPermissions":false,"hasWebMcpPermissions":false,"toggles":[{"name":"kill-isr","enabled":true,"variant":{"name":"disabled","enabled":false,"feature_enabled":true},"impressionData":false},{"name":"custom-rbac-roles","enabled":true,"variant":{"name":"disabled","enabled":false,"feature_enabled":true},"impressionData":false},{"name":"agent-mintlify-slack","enabled":true,"variant":{"name":"disabled","enabled":false,"feature_enabled":true},"impressionData":false},{"name":"agent-integrations-settings","enabled":true,"variant":{"name":"disabled","enabled":false,"feature_enabled":true},"impressionData":false},{"name":"rbac-expansion","enabled":true,"variant":{"name":"disabled","enabled":false,"feature_enabled":true},"impressionData":false},{"name":"automations-pr-grouping","enabled":true,"variant":{"name":"disabled","enabled":false,"feature_enabled":true},"impressionData":false},{"name":"custom-prefix","enabled":true,"variant":{"name":"disabled","enabled":false,"feature_enabled":true},"impressionData":false},{"name":"analytics-v7","enabled":true,"variant":{"name":"disabled","enabled":false,"feature_enabled":true},"impressionData":false},{"name":"user-flows-analytics","enabled":true,"variant":{"name":"disabled","enabled":false,"feature_enabled":true},"impressionData":false},{"name":"no-publish-flow","enabled":true,"variant":{"name":"disabled","enabled":false,"feature_enabled":true},"impressionData":false},{"name":"workos-onboarding","enabled":true,"variant":{"name":"disabled","enabled":false,"feature_enabled":true},"impressionData":false},{"name":"snapshot-serving-live","enabled":true,"variant":{"name":"disabled","enabled":false,"feature_enabled":true},"impressionData":false},{"name":"stripTemperatureMiddleware","enabled":true,"variant":{"name":"disabled","enabled":false,"feature_enabled":true},"impressionData":false},{"name":"support-platform-pylon-zendesk","enabled":true,"variant":{"name":"disabled","enabled":false,"feature_enabled":true},"impressionData":false},{"name":"snapshot-serving","enabled":true,"variant":{"name":"disabled","enabled":false,"feature_enabled":true},"impressionData":false},{"name":"instant-rollback","enabled":true,"variant":{"name":"disabled","enabled":false,"feature_enabled":true},"impressionData":false},{"name":"granular-notifications-server","enabled":true,"variant":{"name":"disabled","enabled":false,"feature_enabled":true},"impressionData":false},{"name":"granular-notifications","enabled":true,"variant":{"name":"disabled","enabled":false,"feature_enabled":true},"impressionData":false},{"name":"automations-fable","enabled":true,"variant":{"name":"disabled","enabled":false,"feature_enabled":true},"impressionData":false},{"name":"fixed-ai-action-pricing","enabled":true,"variant":{"name":"disabled","enabled":false,"feature_enabled":true},"impressionData":false},{"name":"automation-resolve-merge-conflict","enabled":true,"variant":{"name":"disabled","enabled":false,"feature_enabled":true},"impressionData":false},{"name":"scoped-publishing","enabled":true,"variant":{"name":"disabled","enabled":false,"feature_enabled":true},"impressionData":false},{"name":"mintql","enabled":true,"variant":{"name":"disabled","enabled":false,"feature_enabled":true},"impressionData":false},{"name":"page-level-analytics","enabled":true,"variant":{"name":"disabled","enabled":false,"feature_enabled":true},"impressionData":false},{"name":"editor-version-history-v2","enabled":true,"variant":{"name":"disabled","enabled":false,"feature_enabled":true},"impressionData":false},{"name":"billing-page-v2","enabled":true,"variant":{"name":"disabled","enabled":false,"feature_enabled":true},"impressionData":false},{"name":"full-page-search","enabled":true,"variant":{"name":"disabled","enabled":false,"feature_enabled":true},"impressionData":false},{"name":"workspace-projects","enabled":true,"variant":{"name":"disabled","enabled":false,"feature_enabled":true},"impressionData":false},{"name":"assistant-v5","enabled":true,"variant":{"name":"disabled","enabled":false,"feature_enabled":true},"impressionData":false},{"name":"fork-pr-previews","enabled":true,"variant":{"name":"disabled","enabled":false,"feature_enabled":true},"impressionData":false},{"name":"revalidation-jwt","enabled":true,"variant":{"name":"disabled","enabled":false,"feature_enabled":true},"impressionData":false},{"name":"workos-sso-scim","enabled":true,"variant":{"name":"disabled","enabled":false,"feature_enabled":true},"impressionData":false},{"name":"hobby-abuse-scan","enabled":true,"variant":{"name":"disabled","enabled":false,"feature_enabled":true},"impressionData":false},{"name":"dashboard-inbox","enabled":true,"variant":{"name":"disabled","enabled":false,"feature_enabled":true},"impressionData":false},{"name":"workos-signup","enabled":true,"variant":{"name":"disabled","enabled":false,"feature_enabled":true},"impressionData":false},{"name":"turbopuffer-dual-write","enabled":true,"variant":{"name":"disabled","enabled":false,"feature_enabled":true},"impressionData":false},{"name":"workos-enabled","enabled":true,"variant":{"name":"disabled","enabled":false,"feature_enabled":true},"impressionData":false},{"name":"approve-review-flow","enabled":true,"variant":{"name":"disabled","enabled":false,"feature_enabled":true},"impressionData":false},{"name":"editor-metadata","enabled":true,"variant":{"name":"disabled","enabled":false,"feature_enabled":true},"impressionData":false},{"name":"sso-setup-deadline-banner","enabled":true,"variant":{"name":"disabled","enabled":false,"feature_enabled":true},"impressionData":false},{"name":"turbopuffer-serve","enabled":true,"variant":{"name":"disabled","enabled":false,"feature_enabled":true},"impressionData":false},{"name":"live-agents","enabled":true,"variant":{"name":"disabled","enabled":false,"feature_enabled":true},"impressionData":false},{"name":"starter-pricing","enabled":true,"variant":{"name":"treatment","enabled":true,"payload":{"type":"string","value":"treatment"},"feature_enabled":true},"impressionData":false},{"name":"llms-txt-v2","enabled":true,"variant":{"name":"disabled","enabled":false,"feature_enabled":true},"impressionData":false},{"name":"wildcard-email-auth","enabled":true,"variant":{"name":"disabled","enabled":false,"feature_enabled":true},"impressionData":false}],"googleFontsInlined":false},"customCss":[],"page":{"pagePath":"account/payment-gateways/stripe-restricted-key","slug":"/account/payment-gateways/stripe-restricted-key","pageMetadata":{"title":"Stripe Key Setup","description":"Create a Stripe restricted key for 9Pic Checkout and add it to Payment Configuration.","icon":"key","href":"/account/payment-gateways/stripe-restricted-key"},"description":{"compiledSource":"\"use strict\";\nconst {jsx: _jsx} = arguments[0];\nconst {useMDXComponents: _provideComponents} = arguments[0];\nfunction _createMdxContent(props) {\n const _components = {\n p: \"p\",\n ..._provideComponents(),\n ...props.components\n };\n return _jsx(_components.p, {\n children: \"Create a Stripe restricted key for 9Pic Checkout and add it to Payment Configuration.\"\n });\n}\nfunction MDXContent(props = {}) {\n const {wrapper: MDXLayout} = {\n ..._provideComponents(),\n ...props.components\n };\n return MDXLayout ? _jsx(MDXLayout, {\n ...props,\n children: _jsx(_createMdxContent, {\n ...props\n })\n }) : _createMdxContent(props);\n}\nreturn {\n default: MDXContent\n};\n","frontmatter":{},"scope":{}},"pageType":"default","mdx":{"mdxSource":{"compiledSource":"\"use strict\";const{Fragment:_Fragment,jsx:_jsx,jsxs:_jsxs}=arguments[0];const{useMDXComponents:_provideComponents}=arguments[0];function _createMdxContent(props){const _components={a:`a`,code:`code`,p:`p`,strong:`strong`,tbody:`tbody`,td:`td`,th:`th`,thead:`thead`,tr:`tr`,..._provideComponents(),...props.components},{Accordion,AccordionGroup,Card,CardGroup,Frame,Heading,Info,Note,OptimizedImage,Step,Steps,Table,Warning}=_components;if(!Accordion)_missingMdxReference(`Accordion`,true);if(!AccordionGroup)_missingMdxReference(`AccordionGroup`,true);if(!Card)_missingMdxReference(`Card`,true);if(!CardGroup)_missingMdxReference(`CardGroup`,true);if(!Frame)_missingMdxReference(`Frame`,true);if(!Heading)_missingMdxReference(`Heading`,true);if(!Info)_missingMdxReference(`Info`,true);if(!Note)_missingMdxReference(`Note`,true);if(!OptimizedImage)_missingMdxReference(`OptimizedImage`,true);if(!Step)_missingMdxReference(`Step`,true);if(!Steps)_missingMdxReference(`Steps`,true);if(!Table)_missingMdxReference(`Table`,true);if(!Warning)_missingMdxReference(`Warning`,true);return _jsxs(_Fragment,{children:[_jsx(Warning,{children:_jsxs(_components.p,{children:[`9Pic Checkout is a `,_jsx(_components.strong,{children:`Business plan`}),` feature. Create Stripe keys only in the Stripe account and mode you intend to use for the event.`]})}),`\n`,_jsx(Heading,{level:`2`,id:`overview`,children:`Overview`}),`\n`,_jsxs(_components.p,{children:[`A Stripe restricted key lets 9Pic Checkout use only the Stripe permissions it needs instead of a full-access secret key. Create the key in Stripe first, then paste it into `,_jsx(_components.strong,{children:`Payment Config -> Add Gateway -> Stripe`}),` in 9Pic.`]}),`\n`,_jsxs(_components.p,{children:[`Use the downloadable `,_jsx(_components.a,{href:`https://photos.9pic.ai/assets/common/Stripe%20Restricted%20API%20Key%20Setup%20Guide.pdf`,children:`Stripe Restricted API Key Setup Guide`}),` as your external checklist while following this dashboard guide.`]}),`\n`,_jsx(Frame,{caption:`Stripe API keys page`,children:_jsx(OptimizedImage,{src:`https://assets.9pic.ai/docs/dashboard-guide/payment-config/stripe-api-keys-page-redacted.webp`,alt:`Stripe Developers API keys page showing the Restricted keys section and Create restricted key button with existing key values redacted`})}),`\n`,_jsx(Heading,{level:`2`,id:`before-you-start`,children:`Before You Start`}),`\n`,_jsx(_components.p,{children:`Make sure you have:`}),`\n`,_jsxs(Table,{children:[_jsx(_components.thead,{children:_jsxs(_components.tr,{children:[_jsx(_components.th,{children:`Requirement`}),_jsx(_components.th,{children:`Why it matters`})]})}),_jsxs(_components.tbody,{children:[_jsxs(_components.tr,{children:[_jsx(_components.td,{children:_jsx(_components.strong,{children:`Stripe admin access`})}),_jsx(_components.td,{children:`You need permission to create restricted keys.`})]}),_jsxs(_components.tr,{children:[_jsx(_components.td,{children:_jsx(_components.strong,{children:`Correct Stripe account`})}),_jsx(_components.td,{children:`Keys belong to one Stripe account. Check the account switcher before creating one.`})]}),_jsxs(_components.tr,{children:[_jsx(_components.td,{children:_jsx(_components.strong,{children:`Correct mode`})}),_jsx(_components.td,{children:`Use test mode for setup checks and live mode only when you are ready to accept real payments.`})]}),_jsxs(_components.tr,{children:[_jsx(_components.td,{children:_jsx(_components.strong,{children:`A secure storage plan`})}),_jsx(_components.td,{children:`Stripe shows the new key value once. Store it in your team’s approved password manager or secret store before adding it to 9Pic.`})]})]})]}),`\n`,_jsx(Warning,{children:_jsx(_components.p,{children:`Never place restricted keys in a public repository, frontend/mobile app, browser script, email, or chat message. Treat them like passwords.`})}),`\n`,_jsx(Heading,{level:`2`,id:`create-the-restricted-key-in-stripe`,children:`Create the Restricted Key in Stripe`}),`\n`,_jsxs(Steps,{children:[_jsx(Step,{title:`Open API keys`,children:_jsxs(_components.p,{children:[`Sign in to Stripe and open `,_jsx(_components.strong,{children:`Developers -> API keys`}),`. In the `,_jsx(_components.strong,{children:`Restricted keys`}),` section, click `,_jsx(_components.strong,{children:`Create restricted key`}),`.`]})}),_jsx(Step,{title:`Choose the purpose`,children:_jsxs(_components.p,{children:[`When Stripe asks how you will use the key, select `,_jsx(_components.strong,{children:`Powering an integration you built`}),`, then click `,_jsx(_components.strong,{children:`Continue`}),`.`]})})]}),`\n`,_jsx(Frame,{caption:`Choose how the restricted key will be used`,children:_jsx(OptimizedImage,{src:`https://assets.9pic.ai/docs/dashboard-guide/payment-config/stripe-key-purpose.webp`,alt:`Stripe Create a restricted key panel showing the Powering an integration you built option`})}),`\n`,_jsxs(Steps,{children:[_jsx(Step,{title:`Choose your own permissions`,children:_jsxs(_components.p,{children:[`Select `,_jsx(_components.strong,{children:`Choose your own`}),` so you can grant only the permissions 9Pic Checkout needs.`]})}),_jsx(Step,{title:`Name the key`,children:_jsxs(_components.p,{children:[`Use a clear name such as `,_jsx(_components.code,{children:`9Pic Checkout Restricted Key`}),`. If you maintain separate test and live keys, include that in the name.`]})})]}),`\n`,_jsx(Frame,{caption:`Restricted key name and permission table`,children:_jsx(OptimizedImage,{src:`https://assets.9pic.ai/docs/dashboard-guide/payment-config/stripe-permissions-start.webp`,alt:`Stripe Create restricted API key page showing the key name field and the permissions table`})}),`\n`,_jsx(Heading,{level:`2`,id:`required-stripe-permissions`,children:`Required Stripe Permissions`}),`\n`,_jsxs(_components.p,{children:[`Set only the rows 9Pic needs, and leave unrelated resources on `,_jsx(_components.strong,{children:`None`}),`.`]}),`\n`,_jsxs(Table,{children:[_jsx(_components.thead,{children:_jsxs(_components.tr,{children:[_jsx(_components.th,{children:`Stripe resource`}),_jsx(_components.th,{children:`Permission`}),_jsx(_components.th,{children:`Used for`})]})}),_jsxs(_components.tbody,{children:[_jsxs(_components.tr,{children:[_jsx(_components.td,{children:_jsx(_components.strong,{children:`Checkout Sessions`})}),_jsx(_components.td,{children:`Write`}),_jsx(_components.td,{children:`Opening Stripe Checkout for buyers and checking session status.`})]}),_jsxs(_components.tr,{children:[_jsx(_components.td,{children:_jsx(_components.strong,{children:`Customers`})}),_jsx(_components.td,{children:`Write`}),_jsx(_components.td,{children:`Creating or updating buyer customer records for checkout and invoices.`})]}),_jsxs(_components.tr,{children:[_jsx(_components.td,{children:_jsx(_components.strong,{children:`Payment Intents`})}),_jsx(_components.td,{children:`Write`}),_jsx(_components.td,{children:`Completing and checking card payments created through Checkout.`})]}),_jsxs(_components.tr,{children:[_jsx(_components.td,{children:_jsx(_components.strong,{children:`Payment Methods`})}),_jsx(_components.td,{children:`Write`}),_jsx(_components.td,{children:`Supporting payment methods used by Stripe Checkout.`})]}),_jsxs(_components.tr,{children:[_jsx(_components.td,{children:_jsx(_components.strong,{children:`Charges and Refunds`})}),_jsx(_components.td,{children:`Write`}),_jsx(_components.td,{children:`Stripe groups these together in the permission table. Choose Write so charge-related checkout workflows are not blocked.`})]}),_jsxs(_components.tr,{children:[_jsx(_components.td,{children:_jsx(_components.strong,{children:`Balance`})}),_jsx(_components.td,{children:`Read`}),_jsx(_components.td,{children:`Reading balance-related Stripe information when needed for payment checks.`})]}),_jsxs(_components.tr,{children:[_jsx(_components.td,{children:_jsx(_components.strong,{children:`Events`})}),_jsx(_components.td,{children:`Read`}),_jsx(_components.td,{children:`Reading Stripe event information for payment status checks.`})]}),_jsxs(_components.tr,{children:[_jsx(_components.td,{children:_jsx(_components.strong,{children:`Files`})}),_jsx(_components.td,{children:`Read`}),_jsx(_components.td,{children:`Supporting Stripe-hosted payment or invoice file references when Stripe returns them.`})]}),_jsxs(_components.tr,{children:[_jsx(_components.td,{children:_jsx(_components.strong,{children:`Invoices`})}),_jsx(_components.td,{children:`Read (Write also works)`}),_jsxs(_components.td,{children:[`Reading the invoice Stripe issues with each payment when `,_jsx(_components.strong,{children:`Include Stripe invoice`}),` is on. Earlier invoices created by 9Pic used Write.`]})]}),_jsxs(_components.tr,{children:[_jsx(_components.td,{children:_jsx(_components.strong,{children:`Tax Rates`})}),_jsx(_components.td,{children:`Read`}),_jsxs(_components.td,{children:[`Listing your active Stripe tax rates for `,_jsx(_components.strong,{children:`A tax rate from your Stripe account`}),`. Needed only if you use `,_jsx(_components.strong,{children:`Stripe gateway tax`}),`.`]})]}),_jsxs(_components.tr,{children:[_jsx(_components.td,{children:_jsx(_components.strong,{children:`Tax Settings`})}),_jsx(_components.td,{children:`Read`}),_jsxs(_components.td,{children:[`Checking that Stripe Tax is set up for `,_jsx(_components.strong,{children:`Stripe Tax (automatic)`}),`. Needed only if you use Stripe Tax.`]})]}),_jsxs(_components.tr,{children:[_jsx(_components.td,{children:_jsx(_components.strong,{children:`Tax Registrations`})}),_jsx(_components.td,{children:`Read (optional)`}),_jsx(_components.td,{children:`Showing how many active Stripe tax registrations you have. Stripe Tax works without it.`})]})]})]}),`\n`,_jsxs(_components.p,{children:[`New Stripe invoices are created by Stripe as part of the payment page, so 9Pic no longer uses `,_jsx(_components.strong,{children:`Invoice Items`}),` for them. If your existing key already grants it, you can leave it.`]}),`\n`,_jsx(Info,{children:_jsxs(_components.p,{children:[`Exact permission labels can vary by Stripe account and change over time, and 9Pic hasn’t confirmed every label above on a live account. 9Pic flags a missing permission where it’s found: `,_jsx(_components.strong,{children:`Payment Configuration`}),` for checkout and invoice reads, and `,_jsx(_components.strong,{children:`Tax Configuration → Stripe gateway tax`}),` for tax reads. Stripe may also rename or combine rows over time. For example, some accounts show `,_jsx(_components.strong,{children:`Charges and Refunds`}),` as one row. If Stripe shows a permission-denied message later, edit the restricted key, add the missing resource permission, save, and test again.`]})}),`\n`,_jsx(Frame,{caption:`Core permissions in Stripe`,children:_jsx(OptimizedImage,{src:`https://assets.9pic.ai/docs/dashboard-guide/payment-config/stripe-core-permissions.webp`,alt:`Stripe permissions table showing Charges and Refunds, Customers, Events, and Files rows`})}),`\n`,_jsx(Frame,{caption:`Payment permissions in Stripe`,children:_jsx(OptimizedImage,{src:`https://assets.9pic.ai/docs/dashboard-guide/payment-config/stripe-payment-permissions.webp`,alt:`Stripe permissions table showing Payment Intents, Payment Method Configurations, Payment Method Domains, and Payment Methods rows`})}),`\n`,_jsx(Heading,{level:`2`,id:`set-up-participant-invoices`,children:`Set Up Participant Invoices`}),`\n`,_jsxs(_components.p,{children:[`After setting up your key, follow `,_jsx(_components.a,{href:`/account/payment-gateways/stripe-invoices`,children:`Stripe Invoice Setup`}),` to review your business details, invoice currency, tax rate, and invoice PDF layout. The guide includes a 10% inclusive GST example in Australian dollars (AUD) and explains what to change for your country.`]}),`\n`,_jsx(Warning,{children:_jsxs(_components.p,{children:[`Creating a tax rate in Stripe doesn’t apply it to 9Pic purchases by itself. Choose it for the gateway in `,_jsx(_components.strong,{children:`Payment Configuration → Tax Configuration → Stripe gateway tax`}),`, then set `,_jsx(_components.strong,{children:`Package prices`}),` and, if participants need a Stripe invoice, `,_jsx(_components.strong,{children:`Include Stripe invoice`}),` in the event’s `,_jsx(_components.strong,{children:`Checkout → Configuration → Payments → Stripe purchases`}),`. Stripe charges a fee for each invoice it creates. See `,_jsx(_components.strong,{children:`Using this with 9Pic Checkout`}),` in the guide.`]})}),`\n`,_jsx(Heading,{level:`2`,id:`save-the-key-safely`,children:`Save the Key Safely`}),`\n`,_jsxs(Steps,{children:[_jsx(Step,{title:`Review before creating`,children:_jsxs(_components.p,{children:[`Confirm the key name, Stripe account, test/live mode, and permissions before you click `,_jsx(_components.strong,{children:`Create key`}),`.`]})}),_jsx(Step,{title:`Create and copy once`,children:_jsxs(_components.p,{children:[`Click `,_jsx(_components.strong,{children:`Create key`}),`. Stripe shows the restricted key value only once. Copy it immediately and store it securely.`]})}),_jsx(Step,{title:`Do not share it casually`,children:_jsx(_components.p,{children:`Do not paste the key into email, chat, screenshots, task tickets, public documents, or browser-side code.`})})]}),`\n`,_jsx(Warning,{children:_jsxs(_components.p,{children:[`Do not create a live key until the Stripe account is ready for real payments. Test the setup with an `,_jsx(_components.code,{children:`rk_test_`}),` key first, then create a separate `,_jsx(_components.code,{children:`rk_live_`}),` key for production.`]})}),`\n`,_jsx(Heading,{level:`2`,id:`add-the-key-to-9pic`,children:`Add the Key to 9Pic`}),`\n`,_jsxs(Steps,{children:[_jsx(Step,{title:`Open Payment Config`,children:_jsxs(_components.p,{children:[`In 9Pic, open `,_jsx(_components.strong,{children:`Payment Config`}),` from the dashboard sidebar.`]})}),_jsx(Step,{title:`Add a Stripe gateway`,children:_jsxs(_components.p,{children:[`Click `,_jsx(_components.strong,{children:`Add Gateway`}),`, choose `,_jsx(_components.strong,{children:`Stripe`}),`, and paste the restricted key into the `,_jsx(_components.strong,{children:`Stripe Secret Key`}),` field. The field stores the protected Stripe credential for your organisation, even when the key starts with `,_jsx(_components.code,{children:`rk_test_`}),` or `,_jsx(_components.code,{children:`rk_live_`}),`.`]})}),_jsx(Step,{title:`Create the gateway`,children:_jsxs(_components.p,{children:[`Click `,_jsx(_components.strong,{children:`Create Gateway`}),`. 9Pic checks the key with Stripe straight away. The message after saving tells you the result, and the gateway list shows it under `,_jsx(_components.strong,{children:`Secrets`}),`. When everything is in place, you see `,_jsx(_components.strong,{children:`Key accepted`}),`.`]})}),_jsx(Step,{title:`Assign Stripe to your events`,children:_jsxs(_components.p,{children:[`For each event that should use Stripe, open the event’s `,_jsx(_components.strong,{children:`Checkout`}),` product, go to the `,_jsx(_components.strong,{children:`Configuration`}),` tab and, in `,_jsx(_components.strong,{children:`Payments`}),`, assign the Stripe gateway on the `,_jsx(_components.strong,{children:`Payment gateways`}),` row.`]})})]}),`\n`,_jsx(Heading,{level:`2`,id:`key-check-after-saving`,children:`Key Check After Saving`}),`\n`,_jsxs(_components.p,{children:[`When you save the key, 9Pic asks Stripe whether it accepts the key and whether the key can read `,_jsx(_components.strong,{children:`Checkout Sessions`}),`, `,_jsx(_components.strong,{children:`Customers`}),`, `,_jsx(_components.strong,{children:`Payment Intents`}),` and `,_jsx(_components.strong,{children:`Invoices`}),`. The check only reads from your Stripe account, so nothing is created and nobody is charged. It runs again whenever you save a new key in `,_jsx(_components.strong,{children:`Edit`}),`.`]}),`\n`,_jsxs(Table,{children:[_jsx(_components.thead,{children:_jsxs(_components.tr,{children:[_jsx(_components.th,{children:`Secrets shows`}),_jsx(_components.th,{children:`What it means`})]})}),_jsxs(_components.tbody,{children:[_jsxs(_components.tr,{children:[_jsx(_components.td,{children:_jsx(_components.strong,{children:`Key accepted`})}),_jsxs(_components.td,{children:[`Stripe accepted the key, and it can read all four. `,_jsx(_components.strong,{children:`Checked`}),` and the date appear under it.`]})]}),_jsxs(_components.tr,{children:[_jsx(_components.td,{children:_jsx(_components.strong,{children:`Missing permissions`})}),_jsxs(_components.td,{children:[`The key can’t use one or more of those rows. A note above the list names them, for example `,_jsx(_components.strong,{children:`Checkout Sessions, Invoices`}),`.`]})]}),_jsxs(_components.tr,{children:[_jsx(_components.td,{children:_jsx(_components.strong,{children:`Key not accepted`})}),_jsx(_components.td,{children:`Stripe refused the key. Buyers can’t pay through this gateway until you save a working key.`})]}),_jsxs(_components.tr,{children:[_jsxs(_components.td,{children:[_jsx(_components.strong,{children:`Configured`}),`, with `,_jsx(_components.strong,{children:`Couldn’t check the key`})]}),_jsxs(_components.td,{children:[`9Pic couldn’t reach Stripe. Select `,_jsx(_components.strong,{children:`Check key`}),` to try again.`]})]})]})]}),`\n`,_jsx(Note,{children:_jsxs(_components.p,{children:[`9Pic can’t check whether a key can `,_jsx(_components.strong,{children:`write`}),` without creating a payment, so your first test payment confirms write access. If a row is set to Read instead of Write, you can still see `,_jsx(_components.strong,{children:`Key accepted`}),`, and the first payment or invoice then shows `,_jsx(_components.strong,{children:`Payments blocked`}),` or `,_jsx(_components.strong,{children:`Invoices blocked`}),`. Set every row in the table above to the access it lists.`]})}),`\n`,_jsxs(_components.p,{children:[`After you change the key’s permissions in Stripe, select `,_jsx(_components.strong,{children:`Check key`}),` next to `,_jsx(_components.strong,{children:`Edit`}),` on the gateway to check it again. The check is for your information only: the gateway is saved whatever the result, and it never stops buyers paying.`]}),`\n`,_jsx(Heading,{level:`2`,id:`verify-the-setup`,children:`Verify the Setup`}),`\n`,_jsx(_components.p,{children:`Before using Stripe for a live event:`}),`\n`,_jsxs(Table,{children:[_jsx(_components.thead,{children:_jsxs(_components.tr,{children:[_jsx(_components.th,{children:`Check`}),_jsx(_components.th,{children:`What to confirm`})]})}),_jsxs(_components.tbody,{children:[_jsxs(_components.tr,{children:[_jsx(_components.td,{children:_jsx(_components.strong,{children:`Key accepted`})}),_jsxs(_components.td,{children:[`The Stripe gateway shows `,_jsx(_components.strong,{children:`Key accepted`}),` under `,_jsx(_components.strong,{children:`Secrets`}),` in `,_jsx(_components.strong,{children:`Payment Config`}),`.`]})]}),_jsxs(_components.tr,{children:[_jsx(_components.td,{children:_jsx(_components.strong,{children:`Test payment opens`})}),_jsx(_components.td,{children:`A buyer can open Stripe Checkout from a test event.`})]}),_jsxs(_components.tr,{children:[_jsx(_components.td,{children:_jsx(_components.strong,{children:`Payment completes`})}),_jsx(_components.td,{children:`A test payment returns to 9Pic and marks the order as paid.`})]}),_jsxs(_components.tr,{children:[_jsx(_components.td,{children:_jsx(_components.strong,{children:`Invoice support works`})}),_jsxs(_components.td,{children:[`If buyers need invoices, turn on `,_jsx(_components.strong,{children:`Include Stripe invoice`}),` and make a test purchase with your own Stripe test key; the purchase shows `,_jsx(_components.strong,{children:`Download invoice`}),`.`]})]}),_jsxs(_components.tr,{children:[_jsx(_components.td,{children:_jsx(_components.strong,{children:`Stripe gateway tax works`})}),_jsxs(_components.td,{children:[`If you use `,_jsx(_components.strong,{children:`Stripe gateway tax`}),`, the choice saves without a permission message and the test payment page shows the expected tax.`]})]}),_jsxs(_components.tr,{children:[_jsx(_components.td,{children:_jsx(_components.strong,{children:`Blocked access stays blocked`})}),_jsx(_components.td,{children:`Unrelated Stripe resources should remain inaccessible to this restricted key.`})]}),_jsxs(_components.tr,{children:[_jsx(_components.td,{children:_jsx(_components.strong,{children:`Logs look normal`})}),_jsx(_components.td,{children:`Review Stripe logs for permission errors after the test run.`})]})]})]}),`\n`,_jsx(Heading,{level:`2`,id:`troubleshooting`,children:`Troubleshooting`}),`\n`,_jsxs(AccordionGroup,{children:[_jsx(Accordion,{title:`Stripe says the key does not have permission.`,id:`stripe-says-the-key-does-not-have-permission`,children:_jsxs(_components.p,{children:[`Open the restricted key in Stripe, find the resource named in the error message, set the needed permission, save, and retry the test payment. For an invoice, ask the participant to select `,_jsx(_components.strong,{children:`Check again`}),` on their purchase.`]})}),_jsxs(Accordion,{title:`Payment Config says Key missing permissions on my Stripe gateway.`,id:`payment-config-says-key-missing-permissions-on-my-stripe-gateway`,children:[_jsxs(_components.p,{children:[`When 9Pic checked the key, Stripe said it can’t use some of the rows 9Pic Checkout needs. The note above the gateway list names them, for example `,_jsx(_components.strong,{children:`Checkout Sessions, Invoices`}),`, and the `,_jsx(_components.strong,{children:`Secrets`}),` column shows `,_jsx(_components.strong,{children:`Missing permissions`}),`. Buyers may not be able to pay or get invoices through this gateway.`]}),_jsxs(_components.p,{children:[`In Stripe, open `,_jsx(_components.strong,{children:`Developers -> API keys`}),`, edit the restricted key, set those rows to `,_jsx(_components.strong,{children:`Write`}),` and save. You don’t need a new key. Then select `,_jsx(_components.strong,{children:`Check key`}),` on the gateway in `,_jsx(_components.strong,{children:`Payment Config`}),`. `,_jsx(_components.strong,{children:`Secrets`}),` shows `,_jsx(_components.strong,{children:`Key accepted`}),` once Stripe allows it.`]})]}),_jsxs(Accordion,{title:`Payment Config says Key not accepted on my Stripe gateway.`,id:`payment-config-says-key-not-accepted-on-my-stripe-gateway`,children:[_jsx(_components.p,{children:`When 9Pic checked the saved key, Stripe didn’t accept it. The key may have been copied incompletely, or deleted, rolled or expired in Stripe. Buyers can’t pay through this gateway until you save a working key.`}),_jsxs(_components.p,{children:[`Paste the key again from where you stored it, or create a new restricted key with the permissions above. Select `,_jsx(_components.strong,{children:`Edit`}),` on the gateway in `,_jsx(_components.strong,{children:`Payment Config`}),`, paste the key and save. 9Pic checks it again when you save. If a buyer’s payment was already refused, you see `,_jsx(_components.strong,{children:`Key rejected`}),` instead (see below).`]})]}),_jsxs(Accordion,{title:`Payment Config shows Payments blocked on my Stripe gateway.`,id:`payment-config-shows-payments-blocked-on-my-stripe-gateway`,children:[_jsxs(_components.p,{children:[`Stripe refused to open a payment page for a buyer because the restricted key is missing a permission, usually `,_jsx(_components.strong,{children:`Checkout Sessions: Write`}),`. The buyer was told payment isn’t set up correctly for the event and wasn’t charged. The warning on `,_jsx(_components.strong,{children:`Payment Config`}),` (and on the event’s `,_jsx(_components.strong,{children:`Payment gateways`}),` card in Checkout configuration) names the permission, when it was last refused and the purchase number.`]}),_jsxs(_components.p,{children:[`In Stripe, open `,_jsx(_components.strong,{children:`Developers -> API keys`}),`, edit the restricted key, set the named resource to `,_jsx(_components.strong,{children:`Write`}),` (Write includes Read), and save. You don’t need a new key. The warning clears after the next payment page opens on that gateway, or when you save a new key in 9Pic.`]})]}),_jsxs(Accordion,{title:`Payment Config shows Payment checks blocked on my Stripe gateway.`,id:`payment-config-shows-payment-checks-blocked-on-my-stripe-gateway`,children:[_jsxs(_components.p,{children:[`Stripe refused to check or cancel a buyer’s existing payment because the restricted key is missing a permission, usually `,_jsx(_components.strong,{children:`Checkout Sessions`}),`. Nothing is lost: those orders stay pending and are never marked failed or paid because of this. Buyers are told the payment can’t be checked right now and that you’ve been told.`]}),_jsxs(_components.p,{children:[`Set the named resource to `,_jsx(_components.strong,{children:`Write`}),` on the restricted key in Stripe and save. Pending orders update the next time they are checked, and the warning clears after the next successful check.`]})]}),_jsxs(Accordion,{title:`Payment Config says Key rejected on my Stripe gateway.`,id:`payment-config-says-key-rejected-on-my-stripe-gateway`,children:[_jsxs(_components.p,{children:[`Stripe no longer accepts the saved key, usually because it was deleted, rolled or expired in Stripe. Buyers can’t pay through this gateway (they are told payment isn’t set up and aren’t charged), and pending payments can’t be checked until the key is replaced. The gateway shows `,_jsx(_components.strong,{children:`Key rejected`}),` and `,_jsx(_components.strong,{children:`New key needed`}),`.`]}),_jsxs(_components.p,{children:[`Create a new restricted key in Stripe with the permissions above, then select `,_jsx(_components.strong,{children:`Edit`}),` on the gateway in `,_jsx(_components.strong,{children:`Payment Config`}),`, paste the new key and save. The warning clears when you save it, and pending orders update the next time they are checked.`]})]}),_jsxs(Accordion,{title:`Payment Config shows Invoices blocked on my Stripe gateway.`,id:`payment-config-shows-invoices-blocked-on-my-stripe-gateway`,children:[_jsxs(_components.p,{children:[`9Pic tried to read the invoice Stripe issued with a buyer’s payment, and Stripe refused because the restricted key is missing a permission, usually `,_jsx(_components.strong,{children:`Invoices`}),` (Read). The buyer’s payment is complete and their downloads work; their purchase keeps saying the invoice is being prepared. The warning on `,_jsx(_components.strong,{children:`Payment Config`}),` (and on the event’s `,_jsx(_components.strong,{children:`Payment gateways`}),` card in Checkout configuration) names the missing permission. The warning text may still mention `,_jsx(_components.strong,{children:`Get invoice`}),`, which buyers no longer use for Stripe purchases.`]}),_jsxs(_components.p,{children:[`In Stripe, open `,_jsx(_components.strong,{children:`Developers -> API keys`}),`, edit the restricted key, set the named resource to the shown access level, and save. You don’t need a new key. 9Pic checks pending invoices again automatically, or the buyer can select `,_jsx(_components.strong,{children:`Check again`}),`; the warning clears after the next invoice is read on that gateway, or when you save a new key in 9Pic.`]})]}),_jsx(Accordion,{title:`Stripe gateway tax says my Stripe key needs another permission.`,id:`stripe-gateway-tax-says-my-stripe-key-needs-another-permission`,children:_jsxs(_components.p,{children:[`The key can’t read your tax rates (`,_jsx(_components.strong,{children:`Tax Rates: Read`}),`) or your Stripe Tax settings (`,_jsx(_components.strong,{children:`Tax Settings: Read`}),`). Add the named permission to the restricted key in Stripe and save. If you replaced the key instead, save the new key in `,_jsx(_components.strong,{children:`Payment Config`}),`. Then select `,_jsx(_components.strong,{children:`Check again`}),` in `,_jsx(_components.strong,{children:`Payment Configuration → Tax Configuration → Stripe gateway tax`}),`.`]})}),_jsx(Accordion,{title:`I copied the key but lost it before adding it to 9Pic.`,id:`i-copied-the-key-but-lost-it-before-adding-it-to-9pic`,children:_jsx(_components.p,{children:`Create a new restricted key, store it securely, add the new value to 9Pic, then revoke the unused key in Stripe.`})}),_jsx(Accordion,{title:`Should I use the same key for test and live payments?`,id:`should-i-use-the-same-key-for-test-and-live-payments`,children:_jsx(_components.p,{children:`No. Keep separate keys for test mode and live mode. This reduces mistakes and makes rotation easier.`})}),_jsx(Accordion,{title:`The 9Pic field says Stripe Secret Key. Can I paste a restricted key?`,id:`the-9pic-field-says-stripe-secret-key-can-i-paste-a-restricted-key`,children:_jsxs(_components.p,{children:[`Yes. Paste the restricted key value there. Stripe restricted keys start with `,_jsx(_components.code,{children:`rk_test_`}),` in test mode and `,_jsx(_components.code,{children:`rk_live_`}),` in live mode.`]})})]}),`\n`,_jsx(Heading,{level:`2`,id:`next-steps`,children:`Next Steps`}),`\n`,_jsxs(CardGroup,{cols:2,children:[_jsx(Card,{title:`Payment Config`,icon:`wallet`,href:`/account/payment-gateways`,children:_jsx(_components.p,{children:`Create and manage organisation-level gateway configurations.`})}),_jsx(Card,{title:`Checkout Setup`,icon:`gear`,href:`/products/checkout/configuration`,children:_jsx(_components.p,{children:`Assign a gateway to an event, publish plans, and enable Checkout.`})})]})]})}function MDXContent(props={}){const{wrapper:MDXLayout}={..._provideComponents(),...props.components};return MDXLayout?_jsx(MDXLayout,{...props,children:_jsx(_createMdxContent,{...props})}):_createMdxContent(props)}return{default:MDXContent};function _missingMdxReference(id,component){throw new Error(`Expected `+(component?`component`:`object`)+\" `\"+id+\"` to be defined: you likely forgot to import, pass, or provide it.\")}","frontmatter":{},"scope":{"config":{},"pageMetadata":{"title":"Stripe Key Setup","description":"Create a Stripe restricted key for 9Pic Checkout and add it to Payment Configuration.","icon":"key","href":"/account/payment-gateways/stripe-restricted-key"}}},"mdxSourceWithNoJs":null},"mdxExtracts":{"tableOfContents":[{"title":"Overview","slug":"overview","depth":2,"children":[]},{"title":"Before You Start","slug":"before-you-start","depth":2,"children":[]},{"title":"Create the Restricted Key in Stripe","slug":"create-the-restricted-key-in-stripe","depth":2,"children":[]},{"title":"Required Stripe Permissions","slug":"required-stripe-permissions","depth":2,"children":[]},{"title":"Set Up Participant Invoices","slug":"set-up-participant-invoices","depth":2,"children":[]},{"title":"Save the Key Safely","slug":"save-the-key-safely","depth":2,"children":[]},{"title":"Add the Key to 9Pic","slug":"add-the-key-to-9pic","depth":2,"children":[]},{"title":"Key Check After Saving","slug":"key-check-after-saving","depth":2,"children":[]},{"title":"Verify the Setup","slug":"verify-the-setup","depth":2,"children":[]},{"title":"Troubleshooting","slug":"troubleshooting","depth":2,"children":[]},{"title":"Next Steps","slug":"next-steps","depth":2,"children":[]}],"codeExamples":{}},"jsLinks":[],"subdomain":"9picai","siteName":"9Pic AI Documentation","title":"Stripe Key Setup - 9Pic AI Documentation","navMaps":{"firstHrefInVersion":{},"firstHrefInLanguage":{}},"lastModified":"2026-11-17T19:15:49.302Z","originalFileLocation":"account/payment-gateways/stripe-restricted-key.mdx"},"headHtml":"\u003cscript data-mint-head>(function(){var d=document.documentElement,p=null;if(!p){try{p=localStorage.getItem(\"isDarkMode\")}catch(e){}if(p==='true')p='dark';else if(p==='false')p='light';if(p!=='light'\u0026\u0026p!=='dark'\u0026\u0026p!=='system')p=\"system\"}var r=p==='system'?(matchMedia(\"(prefers-color-scheme: dark)\").matches?'dark':'light'):p;d.classList.remove(r==='dark'?'light':'dark');d.classList.add(r);d.setAttribute(\"data-theme-preference\",p)})();\u003c/script>\u003cmeta data-mint-head name=\"description\" content=\"Create a Stripe restricted key for 9Pic Checkout and add it to Payment Configuration.\">\u003cmeta data-mint-head name=\"application-name\" content=\"9Pic AI Documentation\">\u003cmeta data-mint-head name=\"generator\" content=\"Mintlify\">\u003clink data-mint-head rel=\"icon\" type=\"image/png\" sizes=\"192x192\" href=\"/mintlify-assets/_mintlify/favicons/9picai/9qO0Knt0dMOPX3DE/_generated/favicon/android-chrome-192x192.png\" media=\"(prefers-color-scheme: light)\">\u003clink data-mint-head rel=\"apple-touch-icon\" type=\"image/png\" sizes=\"180x180\" href=\"/mintlify-assets/_mintlify/favicons/9picai/9qO0Knt0dMOPX3DE/_generated/favicon/apple-touch-icon.png\">\u003clink data-mint-head rel=\"icon\" type=\"image/png\" sizes=\"16x16\" href=\"/mintlify-assets/_mintlify/favicons/9picai/9qO0Knt0dMOPX3DE/_generated/favicon/favicon-16x16.png\" media=\"(prefers-color-scheme: light)\">\u003clink data-mint-head rel=\"icon\" type=\"image/png\" sizes=\"32x32\" href=\"/mintlify-assets/_mintlify/favicons/9picai/9qO0Knt0dMOPX3DE/_generated/favicon/favicon-32x32.png\" media=\"(prefers-color-scheme: light)\">\u003clink data-mint-head rel=\"shortcut icon\" type=\"image/x-icon\" href=\"/mintlify-assets/_mintlify/favicons/9picai/9qO0Knt0dMOPX3DE/_generated/favicon/favicon.ico\" media=\"(prefers-color-scheme: light)\">\u003clink data-mint-head rel=\"icon\" type=\"image/png\" sizes=\"192x192\" href=\"/mintlify-assets/_mintlify/favicons/9picai/9qO0Knt0dMOPX3DE/_generated/favicon-dark/android-chrome-192x192.png\" media=\"(prefers-color-scheme: dark)\">\u003clink data-mint-head rel=\"icon\" type=\"image/png\" sizes=\"16x16\" href=\"/mintlify-assets/_mintlify/favicons/9picai/9qO0Knt0dMOPX3DE/_generated/favicon-dark/favicon-16x16.png\" media=\"(prefers-color-scheme: dark)\">\u003clink data-mint-head rel=\"icon\" type=\"image/png\" sizes=\"32x32\" href=\"/mintlify-assets/_mintlify/favicons/9picai/9qO0Knt0dMOPX3DE/_generated/favicon-dark/favicon-32x32.png\" media=\"(prefers-color-scheme: dark)\">\u003clink data-mint-head rel=\"shortcut icon\" type=\"image/x-icon\" href=\"/mintlify-assets/_mintlify/favicons/9picai/9qO0Knt0dMOPX3DE/_generated/favicon-dark/favicon.ico\" media=\"(prefers-color-scheme: dark)\">\u003cmeta data-mint-head property=\"og:title\" content=\"Stripe Key Setup - 9Pic AI Documentation\">\u003cmeta data-mint-head property=\"og:description\" content=\"Create a Stripe restricted key for 9Pic Checkout and add it to Payment Configuration.\">\u003cmeta data-mint-head property=\"og:site_name\" content=\"9Pic AI Documentation\">\u003cmeta data-mint-head property=\"og:url\" content=\"https://docs.9pic.ai/account/payment-gateways/stripe-restricted-key\">\u003cmeta data-mint-head property=\"og:type\" content=\"website\">\u003cmeta data-mint-head property=\"og:image\" content=\"https://9picai.mintlify.site/_mintlify/api/og/v2?division=Payment+Gateways\u0026amp;title=Stripe+Key+Setup\u0026amp;description=Create+a+Stripe+restricted+key+for+9Pic+Checkout+and+add+it+to+Payment+Configuration.\u0026amp;theme=b5a7382b9996fec4070d7961\u0026amp;signature=81f0fad7d426fcd46453457fd9608886c7c71b10b43e1a60bf5cf11c48f1543b\">\u003cmeta data-mint-head property=\"og:image:width\" content=\"1200\">\u003cmeta data-mint-head property=\"og:image:height\" content=\"630\">\u003cmeta data-mint-head name=\"twitter:card\" content=\"summary_large_image\">\u003cmeta data-mint-head name=\"twitter:title\" content=\"Stripe Key Setup - 9Pic AI Documentation\">\u003cmeta data-mint-head name=\"twitter:description\" content=\"Create a Stripe restricted key for 9Pic Checkout and add it to Payment Configuration.\">\u003cmeta data-mint-head name=\"twitter:image\" content=\"https://9picai.mintlify.site/_mintlify/api/og/v2?division=Payment+Gateways\u0026amp;title=Stripe+Key+Setup\u0026amp;description=Create+a+Stripe+restricted+key+for+9Pic+Checkout+and+add+it+to+Payment+Configuration.\u0026amp;theme=b5a7382b9996fec4070d7961\u0026amp;signature=81f0fad7d426fcd46453457fd9608886c7c71b10b43e1a60bf5cf11c48f1543b\">\u003cmeta data-mint-head name=\"twitter:image:width\" content=\"1200\">\u003cmeta data-mint-head name=\"twitter:image:height\" content=\"630\">\u003cmeta data-mint-head name=\"msapplication-config\" content=\"/mintlify-assets/_mintlify/favicons/9picai/9qO0Knt0dMOPX3DE/_generated/favicon/browserconfig.xml\">\u003cmeta data-mint-head name=\"apple-mobile-web-app-title\" content=\"9Pic AI Documentation\">\u003cmeta data-mint-head name=\"msapplication-TileColor\" content=\"#155DFC\">\u003clink data-mint-head rel=\"canonical\" href=\"https://docs.9pic.ai/account/payment-gateways/stripe-restricted-key\">\u003clink data-mint-head rel=\"alternate\" type=\"application/xml\" href=\"/sitemap.xml\">\u003clink data-mint-head rel=\"alternate\" type=\"text/markdown\" href=\"/account/payment-gateways/stripe-restricted-key.md\">\u003cscript data-mint-head type=\"application/ld+json\">{\"@context\":\"https://schema.org\",\"@graph\":[{\"@type\":\"Organization\",\"@id\":\"https://docs.9pic.ai/#organization\",\"name\":\"9Pic AI Documentation\",\"url\":\"https://docs.9pic.ai\",\"logo\":{\"@type\":\"ImageObject\",\"url\":\"https://mintcdn.com/9picai/S5EcjfSqjwpORHEo/logo/light.png?fit=max\u0026auto=format\u0026n=S5EcjfSqjwpORHEo\u0026q=85\u0026s=a14647e1552cad86363bd3dfe32ec208\"}},{\"@type\":\"WebSite\",\"@id\":\"https://docs.9pic.ai#website\",\"name\":\"9Pic AI Documentation\",\"url\":\"https://docs.9pic.ai\",\"publisher\":{\"@id\":\"https://docs.9pic.ai/#organization\"}},{\"@type\":\"WebPage\",\"@id\":\"https://docs.9pic.ai/account/payment-gateways/stripe-restricted-key#webpage\",\"url\":\"https://docs.9pic.ai/account/payment-gateways/stripe-restricted-key\",\"name\":\"Stripe Key Setup\",\"description\":\"Create a Stripe restricted key for 9Pic Checkout and add it to Payment Configuration.\",\"dateModified\":\"2026-11-17T19:15:49.302Z\",\"isPartOf\":{\"@id\":\"https://docs.9pic.ai#website\"},\"breadcrumb\":{\"@id\":\"https://docs.9pic.ai/account/payment-gateways/stripe-restricted-key#breadcrumb\"}},{\"@type\":\"BreadcrumbList\",\"@id\":\"https://docs.9pic.ai/account/payment-gateways/stripe-restricted-key#breadcrumb\",\"itemListElement\":[{\"@type\":\"ListItem\",\"position\":1,\"name\":\"Payment Gateways\",\"item\":\"https://docs.9pic.ai/account/payment-gateways\"},{\"@type\":\"ListItem\",\"position\":2,\"name\":\"Stripe Key Setup\",\"item\":\"https://docs.9pic.ai/account/payment-gateways/stripe-restricted-key\"}]},{\"@type\":[\"Article\",\"TechArticle\"],\"@id\":\"https://docs.9pic.ai/account/payment-gateways/stripe-restricted-key#article\",\"headline\":\"Stripe Key Setup\",\"name\":\"Stripe Key Setup\",\"description\":\"Create a Stripe restricted key for 9Pic Checkout and add it to Payment Configuration.\",\"url\":\"https://docs.9pic.ai/account/payment-gateways/stripe-restricted-key\",\"mainEntityOfPage\":{\"@id\":\"https://docs.9pic.ai/account/payment-gateways/stripe-restricted-key#webpage\"},\"dateModified\":\"2026-11-17T19:15:49.302Z\",\"publisher\":{\"@id\":\"https://docs.9pic.ai/#organization\"},\"isPartOf\":{\"@id\":\"https://docs.9pic.ai#website\"}}]}\u003c/script>\u003cscript data-mint-head type=\"application/ld+json\">{\"@context\":\"https://schema.org\",\"@type\":\"WebSite\",\"name\":\"9Pic AI Documentation\",\"publisher\":{\"@type\":\"Organization\",\"name\":\"9Pic AI Documentation\"},\"provider\":{\"@type\":\"Organization\",\"name\":\"Mintlify\",\"url\":\"https://mintlify.com\"}}\u003c/script>","agentPointerHref":"/account/payment-gateways/stripe-restricted-key.md","siteName":"9Pic AI Documentation","nav":{"global":{},"tabs":[{"tab":"Get Started","pages":[{"title":"Get Started","href":"/get-started"}]},{"tab":"Products","pages":[{"title":"Products","href":"/products/events/list"}]},{"tab":"Account \u0026 Billing","groups":[{"group":"Plans","pages":[{"title":"Compare Plans","icon":"scale-balanced","href":"/account/plans/compare"},{"title":"Trial","icon":"rocket","href":"/account/plans/trial"},{"title":"Pay As You Go","icon":"coins","href":"/account/plans/pay-as-you-go"},{"title":"Pro","icon":"crown","href":"/account/plans/pro"},{"title":"Business","icon":"briefcase","href":"/account/plans/business"},{"title":"Change Your Plan","icon":"arrow-up-right-from-square","href":"/account/plans/upgrade"},{"title":"Renewal","icon":"arrows-rotate","href":"/account/plans/renewal"},{"title":"Fair Usage Policy","icon":"scale-balanced","href":"/account/plans/fair-usage"}]},{"group":"Credits","pages":[{"title":"Credits \u0026 Billing","icon":"coins","href":"/account/credits/overview"},{"title":"Photo Processing Costs","icon":"gauge","href":"/account/credits/costs"},{"title":"Buy More Credits","icon":"cart-shopping","href":"/account/credits/buy"},{"title":"Invoices \u0026 Transactions","icon":"file-invoice","href":"/account/credits/invoices"},{"title":"Avoid Wasting Credits","icon":"triangle-exclamation","href":"/account/credits/avoid-waste"}]},{"group":"Your Site","pages":[{"title":"Settings Overview","icon":"gear","href":"/account/site/index"},{"title":"Run the Setup Wizard","icon":"wand-magic-sparkles","href":"/account/site/setup-wizard"},{"title":"Branding \u0026 Theme","icon":"palette","href":"/account/site/branding"},{"title":"Domain \u0026 Region","icon":"globe","href":"/account/site/domain"},{"title":"Footer \u0026 Social","icon":"share-nodes","href":"/account/site/footer"},{"title":"Contact Us Page","icon":"address-card","href":"/account/site/contact"},{"title":"Advanced Settings","icon":"sliders","href":"/account/site/advanced"}]},{"group":"Team \u0026 Account","pages":[{"title":"Account","icon":"user","href":"/account/profile"},{"title":"Team","icon":"users","href":"/account/team"}]},{"group":"Payment Gateways","pages":[{"title":"Payment Configuration","description":"Set up Stripe, Xendit, PayMongo, AFS Gateway and BENEFIT configurations for 9Pic Checkout (Business plan).","icon":"wallet","href":"/account/payment-gateways/index"},{"title":"Stripe Key Setup","icon":"key","href":"/account/payment-gateways/stripe-restricted-key"},{"title":"Stripe Invoice Setup","description":"Turn on Stripe-issued invoices and Stripe tax for 9Pic Checkout, and prepare your Stripe invoice details, with a worked inclusive-tax example.","icon":"file-invoice-dollar","href":"/account/payment-gateways/stripe-invoices"},{"title":"AFS Gateway Setup","icon":"credit-card","href":"/account/payment-gateways/afs-gateway"},{"title":"BENEFIT Setup","icon":"credit-card","href":"/account/payment-gateways/benefit-gateway"},{"title":"PayMongo Setup","icon":"credit-card","href":"/account/payment-gateways/paymongo"},{"title":"Xendit Setup","icon":"credit-card","href":"/account/payment-gateways/xendit"}]},{"group":"Get Help","pages":[{"title":"Contact Support","icon":"life-ring","href":"/account/support"},{"title":"Talk to Us","icon":"comments","href":"/account/talk-to-us"}]}]},{"tab":"Troubleshooting","pages":[{"title":"Troubleshooting","href":"/troubleshooting"}]},{"tab":"AI \u0026 Automation","pages":[{"title":"AI \u0026 Automation","href":"/integrations/ai-assistants"}]},{"tab":"API Reference","pages":[{"title":"API Reference","href":"/api-reference"}]}]},"basePath":"","title":"Stripe Key Setup - 9Pic AI Documentation","deploymentId":"dpl_HhUetB7eHHDAmK9T1Teip38TgFx9","buildId":"dpl_HhUetB7eHHDAmK9T1Teip38TgFx9","dynamics":["07c022d89b","a74be98ba7"],"chunks":["Frame-DevImLcx.js","DynamicMarkdown-BGHukeRM.js","zoom-image-lightbox-DQG3o8Eu.js","lightbox-handle-r17bVUz3.js"]}