

Moving from Trial to Business: a Stripe test key you saved on Trial is removed when your organisation starts taking live payments. The gateway shows New key needed, and events using it take no payments until you select Edit, enter the gateway’s key and save. Pay As You Go and Pro keep the Trial key.
Overview
Payment Configuration is where you set up the payment gateways your organisation uses, then map them to events. It powers 9Pic Checkout: you create a gateway here once, then assign it to individual events. Open it from Payment Config in the dashboard sidebar (or the Payment Config card on the dashboard home).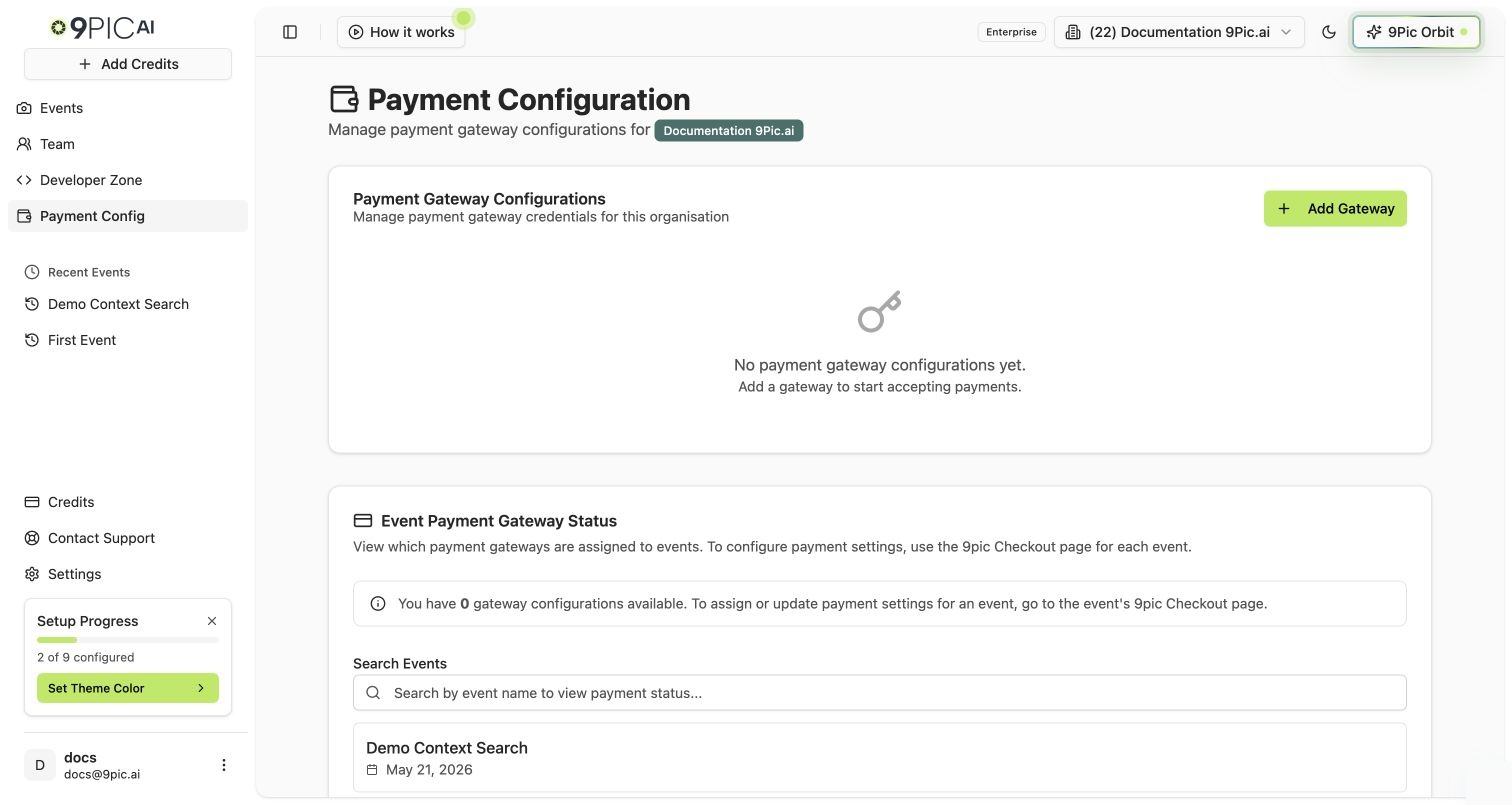
Payment Configuration
Gateway Configurations
The first section lists your gateway configurations and lets you add or edit them.1
Create a gateway config
Add a Stripe, Xendit, PayMongo, AFS Gateway or BENEFIT configuration with the credentials for that account.
2
Edit or update
Open any configuration to update its credentials or details.
3
Set what buyers see (optional)
In Edit, What buyers see holds a Label buyers see (up to 60 characters) and a Note (up to 120 characters). Buyers see them when an event offers more than one way to pay; each event can change them in its Checkout configuration. Saving them doesn’t ask for your credentials again.
We give clear, gateway-specific instructions during setup. Keep API keys and secrets safe — treat them like passwords and never share them outside your admin team.
Key Check
When you save a Stripe, Xendit, PayMongo or AFS Gateway key, 9Pic checks it with the gateway straight away. The check only reads from your account, so nothing is created and nobody is charged. It runs when you add a gateway, and when you save new credentials (or a new Account ID or Merchant ID) in Edit. Renaming a gateway doesn’t run it.The check is for your information only. The gateway is saved whatever the result, and the check never stops you assigning the gateway to an event or buyers paying.
When a key isn’t accepted or is missing permissions, a note above the list names the gateway and explains the fix. For Stripe, it names the rows the key can’t use, such as Checkout Sessions, Invoices. If a buyer’s payment has already failed on that gateway, you see the Key rejected, Payments blocked or Payment checks blocked warning instead. Fix that one first.
Check Key
Check key sits next to Edit in the Actions column for Stripe, Xendit, PayMongo and AFS Gateway configurations that have saved credentials. Select it after you fix a key’s permissions, or any time you want to confirm the key still works. The result appears in a message and in the Secrets column. Checking doesn’t change Last Updated, and it doesn’t clear a Key rejected, Payments blocked or Invoices blocked warning. Those clear after the next successful payment or invoice, or when you save a new key.What 9Pic Checks
Stripe write access can’t be checked without creating a payment, so your first test payment confirms it. BENEFIT, No gateway and the 9Pic test payment account aren’t checked. BENEFIT can only tell whether its details work when a buyer pays, so run a test payment.
Stripe Restricted Key
For Stripe, create a restricted key before you add the gateway in 9Pic. The key should grant only the Stripe permissions needed for Checkout, payment checks, invoices and, if you use Stripe tax, reading your tax rates and Stripe Tax settings.Stripe Key Setup
Follow the end-to-end Stripe restricted key setup, including screenshots and the permission checklist.
AFS Gateway
AFS Gateway supports 9Pic Checkout through Mastercard Hosted Checkout. Add the AFS Merchant ID and API password in Payment Configuration, then assign that configuration to an event. A Merchant ID beginning withTEST uses the simulator; use the separate live Merchant ID for real payments.
AFS Gateway Setup
Follow the AFS credential, test, live-payment, and event-assignment steps.
BENEFIT
BENEFIT lets buyers in Bahrain pay with BENEFIT debit cards, in BHD only. Add the Tranportal ID, Tranportal password and Terminal resource key from your BENEFIT merchant portal. Test environment is on by default; turn it off only with the live Tranportal details BENEFIT gives you at go-live. In Edit, leaving the password or resource key empty keeps the saved one. You can offer BENEFIT next to AFS Gateway on the same event so buyers choose debit or credit cards.BENEFIT Setup
Follow the BENEFIT credential, test, live-payment, and event-assignment steps.
PayMongo
PayMongo supports 9Pic Checkout for PHP photo sales in the Philippines. Add the PayMongo secret key in Payment Configuration, then assign that configuration to an event. Use ask_test_ key for setup checks and a sk_live_ key for public checkout.
PayMongo Setup
Follow the PayMongo secret-key, test, live-payment, and event-assignment steps.
Xendit
Xendit supports 9Pic Checkout for IDR, PHP, MYR, THB, and VND photo sales. Add the Xendit secret key in Payment Configuration, then assign that configuration to an event. Xendit does not offer a Pass on fees option, and 9Pic does not automatically enforce which key mode (development or production) you use.Xendit Setup
Follow the Xendit secret-key, test, live-payment, and event-assignment steps.
Tax Configuration
The Tax Configuration tab has a section menu on the left with two sections:
Regular tax opens first (link:
/payment-configuration/tax). The Stripe gateway tax section (link: /payment-configuration/tax?section=stripe) lists each Stripe gateway of your own; if you have none yet, it asks you to add one in Gateway Configurations. It needs Sales tax settings on your plan; without them it shows the plan lock, unless a gateway still has a saved tax, which you can turn off. Saving is refused while an event using the gateway needs a kind of rate your Stripe account lacks; the error names those events. See Stripe Invoice Setup for the full steps, the inclusive and exclusive rate rules, and a worked AUD example.
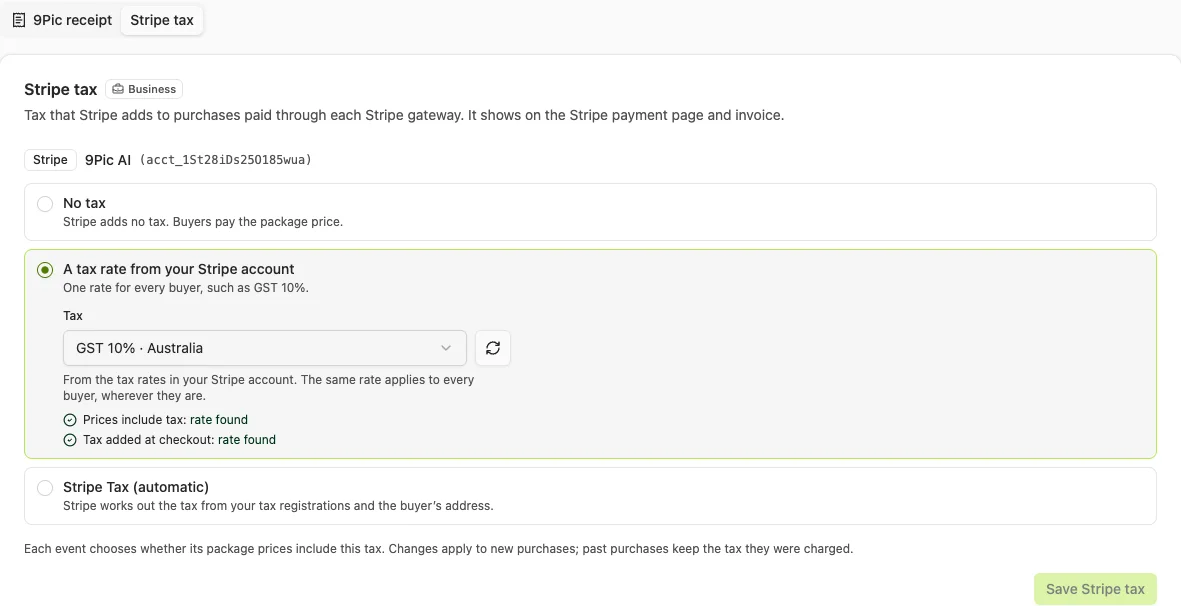
The Stripe gateway tax section of Tax Configuration.
Event Mapping
The second section maps events to a gateway configuration, so each event’s checkout routes payments to the right account. This is the organisation-level counterpart to the per-event gateway assignment you do on the Checkout Configuration tab.Who Can Access It
If you’re on Business or Enterprise but see an “Access Denied” notice, your account isn’t a team admin — ask an admin on your Team to grant access.
Next Steps
9Pic Checkout
Sell photos, videos, and certificates per event.
Checkout Configuration
Assign one of these gateways to an event.