> ## Documentation Index
> Fetch the complete documentation index at: https://docs.9pic.ai/llms.txt
> Use this file to discover all available pages before exploring further.
# Run Your First Event
> Create, sync, process, and test an event end-to-end on the trial
## Why This Matters
The single best way to evaluate 9Pic is to run a real event through it. Even a tiny test event with 20 photos shows you the full flow: upload, AI processing, search, and a working event link you can test yourself. This page is the trial-tuned version of that flow.
Trial events live on the shared `trial.9pic.ai` domain, which is **rate-limited for anti-abuse**. The event link you'll generate at the end of this guide is for **you and your internal team only** — do **not** share it with real participants or customers. See [What's Included](/trial-guide/whats-included) for the full domain rule.
## Before You Begin
* You're signed up at [admin.9pic.ai/login](https://admin.9pic.ai/login) and you can see the dashboard home.
* You're on the **Trial** plan (the dashboard shows a "Start with a 2-minute walkthrough" banner if you are).
* You have at least one event idea — a real upcoming event, or a small test set of photos.
* You have **at least one source** ready: photos uploaded via 9Pic Uplink, a Google Drive folder, or a Dropbox folder.
Plan for **20-30 minutes** end-to-end the first time. Once you've done it, repeating the flow takes a few minutes.
Don't have a real event yet? Use **30-50 sample photos from your phone** as a test gallery. The trial works the same way with sample data.
## Steps
From the dashboard sidebar, open **Trial Setup** and click **Create event** on the first step.
Or, from dashboard home, click the **Create New Event** card in **Quick Access**.
Enter:
* **Event Name** — for example, *Test Event - 9Pic Trial*.
* **Event Date** — today or your real event date.
* **Event Type** — choose the closest match. **Running events** unlock BIB-related options.
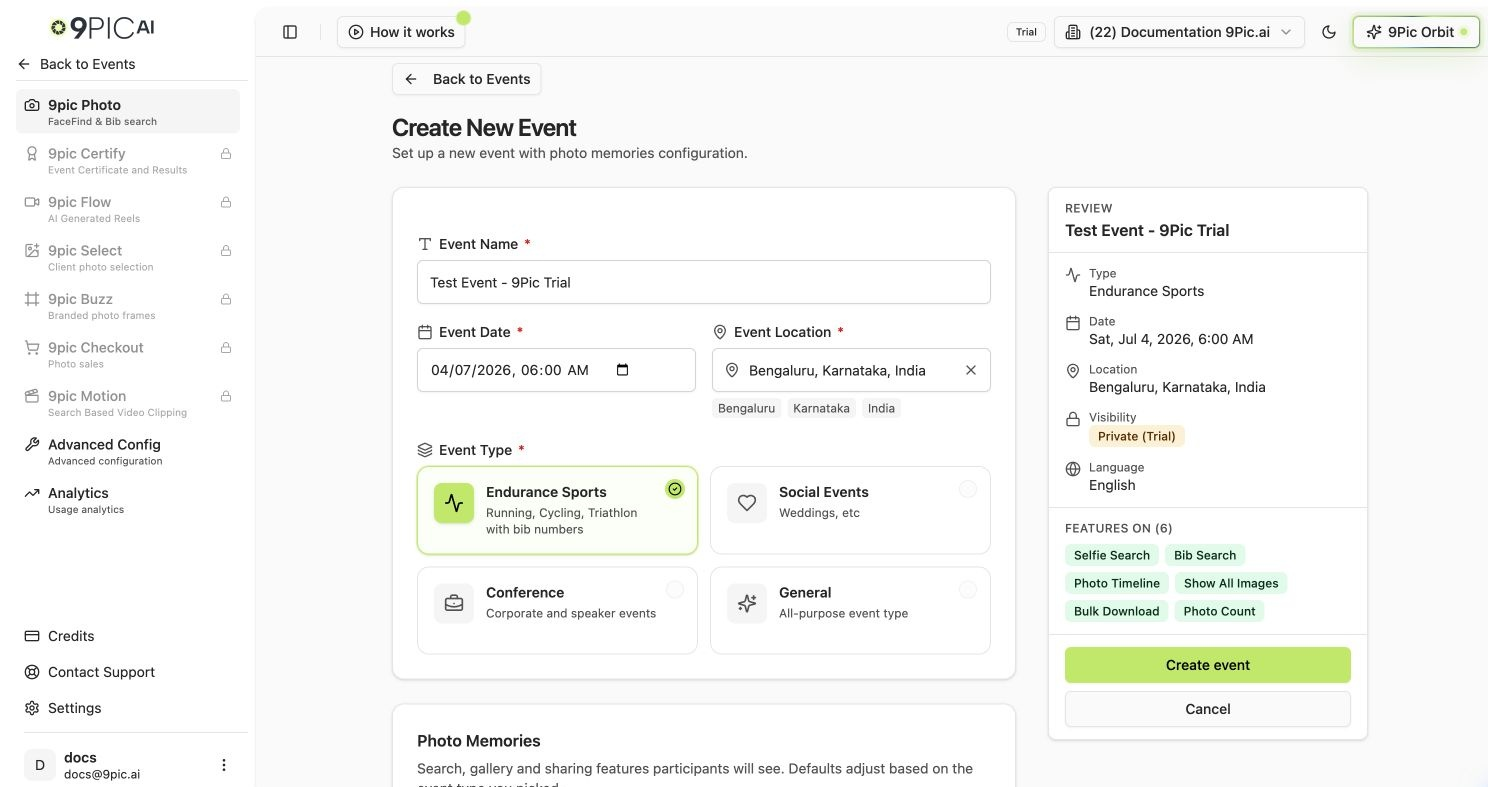 On the trial, **Platform Visibility** is locked to **Private**. Your event will work end-to-end, but it lives on the shared `trial.9pic.ai` domain and won't appear on any public listing. After you upgrade, your domain moves to `app.9pic.ai` — but your existing trial events still stay private until you explicitly flip them.
Pick the photo features you want to test:
* **Selfie Search** — turn on if you want to try **9Pic FaceFind**.
* **Show All Images** — turn on if participants should see the full gallery.
* **Bulk Download** — turn on if participants should download multiple photos at once.
* **Store Original Memories** — leave **off** while you're on the trial. Originals consume more credits.
Click **Create Event** when done.
In the **Events list**, find your new event and click **Details**. This opens the event workspace where you'll add sources and run processing.
On the event's overview, scroll to **Image Sources** and click **Manage Sources**.
* Keep **9Pic Storage** if you want to upload via [9Pic Uplink](https://docs.9pic.ai/photos/overview).
* Add a **Google Drive** or **Dropbox** folder link if your photos already live there.
For a fast trial test, use 9Pic Uplink and drop **20-50 photos** straight from your computer or phone.
From the event's overview, run the **Processing Pipeline** in this order:
1. **Generate Previews** — *(optional)* fast, low-resolution previews to check rotation and framing.
2. **Sync Images** — pulls photos from all your sources into 9Pic.
3. **Start Processing** — runs AI search indexing (FaceFind, BibTrack) and any watermark you configured.
4. **Go Live** — publishes the event so the share link works.
On the trial, **Platform Visibility** is locked to **Private**. Your event will work end-to-end, but it lives on the shared `trial.9pic.ai` domain and won't appear on any public listing. After you upgrade, your domain moves to `app.9pic.ai` — but your existing trial events still stay private until you explicitly flip them.
Pick the photo features you want to test:
* **Selfie Search** — turn on if you want to try **9Pic FaceFind**.
* **Show All Images** — turn on if participants should see the full gallery.
* **Bulk Download** — turn on if participants should download multiple photos at once.
* **Store Original Memories** — leave **off** while you're on the trial. Originals consume more credits.
Click **Create Event** when done.
In the **Events list**, find your new event and click **Details**. This opens the event workspace where you'll add sources and run processing.
On the event's overview, scroll to **Image Sources** and click **Manage Sources**.
* Keep **9Pic Storage** if you want to upload via [9Pic Uplink](https://docs.9pic.ai/photos/overview).
* Add a **Google Drive** or **Dropbox** folder link if your photos already live there.
For a fast trial test, use 9Pic Uplink and drop **20-50 photos** straight from your computer or phone.
From the event's overview, run the **Processing Pipeline** in this order:
1. **Generate Previews** — *(optional)* fast, low-resolution previews to check rotation and framing.
2. **Sync Images** — pulls photos from all your sources into 9Pic.
3. **Start Processing** — runs AI search indexing (FaceFind, BibTrack) and any watermark you configured.
4. **Go Live** — publishes the event so the share link works.
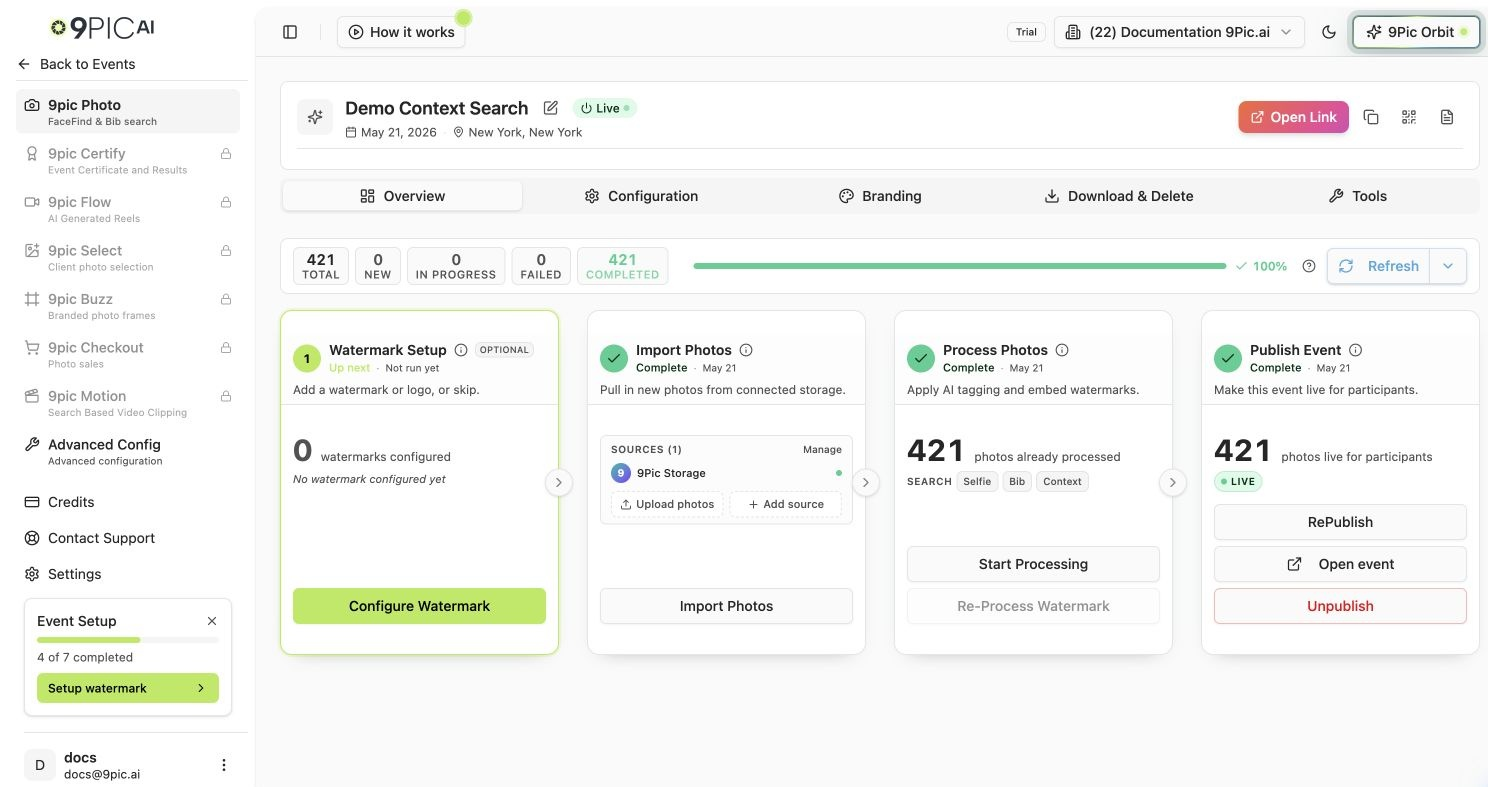 Each photo processed consumes **1 credit**. Watch the credits counter in the sidebar so you know when you're getting close to the trial's 200-credit limit.
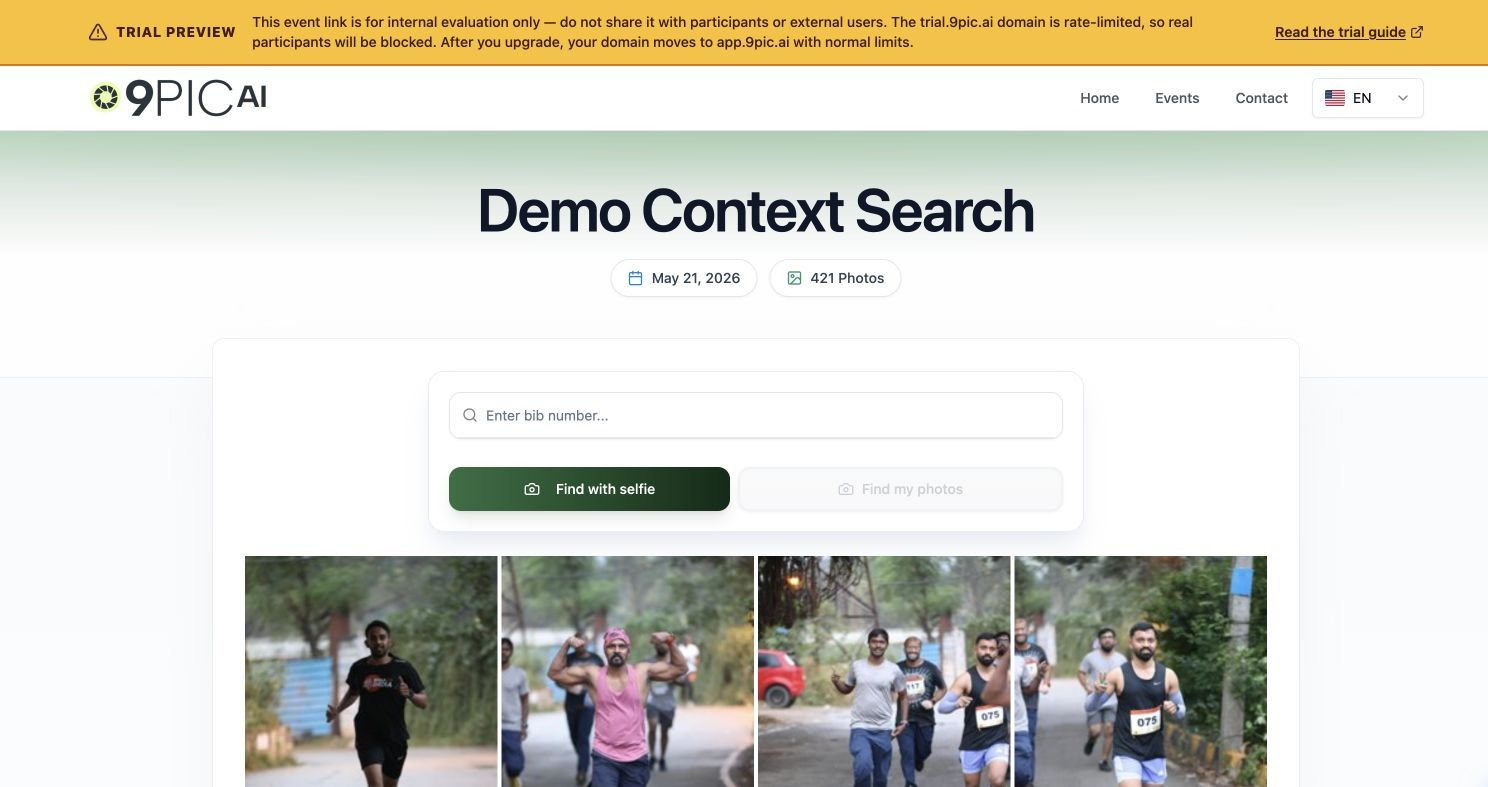
Once the event is **Live**, use **Open Link** in the event header to load the participant view in your browser. Try:
* Searching with a **selfie** (FaceFind).
* Searching by **BIB number** if it's a running event (BibTrack).
* Downloading a single photo or using **Bulk Download**.
If you need a second pair of eyes, use **Copy Link** and send it to a **teammate inside your organisation only** — never to real participants or customers.
The trial domain (`trial.9pic.ai`) is rate-limited for anti-abuse. Sharing the link with real participants will get them blocked. Keep this link inside your team until you upgrade.
Each photo processed consumes **1 credit**. Watch the credits counter in the sidebar so you know when you're getting close to the trial's 200-credit limit.
Once the event is **Live**, use **Open Link** in the event header to load the participant view in your browser. Try:
* Searching with a **selfie** (FaceFind).
* Searching by **BIB number** if it's a running event (BibTrack).
* Downloading a single photo or using **Bulk Download**.
If you need a second pair of eyes, use **Copy Link** and send it to a **teammate inside your organisation only** — never to real participants or customers.
The trial domain (`trial.9pic.ai`) is rate-limited for anti-abuse. Sharing the link with real participants will get them blocked. Keep this link inside your team until you upgrade.
 ## What to Watch For
* **Photos missing after sync?** Check that your source folder is shared correctly. See [No photos after sync](/dashboard-guide/troubleshooting/no-photos-after-sync).
* **Search not finding faces or BIBs?** Confirm Selfie Search was on when you created the event and re-run **Start Processing**. See [Search not working](/dashboard-guide/troubleshooting/search-not-working).
* **Go Live failed?** Usually a credits or source issue. See [Go Live failed](/dashboard-guide/troubleshooting/go-live-failed).
* **Credits blocking processing?** You'll see a notice on the event overview. See [Credits blocking processing](/dashboard-guide/troubleshooting/credits-blocking-processing).
## Common Questions
No. The trial event link works for testing, but it lives on the shared, rate-limited `trial.9pic.ai` domain — real-participant traffic will be blocked by anti-abuse. For an event that real participants will use, upgrade to Pay As You Go or Pro first so your organisation moves to `app.9pic.ai`. See [What's Included](/trial-guide/whats-included) for the full rule.
Your event data stays on the trial. You can come back later, add credits with Pay As You Go, and the event picks up where it left off — your domain moves to `app.9pic.ai` at that point.
No. Your domain moves from `trial.9pic.ai` to `app.9pic.ai`, but the existing event stays **Private** until you explicitly change its visibility yourself.
For a 100-photo test event, end-to-end (sync + process + go live) usually finishes in under 10 minutes. Larger events scale roughly linearly.
Yes. Open the event's **Details** page and use the delete option in event settings. This frees up the event slot but does not refund spent credits.
## Next Steps
Verify FaceFind and BibTrack are working on your gallery.
Invite a teammate to review the event with you.
Eight more things to try before you decide.
Decide which paid plan fits your event volume.
## What to Watch For
* **Photos missing after sync?** Check that your source folder is shared correctly. See [No photos after sync](/dashboard-guide/troubleshooting/no-photos-after-sync).
* **Search not finding faces or BIBs?** Confirm Selfie Search was on when you created the event and re-run **Start Processing**. See [Search not working](/dashboard-guide/troubleshooting/search-not-working).
* **Go Live failed?** Usually a credits or source issue. See [Go Live failed](/dashboard-guide/troubleshooting/go-live-failed).
* **Credits blocking processing?** You'll see a notice on the event overview. See [Credits blocking processing](/dashboard-guide/troubleshooting/credits-blocking-processing).
## Common Questions
No. The trial event link works for testing, but it lives on the shared, rate-limited `trial.9pic.ai` domain — real-participant traffic will be blocked by anti-abuse. For an event that real participants will use, upgrade to Pay As You Go or Pro first so your organisation moves to `app.9pic.ai`. See [What's Included](/trial-guide/whats-included) for the full rule.
Your event data stays on the trial. You can come back later, add credits with Pay As You Go, and the event picks up where it left off — your domain moves to `app.9pic.ai` at that point.
No. Your domain moves from `trial.9pic.ai` to `app.9pic.ai`, but the existing event stays **Private** until you explicitly change its visibility yourself.
For a 100-photo test event, end-to-end (sync + process + go live) usually finishes in under 10 minutes. Larger events scale roughly linearly.
Yes. Open the event's **Details** page and use the delete option in event settings. This frees up the event slot but does not refund spent credits.
## Next Steps
Verify FaceFind and BibTrack are working on your gallery.
Invite a teammate to review the event with you.
Eight more things to try before you decide.
Decide which paid plan fits your event volume.