> ## Documentation Index
> Fetch the complete documentation index at: https://docs.9pic.ai/llms.txt
> Use this file to discover all available pages before exploring further.
# Footer & Contact
> Footer text, social links, About Us, and embedded contact form on Pro
## Why This Matters
Two settings tabs, one operator goal: make sure participants can recognise your brand at the bottom of every page (Footer) and reach you when something matters (Contact). On Pro you get both. The point of doing them together is they share the same fifteen-minute setup window.
## Before You Begin
* You're on **Pro** (or **Enterprise**). Trial and Pay As You Go cannot edit footer or contact settings.
* You have:
* **Footer text** ready (copyright line, tagline, or short legal note).
* **Social media URLs** for the platforms you want to link.
* An **About Us** paragraph (a few sentences about your organisation).
* (Optional) An embedded contact form's iframe URL — most form builders (Tally, Google Forms, HubSpot, JotForm, Typeform) provide this.
## Footer & Social
### Steps
Click **Settings** → **Footer & Social** tab.
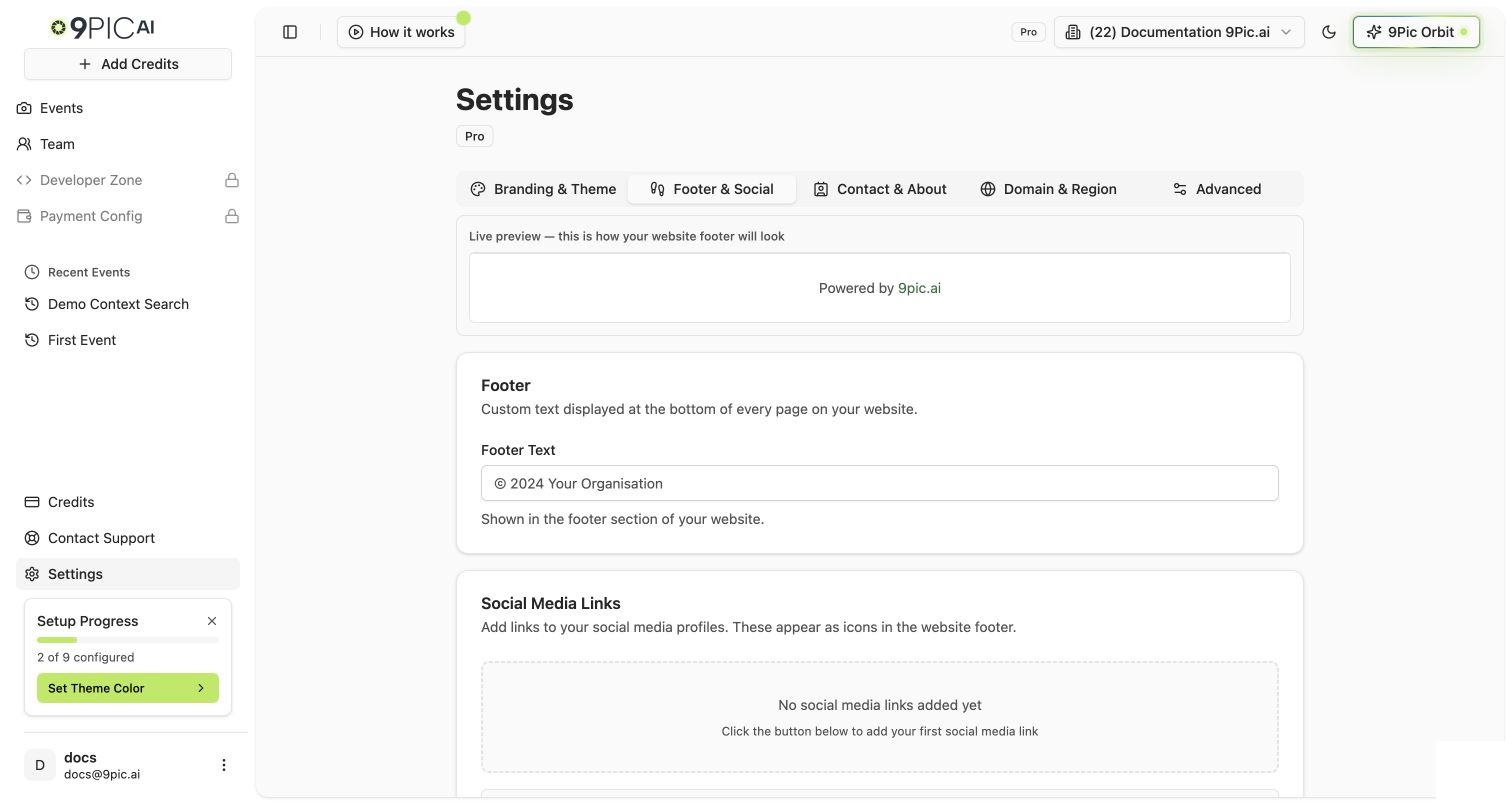 In the **Footer Text** field, type the copy that appears at the bottom of every page on your gallery website. Common patterns:
* `© 2026 Your Brand. All rights reserved.`
* `Powered by Your Brand • Bringing you closer to your event memories`
* `© 2026 Your Brand. Photos hosted by 9Pic.`
Keep it under one or two lines.
Click **+ Add Social Link** to add a row. For each row:
* **Platform** — pick from the dropdown (Facebook, Instagram, X, YouTube, LinkedIn, etc.).
* **URL** — full URL to your profile (`https://instagram.com/yourbrand`).
Click the trash icon to remove a row.
Click **Save Footer Changes** at the bottom of the page.
## Contact & About
### Steps
Click **Settings** → **Contact & About** tab.
In the **About Us** field, write a short paragraph about your organisation. This appears on the gallery's About page and helps participants understand who's running the event.
Keep it operator-honest: who you are, what events you organise, how long you've been doing it.
9Pic embeds an iframe of an external form so you can use whichever form builder your team already uses (Tally, Google Forms, HubSpot, JotForm, Typeform, etc.).
1. In your form builder, find the **Embed → iframe** option and copy the iframe `src` URL.
2. Paste it into the **Contact Form Iframe Source** field.
3. (Optional) If your form builder also requires an embed script (e.g. Tally), paste it into the **Script Source** field.
If you don't already use a form builder, **Tally** has a free tier that works well for event contact forms. Get the embed URL from Tally's *Share → Embed → iframe URL*.
Click **Save Contact Changes** at the bottom of the page.
## Recommended Settings
| Setting | Recommended | Why |
| ------------ | ------------------------------------- | ------------------------------------------------------------------------------------------------- |
| Footer text | One copyright line + one tagline | Keeps the footer visually clean. |
| Social links | Only platforms you actually update | Linking to a dormant Twitter/X profile hurts more than it helps. |
| About Us | 2–3 short sentences | Long About Us copy is rarely read on mobile. |
| Contact form | Use your existing CRM-integrated form | Avoid double inbox. If you already triage via HubSpot or Tally → email, embed that form directly. |
The contact form is **embedded** as an iframe. Every submission goes to your form builder, **not** to 9Pic. Make sure your form builder has a working email notification or webhook before you launch the gallery.
## Common Questions
On every page of your gallery website — event listings, individual event pages, the About page, and the contact page. It does **not** appear inside the dashboard itself.
The dropdown covers the most common platforms. If you need one we don't list, email [support@9pic.ai](mailto:support@9pic.ai) with the platform name and link format.
No. The contact form is intentionally an iframe of *your* form, so submissions land in *your* form builder. 9Pic does not store or relay form submissions on Pro.
Most form builders provide a recommended iframe height. If yours is taller than the default, ask the form builder for the recommended height/width and replace the iframe URL with one that includes those parameters.
Yes. All social links on your gallery website open in a new browser tab so participants don't lose their place in the gallery.
## Next Steps
Field-level reference in the Dashboard Guide.
Field-level reference in the Dashboard Guide.
Google Tag Manager and analytics tradeoffs.
Move the branded gallery to your own domain.
In the **Footer Text** field, type the copy that appears at the bottom of every page on your gallery website. Common patterns:
* `© 2026 Your Brand. All rights reserved.`
* `Powered by Your Brand • Bringing you closer to your event memories`
* `© 2026 Your Brand. Photos hosted by 9Pic.`
Keep it under one or two lines.
Click **+ Add Social Link** to add a row. For each row:
* **Platform** — pick from the dropdown (Facebook, Instagram, X, YouTube, LinkedIn, etc.).
* **URL** — full URL to your profile (`https://instagram.com/yourbrand`).
Click the trash icon to remove a row.
Click **Save Footer Changes** at the bottom of the page.
## Contact & About
### Steps
Click **Settings** → **Contact & About** tab.
In the **About Us** field, write a short paragraph about your organisation. This appears on the gallery's About page and helps participants understand who's running the event.
Keep it operator-honest: who you are, what events you organise, how long you've been doing it.
9Pic embeds an iframe of an external form so you can use whichever form builder your team already uses (Tally, Google Forms, HubSpot, JotForm, Typeform, etc.).
1. In your form builder, find the **Embed → iframe** option and copy the iframe `src` URL.
2. Paste it into the **Contact Form Iframe Source** field.
3. (Optional) If your form builder also requires an embed script (e.g. Tally), paste it into the **Script Source** field.
If you don't already use a form builder, **Tally** has a free tier that works well for event contact forms. Get the embed URL from Tally's *Share → Embed → iframe URL*.
Click **Save Contact Changes** at the bottom of the page.
## Recommended Settings
| Setting | Recommended | Why |
| ------------ | ------------------------------------- | ------------------------------------------------------------------------------------------------- |
| Footer text | One copyright line + one tagline | Keeps the footer visually clean. |
| Social links | Only platforms you actually update | Linking to a dormant Twitter/X profile hurts more than it helps. |
| About Us | 2–3 short sentences | Long About Us copy is rarely read on mobile. |
| Contact form | Use your existing CRM-integrated form | Avoid double inbox. If you already triage via HubSpot or Tally → email, embed that form directly. |
The contact form is **embedded** as an iframe. Every submission goes to your form builder, **not** to 9Pic. Make sure your form builder has a working email notification or webhook before you launch the gallery.
## Common Questions
On every page of your gallery website — event listings, individual event pages, the About page, and the contact page. It does **not** appear inside the dashboard itself.
The dropdown covers the most common platforms. If you need one we don't list, email [support@9pic.ai](mailto:support@9pic.ai) with the platform name and link format.
No. The contact form is intentionally an iframe of *your* form, so submissions land in *your* form builder. 9Pic does not store or relay form submissions on Pro.
Most form builders provide a recommended iframe height. If yours is taller than the default, ask the form builder for the recommended height/width and replace the iframe URL with one that includes those parameters.
Yes. All social links on your gallery website open in a new browser tab so participants don't lose their place in the gallery.
## Next Steps
Field-level reference in the Dashboard Guide.
Field-level reference in the Dashboard Guide.
Google Tag Manager and analytics tradeoffs.
Move the branded gallery to your own domain.