> ## Documentation Index
> Fetch the complete documentation index at: https://docs.9pic.ai/llms.txt
> Use this file to discover all available pages before exploring further.
# Run an Event
> End-to-end event flow on Pay As You Go, with credit costs called out at every step
## Why This Matters
Running an event on Pay As You Go is operationally identical to running one on Pro — same gallery, same sync, same AI search. The difference is the meter is on. This page walks through the same end-to-end flow as the Dashboard Guide, but with the **credit cost** called out at every step so you know what's about to come out of your balance.
For deep-dive reference on any single step, link out to the corresponding [Dashboard Guide](/dashboard-guide) page.
## Before You Begin
* You're on the **Pay As You Go** plan (your sidebar shows the **Pay As You Go** badge).
* You have an idea of how many photos this event will produce. Multiply by \~1.1 to estimate credit cost (1 credit per processed photo with AI on, plus a small buffer).
* Your **available credits** balance covers your estimate. Open **Credits** in the sidebar to confirm.
* You're an **admin** of the organisation. Operators can run events but cannot top up credits.
**Plan your top-up before the event, not during.** Processing pauses the moment you hit zero credits. Top up to \~1.5× your event estimate so a busy day doesn't stall mid-sync.
## The 7-Step Event Flow on Pay As You Go
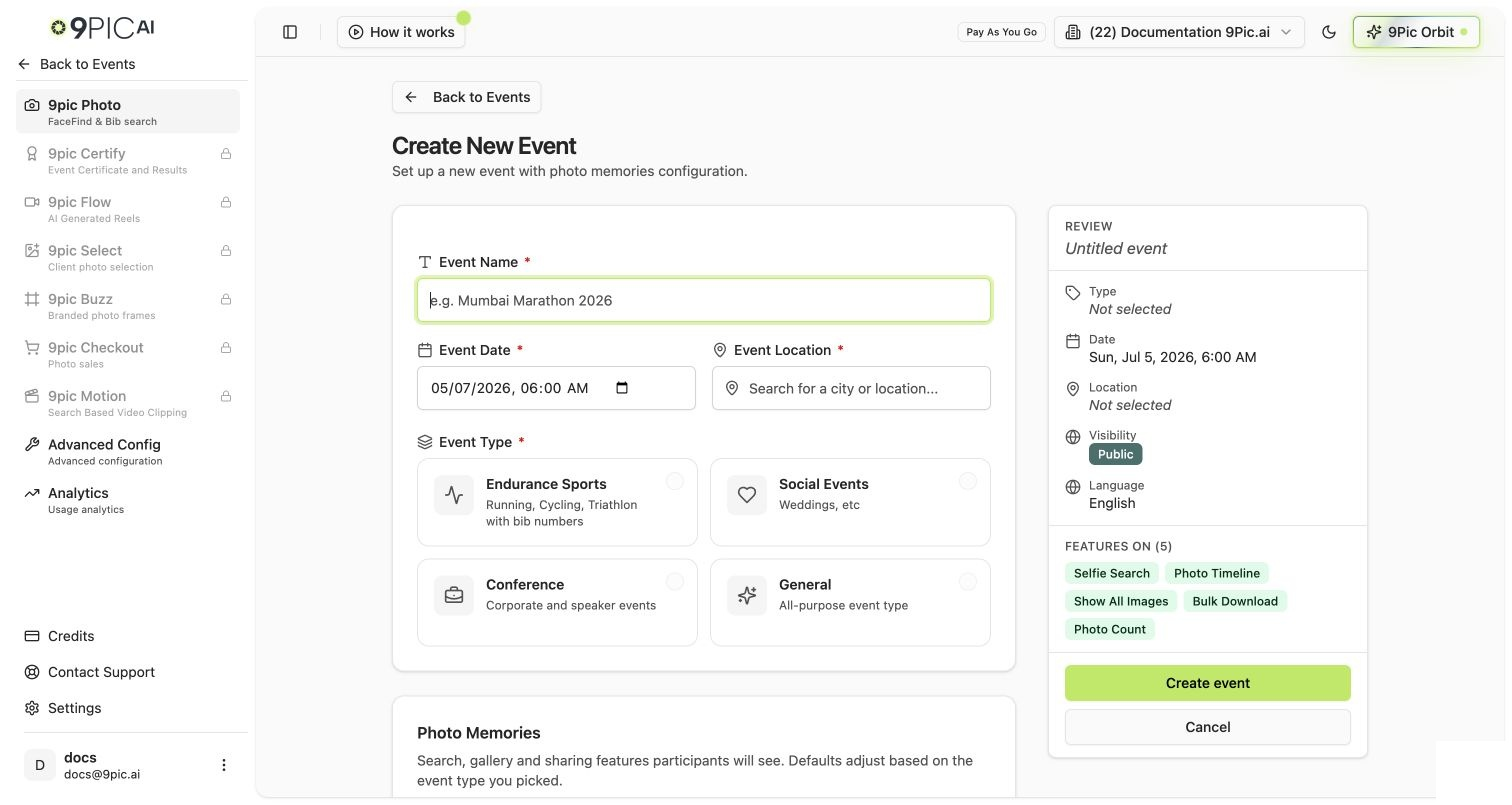
Sidebar → **Events** → **Create Event**.
On Pay As You Go you can set **Platform Visibility** to **Public** (trial accounts couldn't). Public events are accessible at `app.9pic.ai/` to anyone with the link.
**Credit cost: 0.** Creating an event is free.
 On the event details page, open the **Configuration** tab and check:
* **Enable Selfie Search** (powered by 9Pic FaceFind)
* **Enable BIB Search** (powered by 9Pic BibTrack)
These two toggles are the single biggest credit-cost lever. **If both are off, processing this event's photos consumes 0 credits.** If either is on, processing consumes 1 credit per photo.
Most public-facing events keep at least one on (otherwise the search experience is degraded). Internal-only galleries can leave both off and process for free.
**Store Original Memories** is a separate setting on **Create New Event**. Leaving it on stores full-resolution originals and adds to your usage. Leave it off unless your event explicitly needs originals (sales, archival).
Use **9Pic Uplink** (desktop uploader) for large batches, or drag & drop directly into the event gallery for small batches.
**Credit cost: 0** for the upload itself. Photos sit in **Pending** state and don't consume credits until you process them.
See [Camera Configuration Guide](/dashboard-guide/event-requirements/camera-configuration-guide) for camera settings that produce the best AI search results.
Click **Sync Images** → **Process Photos**. The dashboard shows you:
* The number of **pending photos** waiting.
* Your **available credits** balance.
* Whether the batch fits in your balance.
If the batch needs more credits than you have, the **Process** button is disabled and the dialog shows: "*You have N credits available, but need M credits for this processing job.*" Top up first, then come back.
**Use the Custom Batch option to test first.** Process **100 photos** with your settings before processing thousands. Verify the watermark, the search results, and the gallery look right. Then run the rest.
**Credit cost:** 1 credit per processed photo (when AI is enabled). 0 credits when AI is fully off.
Open the **Branding** tab on the event:
* **Cover image** — a gallery banner.
* **Watermark** — your logo or text overlay applied to processed photos.
* **Event name & description** — public-facing copy.
**Credit cost: 0** for changing branding settings. **But:** if you change the watermark **after** photos are already processed and you want the new watermark applied, see Step 7 (Re-process Watermark) — that does consume credits.
See [Branding](/dashboard-guide/photos/branding) for the full reference.
On the event overview, click **Go Live**. The dashboard runs the go-live checks (watermark configured, at least one processed batch, etc.) and flips the event to public.
Share the public link `app.9pic.ai/` with attendees. They can browse, search by face (FaceFind), or search by BIB (BibTrack) depending on the toggles you set in Step 2.
**Credit cost: 0** for going live. Search-side queries don't consume your credits — your bill is set at processing time.
See [Go-Live Failed troubleshooting](/dashboard-guide/troubleshooting/go-live-failed) if go-live fails.
If you go live and then realise the watermark is wrong, you can re-apply the new watermark to all already-processed photos.
From the event details, open **Reprocess Watermark**. The dashboard tells you exactly how many credits this will cost: **10% of your processed photo count.** Re-watermarking 5,000 processed photos uses 500 credits.
BIB tags, selfie-search index, and all other data are preserved — only the watermark overlay changes.
**Re-process watermark is the most common surprise PAYG bill.** Get the watermark right *before* you sync 5,000 photos. Test on a Custom Batch of 100 first.
## Credit Costs at a Glance for One Event
For a typical 5,000-photo public event with FaceFind enabled, BIB Search off, and Store Originals off:
| Action | Credit cost |
| -------------------------------------------------------- | ----------------- |
| Create event | 0 |
| Upload 5,000 photos | 0 |
| Process 5,000 photos with FaceFind on | 5,000 |
| Brand & go live | 0 |
| Re-process watermark *if* you need to fix it post-launch | 500 |
| **Best case (no re-process)** | **5,000 credits** |
| **Worst case (one re-process)** | **5,500 credits** |
Multiply by your per-credit cost (visible on **Credits → Available Credits → Show**) for the dollar number.
## Common Questions
Yes. If both **Enable Selfie Search** and **Enable BIB Search** are off, processing those photos uses 0 credits. The trade-off is your attendees won't have face search or BIB search — they'll have to scroll the gallery manually. For internal-only galleries, this is fine.
Already-processed photos stay live and searchable. New photos queue and wait in **Pending** state. Top up at **Credits → Purchase Credits** (minimum 1,000 credits), then click **Sync Images** again on the affected event. Processing resumes automatically.
Sync Images pulls newly uploaded photos into the dashboard and stages them for processing. It doesn't consume credits — the actual processing step (which applies AI search and watermarking) is what uses credits.
Processing is asynchronous. For a typical event, expect under 30 minutes for several thousand photos. The event details page shows a live progress bar. You can close the tab — processing continues server-side.
Yes. Uploads queue independently of processing. Operators can keep adding photos via 9Pic Uplink while the previous batch is being processed.
## Next Steps
The full credit-cost cheatsheet by action type.
The 5 mistakes that burn the most credits.
Watch your balance and monthly usage.
Full Dashboard Guide reference for the Photos product.
On the event details page, open the **Configuration** tab and check:
* **Enable Selfie Search** (powered by 9Pic FaceFind)
* **Enable BIB Search** (powered by 9Pic BibTrack)
These two toggles are the single biggest credit-cost lever. **If both are off, processing this event's photos consumes 0 credits.** If either is on, processing consumes 1 credit per photo.
Most public-facing events keep at least one on (otherwise the search experience is degraded). Internal-only galleries can leave both off and process for free.
**Store Original Memories** is a separate setting on **Create New Event**. Leaving it on stores full-resolution originals and adds to your usage. Leave it off unless your event explicitly needs originals (sales, archival).
Use **9Pic Uplink** (desktop uploader) for large batches, or drag & drop directly into the event gallery for small batches.
**Credit cost: 0** for the upload itself. Photos sit in **Pending** state and don't consume credits until you process them.
See [Camera Configuration Guide](/dashboard-guide/event-requirements/camera-configuration-guide) for camera settings that produce the best AI search results.
Click **Sync Images** → **Process Photos**. The dashboard shows you:
* The number of **pending photos** waiting.
* Your **available credits** balance.
* Whether the batch fits in your balance.
If the batch needs more credits than you have, the **Process** button is disabled and the dialog shows: "*You have N credits available, but need M credits for this processing job.*" Top up first, then come back.
**Use the Custom Batch option to test first.** Process **100 photos** with your settings before processing thousands. Verify the watermark, the search results, and the gallery look right. Then run the rest.
**Credit cost:** 1 credit per processed photo (when AI is enabled). 0 credits when AI is fully off.
Open the **Branding** tab on the event:
* **Cover image** — a gallery banner.
* **Watermark** — your logo or text overlay applied to processed photos.
* **Event name & description** — public-facing copy.
**Credit cost: 0** for changing branding settings. **But:** if you change the watermark **after** photos are already processed and you want the new watermark applied, see Step 7 (Re-process Watermark) — that does consume credits.
See [Branding](/dashboard-guide/photos/branding) for the full reference.
On the event overview, click **Go Live**. The dashboard runs the go-live checks (watermark configured, at least one processed batch, etc.) and flips the event to public.
Share the public link `app.9pic.ai/` with attendees. They can browse, search by face (FaceFind), or search by BIB (BibTrack) depending on the toggles you set in Step 2.
**Credit cost: 0** for going live. Search-side queries don't consume your credits — your bill is set at processing time.
See [Go-Live Failed troubleshooting](/dashboard-guide/troubleshooting/go-live-failed) if go-live fails.
If you go live and then realise the watermark is wrong, you can re-apply the new watermark to all already-processed photos.
From the event details, open **Reprocess Watermark**. The dashboard tells you exactly how many credits this will cost: **10% of your processed photo count.** Re-watermarking 5,000 processed photos uses 500 credits.
BIB tags, selfie-search index, and all other data are preserved — only the watermark overlay changes.
**Re-process watermark is the most common surprise PAYG bill.** Get the watermark right *before* you sync 5,000 photos. Test on a Custom Batch of 100 first.
## Credit Costs at a Glance for One Event
For a typical 5,000-photo public event with FaceFind enabled, BIB Search off, and Store Originals off:
| Action | Credit cost |
| -------------------------------------------------------- | ----------------- |
| Create event | 0 |
| Upload 5,000 photos | 0 |
| Process 5,000 photos with FaceFind on | 5,000 |
| Brand & go live | 0 |
| Re-process watermark *if* you need to fix it post-launch | 500 |
| **Best case (no re-process)** | **5,000 credits** |
| **Worst case (one re-process)** | **5,500 credits** |
Multiply by your per-credit cost (visible on **Credits → Available Credits → Show**) for the dollar number.
## Common Questions
Yes. If both **Enable Selfie Search** and **Enable BIB Search** are off, processing those photos uses 0 credits. The trade-off is your attendees won't have face search or BIB search — they'll have to scroll the gallery manually. For internal-only galleries, this is fine.
Already-processed photos stay live and searchable. New photos queue and wait in **Pending** state. Top up at **Credits → Purchase Credits** (minimum 1,000 credits), then click **Sync Images** again on the affected event. Processing resumes automatically.
Sync Images pulls newly uploaded photos into the dashboard and stages them for processing. It doesn't consume credits — the actual processing step (which applies AI search and watermarking) is what uses credits.
Processing is asynchronous. For a typical event, expect under 30 minutes for several thousand photos. The event details page shows a live progress bar. You can close the tab — processing continues server-side.
Yes. Uploads queue independently of processing. Operators can keep adding photos via 9Pic Uplink while the previous batch is being processed.
## Next Steps
The full credit-cost cheatsheet by action type.
The 5 mistakes that burn the most credits.
Watch your balance and monthly usage.
Full Dashboard Guide reference for the Photos product.