> ## Documentation Index
> Fetch the complete documentation index at: https://docs.9pic.ai/llms.txt
> Use this file to discover all available pages before exploring further.
# Domain & Region
> Set your organisation region and manage your gallery website domain.
## Overview
The **Domain & Region** tab controls two parts of your public gallery website:
* **Region** — your organisation's country, used for billing and to pick the nearest website edge.
* **Domain** — the public web address visitors use to open your gallery website.
**Plan availability:**
| Feature | Trial | Pay As You Go | Pro | Enterprise |
| :----------------------------------------------- | :----------- | :------------ | :-------- | :--------- |
| View the current domain | View only | View only | Available | Available |
| Edit Region | Available | Available | Available | Available |
| Use a `yourname.9pic.ai` platform subdomain | Not included | Not included | Available | Available |
| Connect a custom domain (`photos.yourbrand.com`) | Not included | Not included | Available | Available |
| Verify DNS, change, or remove a managed domain | Not included | Not included | Available | Available |
On Trial and Pay As You Go, the **Domain** card is read-only, but **Region** is still editable. Upgrade to Pro or contact 9Pic for an Enterprise plan to connect a platform subdomain or custom domain.
 ## How to Open
Click **Settings** in the sidebar.
Click the **Domain & Region** tab.
You can also open it directly at `/settings?tab=domain`.
***
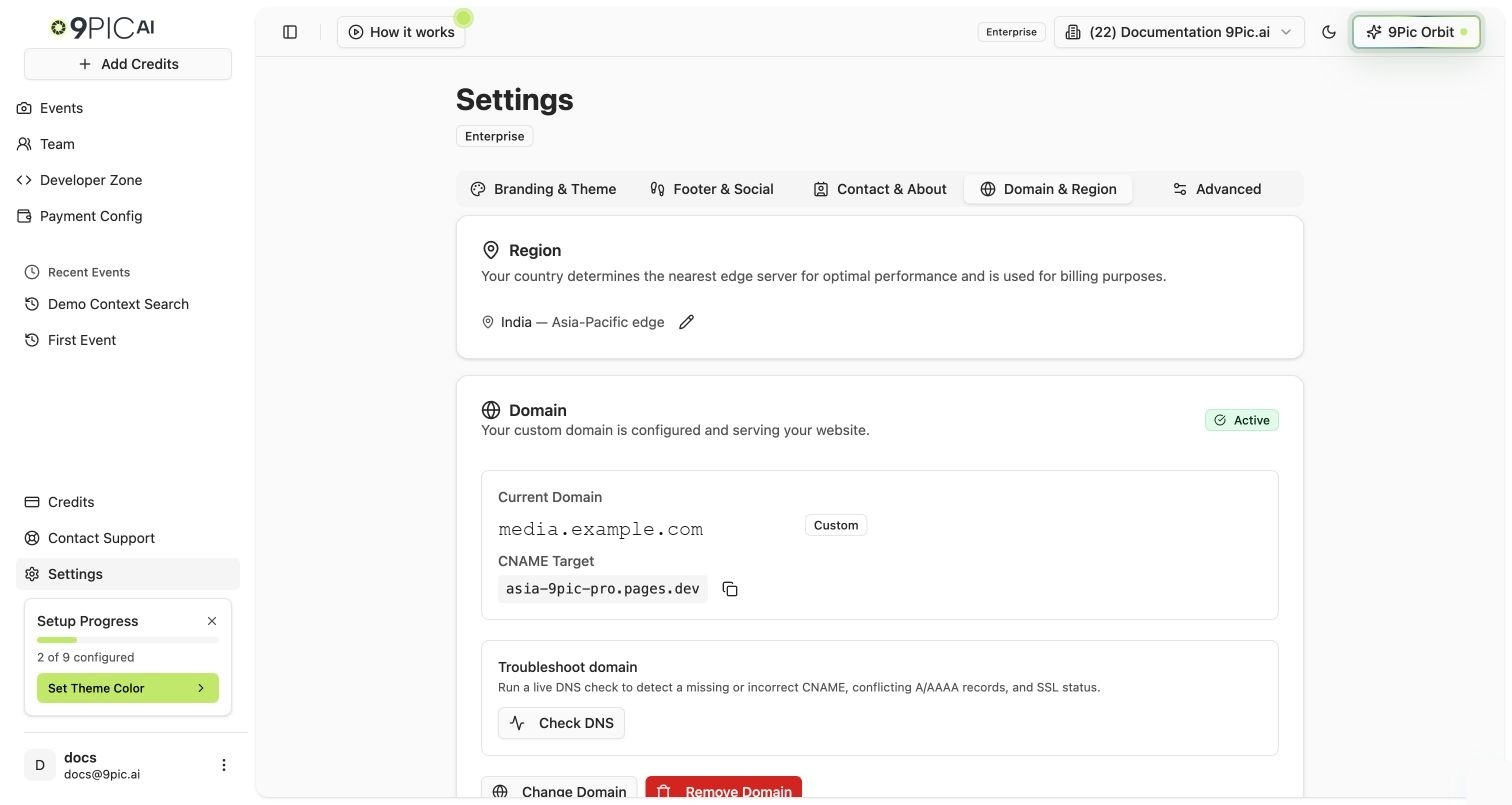
## Region
Your region starts with the country you selected during onboarding. It is used for billing and helps 9Pic pick the nearest website edge for better performance.
When a region is detected, the Region card shows the country name followed by the edge label — **Europe edge**, **Americas edge**, or **Asia-Pacific edge**.
In the **Region** card, click the pencil icon next to the current country.
Search for your country and pick it from the dropdown.
Click **Save Domain Changes** at the bottom of the page.
If no country has been set yet, the card says **Not set — nearest edge server will be auto-detected**.
***
## Domain — Trial and Pay As You Go (Read-Only)
Trial and Pay As You Go plans show the Domain card as read-only.
| What you see | What it means |
| :--------------- | :--------------------------------------------------------------------------------------------------------------------------------------------------------- |
| **Domain** | The current website address assigned to your organisation. Trial organisations usually see `trial.9pic.ai`; Pay As You Go organisations see `app.9pic.ai`. |
| **CNAME Target** | A DNS target value, shown only when one already exists for the organisation. The copy icon next to it copies the value to your clipboard. |
To switch to a platform subdomain or connect a custom domain, upgrade to **Pro** or **Enterprise**.
***
## Domain — Pro and Enterprise
On Pro and Enterprise plans, the Domain card shows the current domain, status badge, and action buttons.
### Domain Types
| Domain type | Example | Best for |
| :--------------------- | :--------------------- | :------------------------------------------------------------------------ |
| **Platform Subdomain** | `yourname.9pic.ai` | You want a branded 9Pic subdomain without DNS setup. |
| **Custom Domain** | `photos.yourbrand.com` | You own a domain and want participants to visit your own brand's address. |
### Domain Statuses
| Status | Meaning |
| :----------------------- | :----------------------------------------------------------------------- |
| **Active** | The domain is ready and serving traffic. |
| **Pending Verification** | DNS or SSL setup is still being checked. |
| **Initializing** | 9Pic is preparing the domain. |
| **Failed** | Verification did not complete. Check the DNS instructions and try again. |
The status appears as a coloured badge in the top right of the Domain card.
### Available Actions
The action buttons depend on whether a domain is configured and what its current status is.
| Button | When it appears | What it does |
| :-------------------- | :---------------------------------------- | :---------------------------------------------------------------------------------------------------- |
| **Add Custom Domain** | No custom domain configured yet. | Opens a guided choice: "I have a domain" or "I don't have a domain". |
| **Verify DNS** | A domain is configured but is not Active. | Re-checks DNS and SSL status. |
| **Change Domain** | A domain is already configured. | Opens the setup form to switch to a different domain or subdomain, with a risk-acknowledge checkbox. |
| **Remove Domain** | A domain is already configured. | Opens a confirmation dialog with a risk-acknowledge checkbox. Reverts to `app.9pic.ai` after removal. |
***
## Add a Domain
In the **Domain** card, click **Add Custom Domain**. A guided choice card appears with the recommendation.
Click **I have a domain** to connect your own domain, or **I don't have a domain** to use a free `yourname.9pic.ai` subdomain.
* For a **custom domain**, enter a full address such as `photos.yourcompany.com`.
* For a **platform subdomain**, enter only the slug, e.g. `your-org-name`. The dashboard appends `.9pic.ai`. The slug must be lowercase letters, numbers, or hyphens, 3–63 characters.
Click **Check**. A green message confirms the value is available; a red message tells you to pick a different one.
The preview block shows your current domain crossed out next to the new domain so you can confirm the change before saving.
Click **Configure Domain**. A toast confirms the domain has been set up. If it is a custom domain, the toast asks you to verify DNS next.
Platform subdomains are the fastest option. 9Pic manages DNS automatically and your subdomain is usually active within a few minutes.
***
## Connect a Custom Domain (CNAME)
For a custom domain, you must update DNS at the place where your domain is managed.
Follow **Add a Domain** above and choose **I have a domain**, then enter your domain (e.g. `photos.yourcompany.com`) and click **Configure Domain**.
The **CNAME Target** appears in the Domain card. Click the copy icon next to it.
Sign in to the place where you manage DNS for your domain and add a **CNAME record** that points your custom domain (or subdomain) to the copied CNAME Target. 9Pic links to short guides for GoDaddy, Wix, Hostinger, Namecheap, Google Domains, and Cloudflare from the Domain card.
DNS propagation and SSL provisioning can take up to **48 hours**.
Return to **Settings → Domain & Region** and click **Verify DNS**. A toast tells you whether the domain is now Active, still pending, or failed.
Changing DNS can affect live traffic for any other service on that domain. If you are not sure which record to edit, ask the person who manages your domain before making changes.
***
## Change a Domain
When a domain is already configured and you click **Change Domain**, the setup form opens with a risk-acknowledge alert.
In the **Domain** card, click **Change Domain**.
Pick **Platform Subdomain** or **Custom Domain** from the **Domain Type** dropdown and enter the new value. The preview shows the change from your current domain to the new one.
A yellow warning lists the risks (broken links, SEO impact, downtime up to 48 hours, SSL re-provisioning). Tick **I understand the risks and want to proceed** to enable the update button.
Click **Update Domain**. A toast confirms the change and asks you to verify DNS if needed.
Changing your domain can break existing event links, affect search rankings, and cause temporary downtime while DNS and SSL update.
***
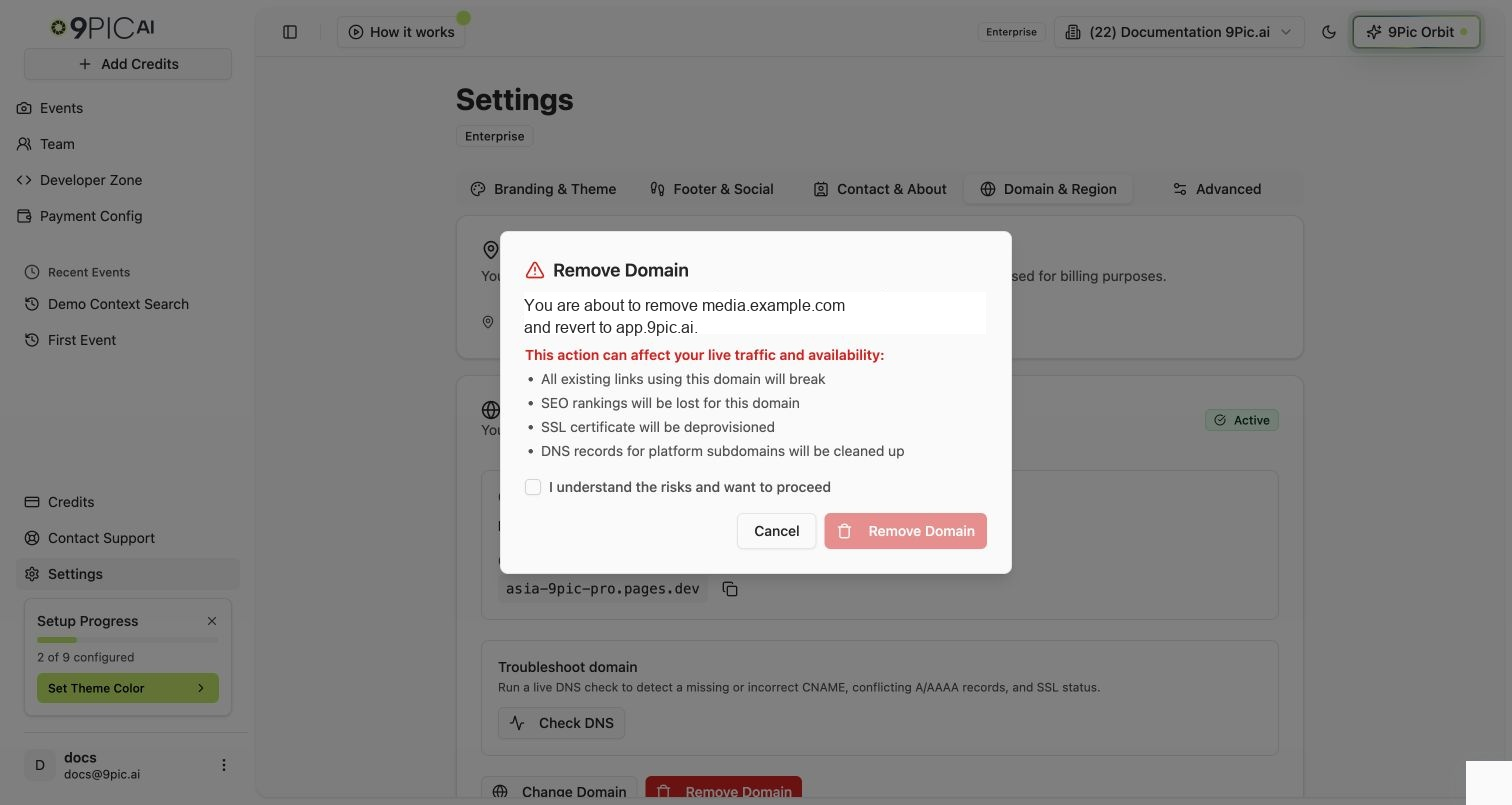
## Remove a Domain
In the **Domain** card, click **Remove Domain** (red button).
The dialog shows the domain you are about to remove and explains the impact — broken links, lost SEO rankings, SSL deprovisioning, and DNS cleanup for platform subdomains.
Tick **I understand the risks and want to proceed**. The **Remove Domain** button stays disabled until you do.
Click **Remove Domain** in the dialog. The website returns to the default `app.9pic.ai` domain and a toast confirms the change.
Removing a domain is permanent for that domain. Existing links using the old domain will break, and SSL for it will be deprovisioned.
## How to Open
Click **Settings** in the sidebar.
Click the **Domain & Region** tab.
You can also open it directly at `/settings?tab=domain`.
***
## Region
Your region starts with the country you selected during onboarding. It is used for billing and helps 9Pic pick the nearest website edge for better performance.
When a region is detected, the Region card shows the country name followed by the edge label — **Europe edge**, **Americas edge**, or **Asia-Pacific edge**.
In the **Region** card, click the pencil icon next to the current country.
Search for your country and pick it from the dropdown.
Click **Save Domain Changes** at the bottom of the page.
If no country has been set yet, the card says **Not set — nearest edge server will be auto-detected**.
***
## Domain — Trial and Pay As You Go (Read-Only)
Trial and Pay As You Go plans show the Domain card as read-only.
| What you see | What it means |
| :--------------- | :--------------------------------------------------------------------------------------------------------------------------------------------------------- |
| **Domain** | The current website address assigned to your organisation. Trial organisations usually see `trial.9pic.ai`; Pay As You Go organisations see `app.9pic.ai`. |
| **CNAME Target** | A DNS target value, shown only when one already exists for the organisation. The copy icon next to it copies the value to your clipboard. |
To switch to a platform subdomain or connect a custom domain, upgrade to **Pro** or **Enterprise**.
***
## Domain — Pro and Enterprise
On Pro and Enterprise plans, the Domain card shows the current domain, status badge, and action buttons.
### Domain Types
| Domain type | Example | Best for |
| :--------------------- | :--------------------- | :------------------------------------------------------------------------ |
| **Platform Subdomain** | `yourname.9pic.ai` | You want a branded 9Pic subdomain without DNS setup. |
| **Custom Domain** | `photos.yourbrand.com` | You own a domain and want participants to visit your own brand's address. |
### Domain Statuses
| Status | Meaning |
| :----------------------- | :----------------------------------------------------------------------- |
| **Active** | The domain is ready and serving traffic. |
| **Pending Verification** | DNS or SSL setup is still being checked. |
| **Initializing** | 9Pic is preparing the domain. |
| **Failed** | Verification did not complete. Check the DNS instructions and try again. |
The status appears as a coloured badge in the top right of the Domain card.
### Available Actions
The action buttons depend on whether a domain is configured and what its current status is.
| Button | When it appears | What it does |
| :-------------------- | :---------------------------------------- | :---------------------------------------------------------------------------------------------------- |
| **Add Custom Domain** | No custom domain configured yet. | Opens a guided choice: "I have a domain" or "I don't have a domain". |
| **Verify DNS** | A domain is configured but is not Active. | Re-checks DNS and SSL status. |
| **Change Domain** | A domain is already configured. | Opens the setup form to switch to a different domain or subdomain, with a risk-acknowledge checkbox. |
| **Remove Domain** | A domain is already configured. | Opens a confirmation dialog with a risk-acknowledge checkbox. Reverts to `app.9pic.ai` after removal. |
***
## Add a Domain
In the **Domain** card, click **Add Custom Domain**. A guided choice card appears with the recommendation.
Click **I have a domain** to connect your own domain, or **I don't have a domain** to use a free `yourname.9pic.ai` subdomain.
* For a **custom domain**, enter a full address such as `photos.yourcompany.com`.
* For a **platform subdomain**, enter only the slug, e.g. `your-org-name`. The dashboard appends `.9pic.ai`. The slug must be lowercase letters, numbers, or hyphens, 3–63 characters.
Click **Check**. A green message confirms the value is available; a red message tells you to pick a different one.
The preview block shows your current domain crossed out next to the new domain so you can confirm the change before saving.
Click **Configure Domain**. A toast confirms the domain has been set up. If it is a custom domain, the toast asks you to verify DNS next.
Platform subdomains are the fastest option. 9Pic manages DNS automatically and your subdomain is usually active within a few minutes.
***
## Connect a Custom Domain (CNAME)
For a custom domain, you must update DNS at the place where your domain is managed.
Follow **Add a Domain** above and choose **I have a domain**, then enter your domain (e.g. `photos.yourcompany.com`) and click **Configure Domain**.
The **CNAME Target** appears in the Domain card. Click the copy icon next to it.
Sign in to the place where you manage DNS for your domain and add a **CNAME record** that points your custom domain (or subdomain) to the copied CNAME Target. 9Pic links to short guides for GoDaddy, Wix, Hostinger, Namecheap, Google Domains, and Cloudflare from the Domain card.
DNS propagation and SSL provisioning can take up to **48 hours**.
Return to **Settings → Domain & Region** and click **Verify DNS**. A toast tells you whether the domain is now Active, still pending, or failed.
Changing DNS can affect live traffic for any other service on that domain. If you are not sure which record to edit, ask the person who manages your domain before making changes.
***
## Change a Domain
When a domain is already configured and you click **Change Domain**, the setup form opens with a risk-acknowledge alert.
In the **Domain** card, click **Change Domain**.
Pick **Platform Subdomain** or **Custom Domain** from the **Domain Type** dropdown and enter the new value. The preview shows the change from your current domain to the new one.
A yellow warning lists the risks (broken links, SEO impact, downtime up to 48 hours, SSL re-provisioning). Tick **I understand the risks and want to proceed** to enable the update button.
Click **Update Domain**. A toast confirms the change and asks you to verify DNS if needed.
Changing your domain can break existing event links, affect search rankings, and cause temporary downtime while DNS and SSL update.
***
## Remove a Domain
In the **Domain** card, click **Remove Domain** (red button).
The dialog shows the domain you are about to remove and explains the impact — broken links, lost SEO rankings, SSL deprovisioning, and DNS cleanup for platform subdomains.
Tick **I understand the risks and want to proceed**. The **Remove Domain** button stays disabled until you do.
Click **Remove Domain** in the dialog. The website returns to the default `app.9pic.ai` domain and a toast confirms the change.
Removing a domain is permanent for that domain. Existing links using the old domain will break, and SSL for it will be deprovisioned.
 ***
## Common Questions
Connecting a platform subdomain or custom domain is available on **Pro** and **Enterprise** plans. Trial and Pay As You Go plans see the Domain card as read-only — but **Region** is editable on every plan.
A platform subdomain uses `yourname.9pic.ai` and does not require DNS setup. A custom domain uses an address you own, such as `photos.yourbrand.com`, and requires you to add a CNAME record at your DNS provider.
DNS propagation and SSL provisioning can take up to **48 hours**. Check that your CNAME record points to the exact target shown in the Domain card, then click **Verify DNS**.
Lowercase letters, numbers, and hyphens only, **3–63 characters**. The slug picker strips invalid characters as you type.
Yes — Region is editable on every plan. Edit the country in the **Region** card and click **Save Domain Changes**. Domain actions are separate and don't depend on the Save button.
Your website returns to `app.9pic.ai`. The CNAME you had pointing to 9Pic will return errors until you remove or repoint it at your DNS provider.
## Next Steps
Configure Google Tag Manager once your domain is live.
Back to all settings.
***
## Common Questions
Connecting a platform subdomain or custom domain is available on **Pro** and **Enterprise** plans. Trial and Pay As You Go plans see the Domain card as read-only — but **Region** is editable on every plan.
A platform subdomain uses `yourname.9pic.ai` and does not require DNS setup. A custom domain uses an address you own, such as `photos.yourbrand.com`, and requires you to add a CNAME record at your DNS provider.
DNS propagation and SSL provisioning can take up to **48 hours**. Check that your CNAME record points to the exact target shown in the Domain card, then click **Verify DNS**.
Lowercase letters, numbers, and hyphens only, **3–63 characters**. The slug picker strips invalid characters as you type.
Yes — Region is editable on every plan. Edit the country in the **Region** card and click **Save Domain Changes**. Domain actions are separate and don't depend on the Save button.
Your website returns to `app.9pic.ai`. The CNAME you had pointing to 9Pic will return errors until you remove or repoint it at your DNS provider.
## Next Steps
Configure Google Tag Manager once your domain is live.
Back to all settings.