> ## Documentation Index
> Fetch the complete documentation index at: https://docs.9pic.ai/llms.txt
> Use this file to discover all available pages before exploring further.
# Photo Overview
> The processing pipeline for sources, sync, processing, and publishing your event photos.
## Overview
The **Overview** tab is the control centre for 9Pic Photo. It is where you connect image sources, sync photos into 9Pic, run AI processing (face recognition, bib detection, optional watermarking), and publish the event so participants can search and download their photos.
The tab has two regions: a **status strip** at the top, and the **four-step processing pipeline** below it.
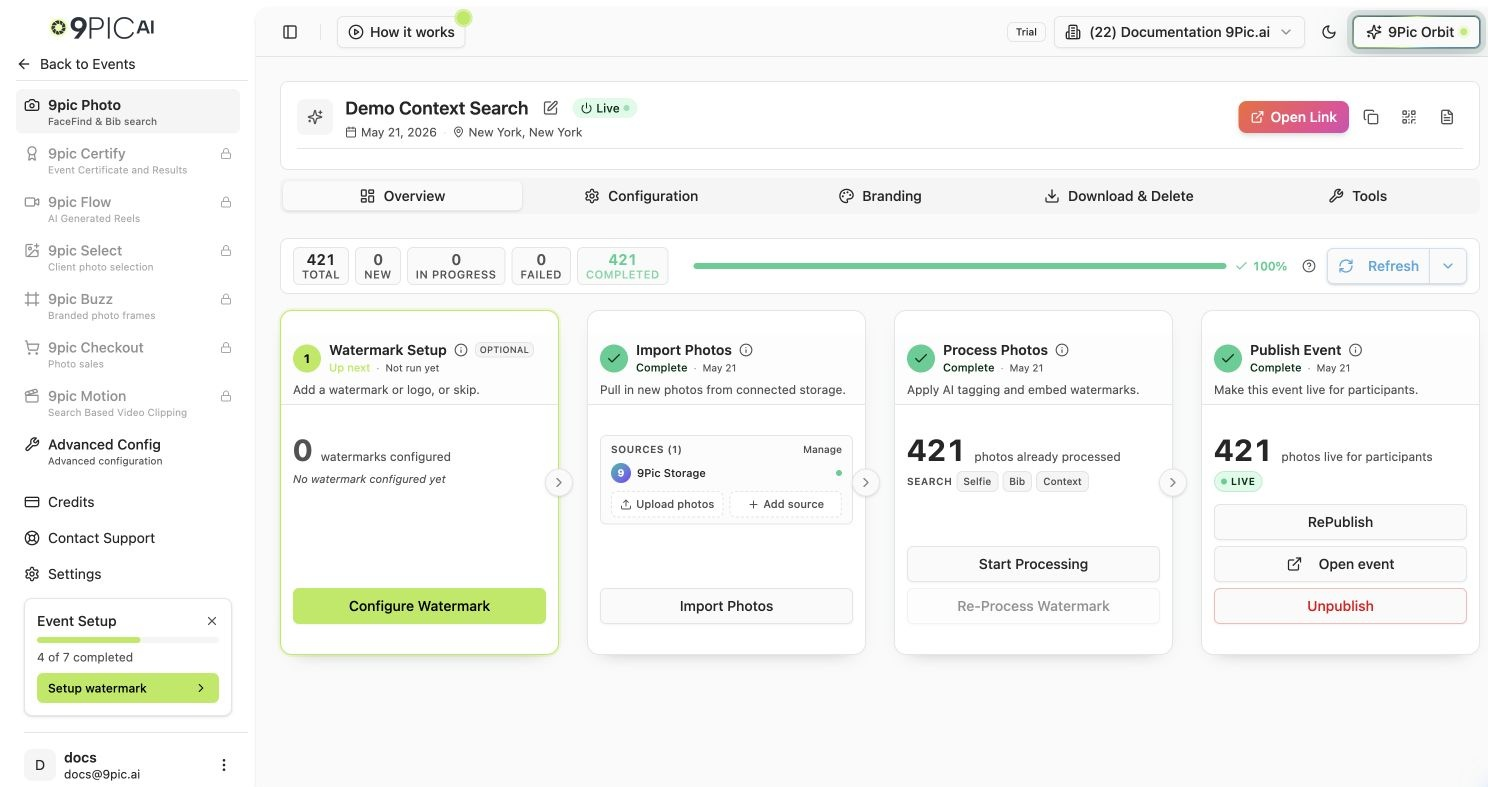 ## The Status Strip
The strip across the top summarises where your photos are in the pipeline:
| Stat | What it means |
| --------------- | --------------------------------------------------------------- |
| **Total** | Every image 9Pic knows about for this event |
| **Processed** | Images that finished AI processing and are searchable |
| **In Progress** | Images currently being processed |
| **Failed** | Images that could not be processed (open the report to see why) |
A **Refresh** button re-pulls the latest status on demand, and an **auto-refresh** toggle pauses or resumes the automatic polling while a step is running.
## The Four-Step Pipeline
The pipeline runs top to bottom. Each step is a card that shows its status, a primary action, and a recommended-next highlight so you always know what to do next.
Add a logo, sponsor mark, or copyright overlay that is burned onto every processed photo. Click **Configure Watermark** to upload portrait and landscape art, then **Generate Preview** to check placement before processing. Skip this step entirely if you don't need branding. See [Branding](/dashboard-guide/photos/branding).
Connect your photo **sources** and pull images into 9Pic. The Sources manager lives inside this step. Run **Sync Images** to import new photos; it only pulls what's new, so it's safe to re-run.
Run AI processing on synced images — face recognition, bib detection, and watermarking (if configured). Processing consumes credits, so the event needs enough balance to finish.
Click **Publish** to make processed photos live on the public event page. Only processed photos appear; newly imported ones stay hidden until you process them. Use **Unpublish** to take the event offline again, or **Open event** to preview the participant page.
The pipeline highlights the **recommended next step**. You don't have to follow it in strict order, but Publish is gated until Step 3 has processed at least some photos.
## Managing Sources (Step 2)
Sources tell 9Pic where your event photos live. After connecting a source, run **Sync Images** to import new photos.
In **Step 2 — Sync Images**, open **Manage Sources**.
Click **Add Source**, pick a **Source Type**, and paste the **Source URL** for the folder you want to import.
After saving, make sure the source shows **Live**. If it doesn't, reopen it and fix the URL or permissions.
Run **Sync Images** to pull photos in.
| Source type | What to paste |
| ---------------------- | --------------------------------------------------------------------------------------------- |
| **9Pic Storage** | Upload directly to 9Pic, or point the source at the event folder shown in the Sources manager |
| **Google Drive** | The Drive folder link copied from your browser address bar |
| **Dropbox / OneDrive** | The shared folder link (the same link you'd send a teammate) |
| **AWS S3** | The bucket + prefix your team configured for this event |
External providers (Google Drive, S3, and similar) may require you to connect credentials first. Use **Upload Credentials** / **Upload Photos** in the Overview tab to connect a provider or upload images directly from your computer or the desktop uploader.
Point each source at the **single folder** for this event. If a source points at the wrong folder, participants may see photos from another event. Always verify the folder before processing.
## If Publish Fails on Rotated Images
When Step 4 fails because the AI flagged rotated photos, the Publish card shows two extra buttons:
* **Open AI Analysis** — jump to the rotation review tool to fix orientations. See [AI Image Analysis](/dashboard-guide/photos/ai-analysis).
* **Skip AI Analysis** — publish anyway, leaving the flagged images as-is.
## Common Questions
Yes. Sync only imports new images, so it's safe to re-run after you add more photos to a source.
No. Processing creates searchable, optionally watermarked copies. Your original files stay in your source.
Publish needs at least some processed photos. Finish Step 3 (Process Photos) first. If processing is paused, check your [credit balance](/dashboard-guide/credits).
Click **Unpublish** on the Publish card. The event moves back to draft and participants can no longer access photos until you publish again.
## Next Steps
Search methods, display options, downloads, and bib detection.
Watermarks, event banner, and the custom landing page.
Download originals and permanently remove photos.
Review and fix rotated photos flagged during publish.
## The Status Strip
The strip across the top summarises where your photos are in the pipeline:
| Stat | What it means |
| --------------- | --------------------------------------------------------------- |
| **Total** | Every image 9Pic knows about for this event |
| **Processed** | Images that finished AI processing and are searchable |
| **In Progress** | Images currently being processed |
| **Failed** | Images that could not be processed (open the report to see why) |
A **Refresh** button re-pulls the latest status on demand, and an **auto-refresh** toggle pauses or resumes the automatic polling while a step is running.
## The Four-Step Pipeline
The pipeline runs top to bottom. Each step is a card that shows its status, a primary action, and a recommended-next highlight so you always know what to do next.
Add a logo, sponsor mark, or copyright overlay that is burned onto every processed photo. Click **Configure Watermark** to upload portrait and landscape art, then **Generate Preview** to check placement before processing. Skip this step entirely if you don't need branding. See [Branding](/dashboard-guide/photos/branding).
Connect your photo **sources** and pull images into 9Pic. The Sources manager lives inside this step. Run **Sync Images** to import new photos; it only pulls what's new, so it's safe to re-run.
Run AI processing on synced images — face recognition, bib detection, and watermarking (if configured). Processing consumes credits, so the event needs enough balance to finish.
Click **Publish** to make processed photos live on the public event page. Only processed photos appear; newly imported ones stay hidden until you process them. Use **Unpublish** to take the event offline again, or **Open event** to preview the participant page.
The pipeline highlights the **recommended next step**. You don't have to follow it in strict order, but Publish is gated until Step 3 has processed at least some photos.
## Managing Sources (Step 2)
Sources tell 9Pic where your event photos live. After connecting a source, run **Sync Images** to import new photos.
In **Step 2 — Sync Images**, open **Manage Sources**.
Click **Add Source**, pick a **Source Type**, and paste the **Source URL** for the folder you want to import.
After saving, make sure the source shows **Live**. If it doesn't, reopen it and fix the URL or permissions.
Run **Sync Images** to pull photos in.
| Source type | What to paste |
| ---------------------- | --------------------------------------------------------------------------------------------- |
| **9Pic Storage** | Upload directly to 9Pic, or point the source at the event folder shown in the Sources manager |
| **Google Drive** | The Drive folder link copied from your browser address bar |
| **Dropbox / OneDrive** | The shared folder link (the same link you'd send a teammate) |
| **AWS S3** | The bucket + prefix your team configured for this event |
External providers (Google Drive, S3, and similar) may require you to connect credentials first. Use **Upload Credentials** / **Upload Photos** in the Overview tab to connect a provider or upload images directly from your computer or the desktop uploader.
Point each source at the **single folder** for this event. If a source points at the wrong folder, participants may see photos from another event. Always verify the folder before processing.
## If Publish Fails on Rotated Images
When Step 4 fails because the AI flagged rotated photos, the Publish card shows two extra buttons:
* **Open AI Analysis** — jump to the rotation review tool to fix orientations. See [AI Image Analysis](/dashboard-guide/photos/ai-analysis).
* **Skip AI Analysis** — publish anyway, leaving the flagged images as-is.
## Common Questions
Yes. Sync only imports new images, so it's safe to re-run after you add more photos to a source.
No. Processing creates searchable, optionally watermarked copies. Your original files stay in your source.
Publish needs at least some processed photos. Finish Step 3 (Process Photos) first. If processing is paused, check your [credit balance](/dashboard-guide/credits).
Click **Unpublish** on the Publish card. The event moves back to draft and participants can no longer access photos until you publish again.
## Next Steps
Search methods, display options, downloads, and bib detection.
Watermarks, event banner, and the custom landing page.
Download originals and permanently remove photos.
Review and fix rotated photos flagged during publish.