> ## Documentation Index
> Fetch the complete documentation index at: https://docs.9pic.ai/llms.txt
> Use this file to discover all available pages before exploring further.
# PayMongo Setup
> Add PayMongo credentials to 9Pic Checkout and prepare a PHP event for test or live payments.
9Pic Checkout is a **Beta**, **Enterprise plan** feature. Only team admins can add or change a PayMongo configuration.
## Overview
PayMongo collects payments for 9Pic Checkout in the Philippines. Add one PayMongo configuration for your organisation, then assign it to the event that will sell packages in **PHP**.
You need a **secret key** from the PayMongo Dashboard. Use a test key while you check the buyer journey, and a live key only when the event is ready to accept real payments.
## Before You Start
| Requirement | Why it matters |
| ------------------------------ | ------------------------------------------------------------------------------------------- |
| **PayMongo merchant access** | You need permission to view **Developers -> API keys** in the PayMongo Dashboard. |
| **Correct mode** | Use a `sk_test_…` key for setup checks. Use a separate `sk_live_…` key for public checkout. |
| **A team admin account** | Only team admins can open and manage Payment Configuration. |
| **An Enterprise organisation** | Payment Configuration and 9Pic Checkout are available on the Enterprise plan. |
| **PHP packages** | Events that use PayMongo can only sell packages priced in PHP. |
Do not share the secret key in email, chat, task tickets, screenshots, frontend code, or a public repository. If you think it has been exposed, create a new key in PayMongo and update the configuration in 9Pic.
## Get Your PayMongo Secret Key
Sign in to the PayMongo Dashboard and open **Developers -> API keys**.
Copy the **secret key** for test mode or live mode. Test keys start with `sk_test_`. Live keys start with `sk_live_`.
Keep the key in your organisation's approved password manager until you add it to 9Pic. Do not paste it into a buyer-facing website or app.
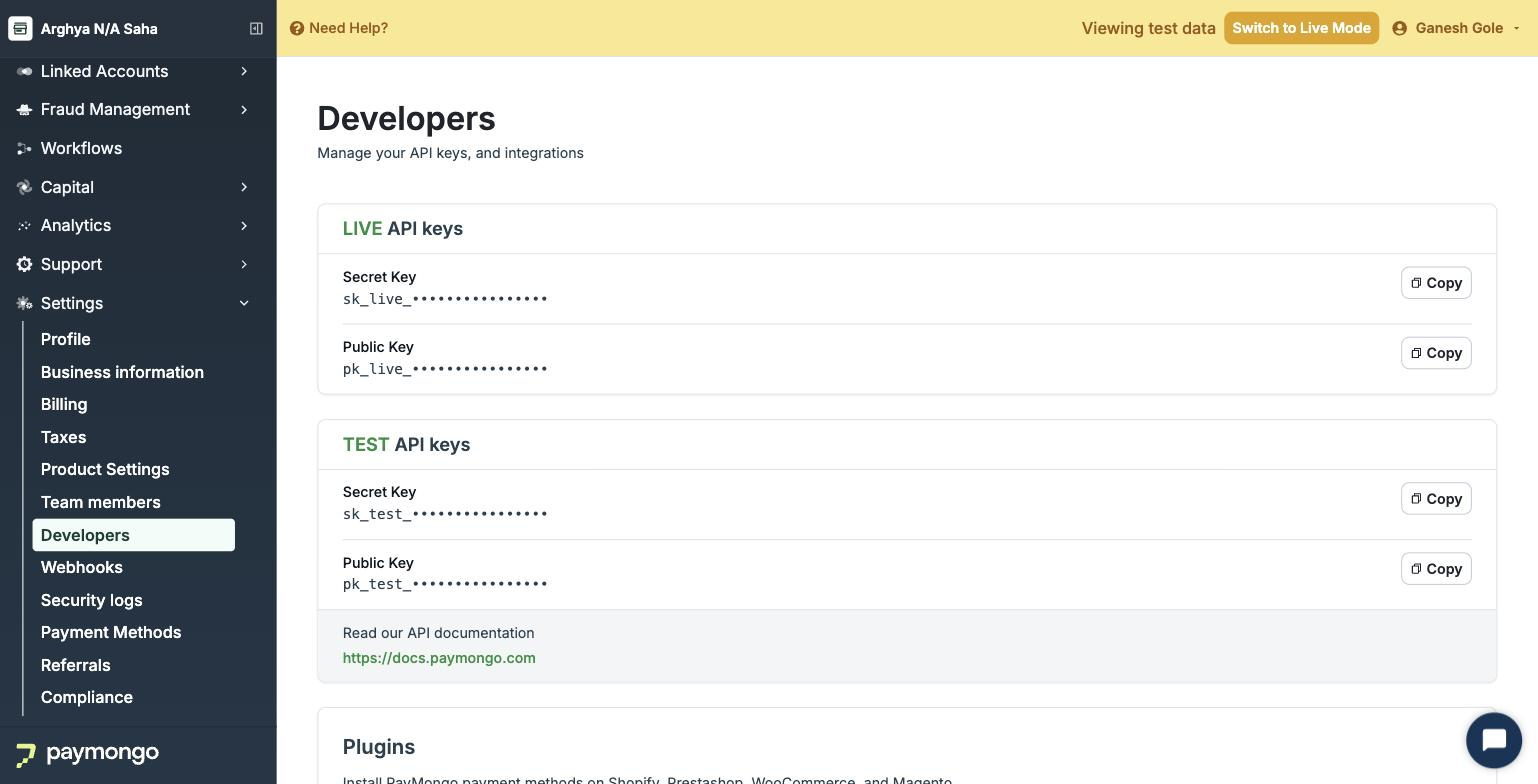
Need help finding the keys in PayMongo? Use the [PayMongo API keys guide](https://docs.paymongo.com/docs/api-keys) or contact the PayMongo team that provisioned your merchant account.
## Add PayMongo to 9Pic
In the dashboard sidebar, select **Payment Config**.
In **Payment Gateway Configurations**, click **Add Gateway**, then select **PayMongo**.
Enter an optional **Label** that makes the configuration easy to recognise, such as `PayMongo Test` or `PayMongo Live Philippines`.
**Account ID** is optional for PayMongo. Use it only if your team wants a reminder of which PayMongo account the key belongs to.
Paste the key into **PayMongo Secret Key**. This required value is stored as a protected credential for your organisation.
Click **Create Gateway**. The new PayMongo configuration appears in the organisation's gateway list.
## Assign PayMongo to an Event
Open the event, then open its **Checkout** configuration.
In the **Payment gateway** card, select **Assign** (or **Edit** if a gateway is already assigned), choose the PayMongo configuration, and save.
When PayMongo is selected, the **Pass on fees** switch is available. Leave it off to keep the listed package price as the charged amount. Turn it on if buyers should pay the payment-provider fee on the PayMongo page. Package prices stay the same; the total shown on the payment page may increase depending on the payment method.
Create or update Checkout packages in **PHP**. Other currencies cannot be used with PayMongo. Each package must be at least PHP 1.00.
Publish the packages and run a complete buyer journey with a `sk_test_` configuration before you switch the event to a live key.
Replacing the assigned gateway while Checkout is live pauses Checkout first. Confirm the new configuration and package currency before you publish it again.
## Verify the Setup
| Check | What to confirm |
| ------------------------ | --------------------------------------------------------------------------------- |
| **Correct mode** | Test events use a `sk_test_` key; public checkout uses a `sk_live_` key. |
| **Payment page opens** | A buyer can continue from 9Pic to the PayMongo hosted payment page. |
| **Payment completes** | A successful test payment returns to 9Pic and marks the order paid. |
| **Currency is PHP** | Package prices and the PayMongo payment page both show PHP. |
| **Buyer methods appear** | Card, GCash, Maya, GrabPay, and QR Ph appear as enabled on your PayMongo account. |
| **Cancellation works** | Cancelling returns the buyer to 9Pic without marking the order paid. |
## Troubleshooting
Edit the PayMongo configuration in **Payment Config** and confirm that **PayMongo Secret Key** has a value. Then assign that configuration on the event's **Payment gateway** card.
A `sk_test_` key is only for setup checks and cannot complete public checkout. Add or update the configuration with a `sk_live_` key from PayMongo live mode.
Events assigned to PayMongo can only sell PHP packages. Choose PHP, or assign a gateway that supports the currency you need.
9Pic requests those methods when they are available on your PayMongo account. Enable the method in PayMongo, then retry a test purchase.
Check whether **Pass on fees** is on for the event. When that switch is on, buyers pay the payment-provider fee and the PayMongo page total can be higher than the listed package price.
## Next Steps
Manage the payment gateways saved for your organisation.
Assign a gateway, publish packages, and enable Checkout for an event.