> ## Documentation Index
> Fetch the complete documentation index at: https://docs.9pic.ai/llms.txt
> Use this file to discover all available pages before exploring further.
# AFS Gateway Setup
> Add AFS Gateway credentials to 9Pic Checkout and prepare an event for test or live payments.
9Pic Checkout is a **Beta**, **Enterprise plan** feature. Only team admins can add or change an AFS Gateway configuration.
## Overview
AFS Gateway uses Mastercard Hosted Checkout to collect payments for 9Pic Checkout. Add one AFS configuration for your organisation, then assign it to the event that will sell packages.
You need two values from your AFS merchant setup: a **Merchant ID** and an **API password**. The Merchant ID identifies the account; the API password is private and should be handled like a password.
TODO screenshot (Codex Chrome required): Capture the Add Payment Gateway dialog with AFS Gateway selected, using redacted placeholder credentials.
## Before You Start
| Requirement | Why it matters |
| ------------------------------ | ---------------------------------------------------------------------------------------------------------------------- |
| **AFS merchant access** | You need the Merchant ID and API password issued for the AFS account you will use. |
| **Correct environment** | A Merchant ID starting with `TEST` uses the AFS simulator. AFS provides a separate live Merchant ID for real payments. |
| **A team admin account** | Only team admins can open and manage Payment Configuration. |
| **An Enterprise organisation** | Payment Configuration and 9Pic Checkout are available on the Enterprise plan. |
| **Supported event currency** | AFS package prices can use BHD, USD, AED, SAR, or QAR. |
Do not share the API password in email, chat, task tickets, screenshots, frontend code, or a public repository. If you think it has been exposed, replace it in AFS and update the configuration in 9Pic.
## Get Your AFS Credentials
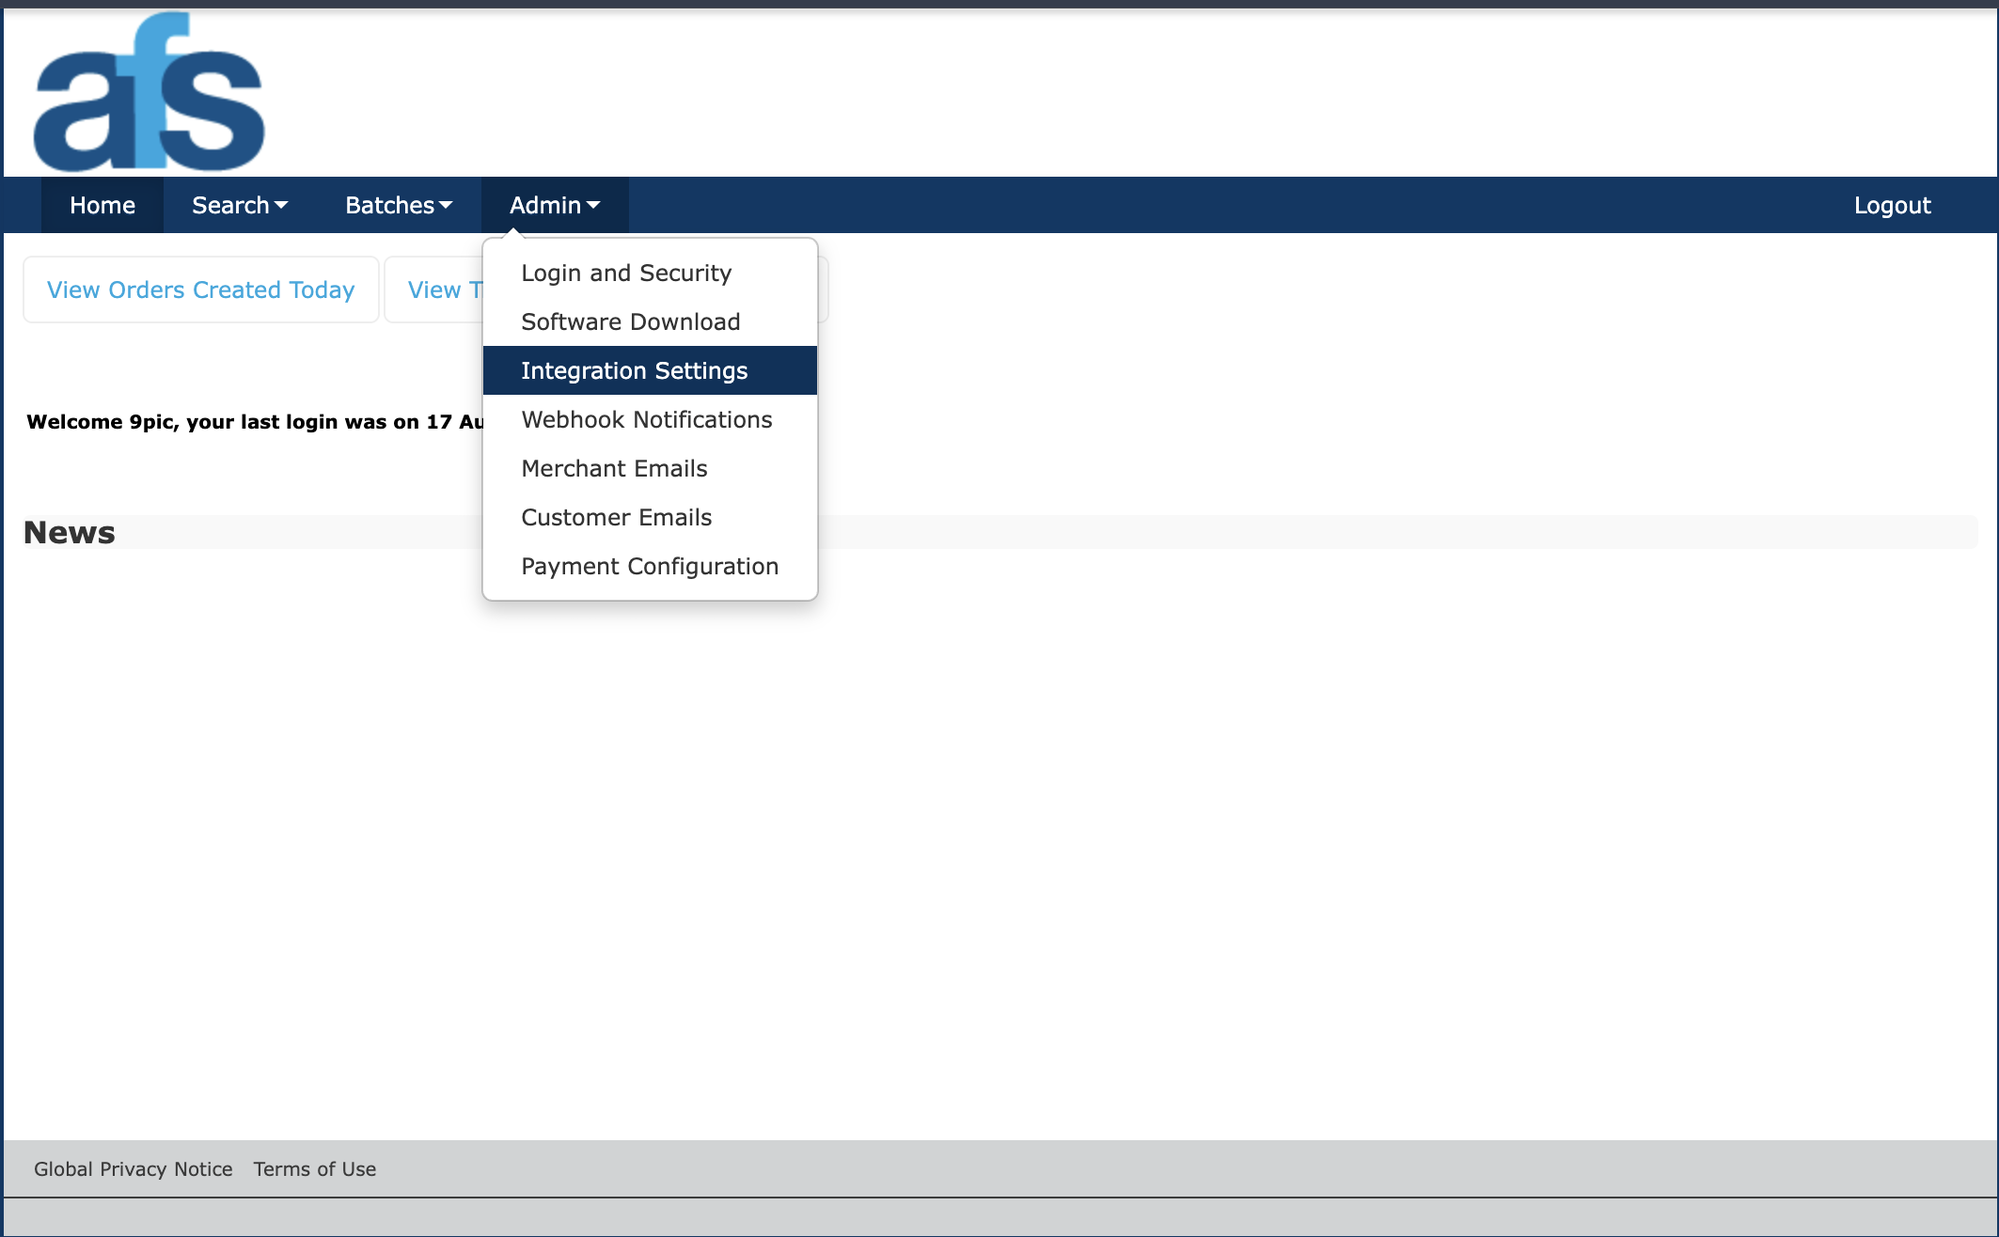 Sign in to the AFS merchant administration area for the account you plan to use. Open **Admin -> Integration Settings** and find the **Integration Authentication** section.
Copy **Password 1** from the Integration Authentication section. Paste this value into the **AFS API Password** field in 9Pic. Do not copy it into a buyer-facing website or app.
Use the simulator credentials while testing. A Merchant ID that begins with `TEST` is recognised as a test configuration. Use the separate live Merchant ID only when the event is ready to accept real payments.
Keep the password in your organisation's approved password manager until you add it to 9Pic. AFS credentials should never be added to a buyer-facing website or app.
Sign in to the AFS merchant administration area for the account you plan to use. Open **Admin -> Integration Settings** and find the **Integration Authentication** section.
Copy **Password 1** from the Integration Authentication section. Paste this value into the **AFS API Password** field in 9Pic. Do not copy it into a buyer-facing website or app.
Use the simulator credentials while testing. A Merchant ID that begins with `TEST` is recognised as a test configuration. Use the separate live Merchant ID only when the event is ready to accept real payments.
Keep the password in your organisation's approved password manager until you add it to 9Pic. AFS credentials should never be added to a buyer-facing website or app.
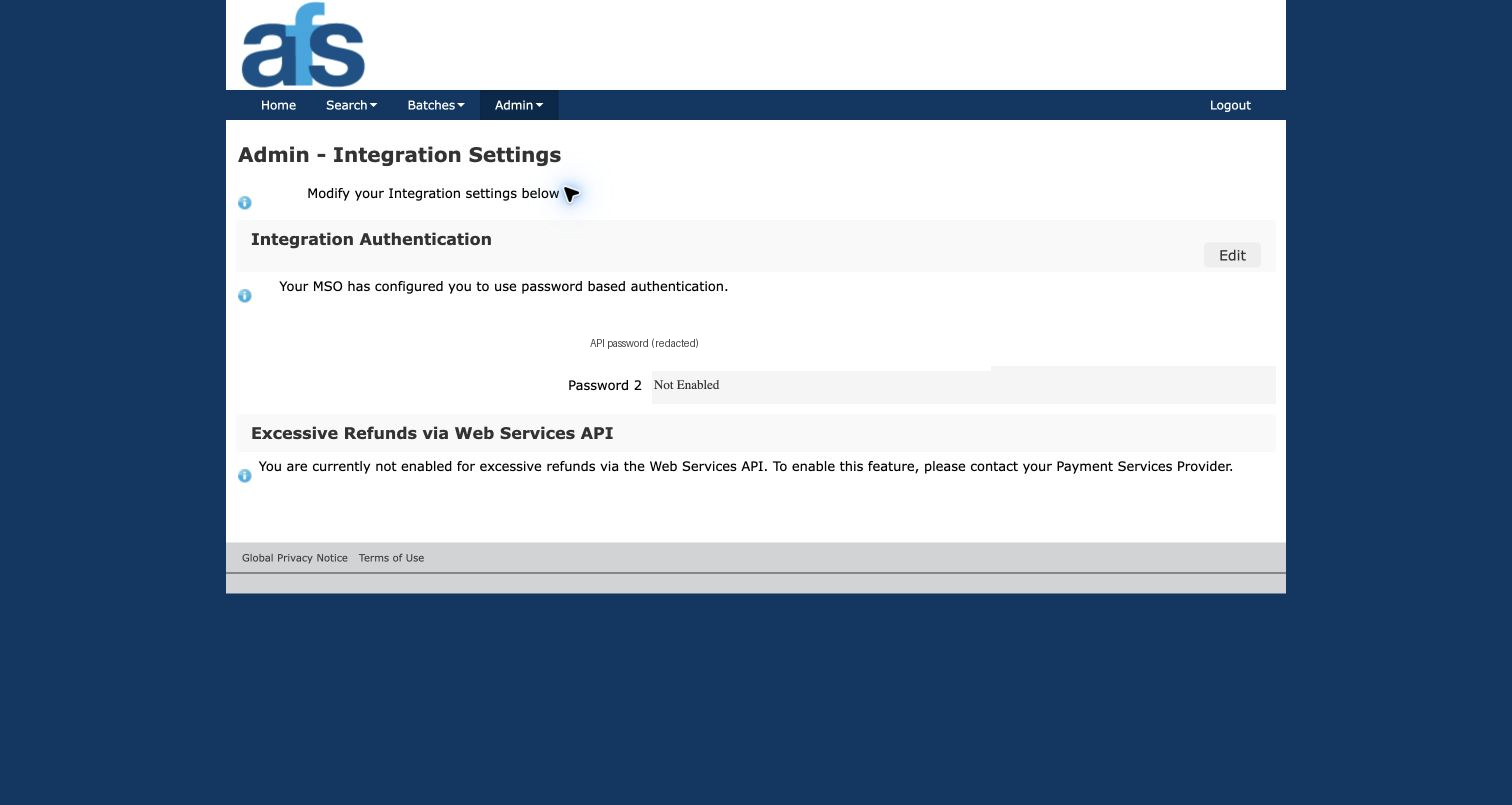 Need help locating the credentials in AFS? Use the [AFS integration guide](https://afs.gateway.mastercard.com/api/documentation/integrationGuidelines/index.html?locale=en_US) or contact the AFS team that provisioned your merchant account.
## Add AFS Gateway to 9Pic
In the dashboard sidebar, select **Payment Config**.
In **Payment Gateway Configurations**, click **Add Gateway**, then select **AFS Gateway**.
Enter an optional **Label** that makes the configuration easy to recognise, such as `AFS Test` or `AFS Live Bahrain`.
Paste the AFS Merchant ID into **Merchant ID**. This field is required. Use the ID that matches the environment you chose: a `TEST` ID for simulator checks or your live ID for real payments.
Paste the AFS API password into **AFS API Password**. This required value is stored as a protected credential for your organisation.
Click **Create Gateway**. The new AFS Gateway configuration appears in the organisation's gateway list.
## Assign AFS to an Event
Open the event, then open its **Checkout** configuration.
In the **Payment gateway** card, select **Assign** (or **Edit** if a gateway is already assigned), choose the AFS Gateway configuration, and save.
Create or update Checkout packages in **BHD**, **USD**, **AED**, **SAR**, or **QAR**. Other currencies cannot be used with AFS.
Publish the packages and run a complete buyer journey using the simulator before you switch the event to a live AFS configuration.
Replacing the assigned gateway while Checkout is live pauses Checkout first. Confirm the new configuration and package currency before you publish it again.
## Verify the Setup
| Check | What to confirm |
| ---------------------- | ----------------------------------------------------------------------------------------------- |
| **Correct mode** | Test events use a Merchant ID beginning with `TEST`; public checkout uses the live Merchant ID. |
| **Payment page opens** | A buyer can continue from 9Pic to the AFS hosted payment page. |
| **Payment completes** | A successful test payment returns to 9Pic and marks the order paid. |
| **Price is correct** | The amount shown by AFS matches the package price, including three decimal places for BHD. |
| **Cancellation works** | Cancelling returns the buyer to 9Pic without marking the order paid. |
## Troubleshooting
Edit the AFS Gateway configuration and confirm that both required fields have values. The Merchant ID and AFS API Password are separate fields.
A Merchant ID beginning with `TEST` is only for the simulator and cannot be used for public checkout. Add or update the configuration with the live Merchant ID supplied by AFS.
Confirm that the configuration was created for the same organisation as the event, then save the selection from the event's **Payment gateway** card.
AFS supports BHD, USD, AED, SAR, and QAR in 9Pic Checkout. Select one of those currencies or assign a gateway that supports the currency you need.
## Next Steps
Manage the payment gateways saved for your organisation.
Assign a gateway, publish packages, and enable Checkout for an event.
Need help locating the credentials in AFS? Use the [AFS integration guide](https://afs.gateway.mastercard.com/api/documentation/integrationGuidelines/index.html?locale=en_US) or contact the AFS team that provisioned your merchant account.
## Add AFS Gateway to 9Pic
In the dashboard sidebar, select **Payment Config**.
In **Payment Gateway Configurations**, click **Add Gateway**, then select **AFS Gateway**.
Enter an optional **Label** that makes the configuration easy to recognise, such as `AFS Test` or `AFS Live Bahrain`.
Paste the AFS Merchant ID into **Merchant ID**. This field is required. Use the ID that matches the environment you chose: a `TEST` ID for simulator checks or your live ID for real payments.
Paste the AFS API password into **AFS API Password**. This required value is stored as a protected credential for your organisation.
Click **Create Gateway**. The new AFS Gateway configuration appears in the organisation's gateway list.
## Assign AFS to an Event
Open the event, then open its **Checkout** configuration.
In the **Payment gateway** card, select **Assign** (or **Edit** if a gateway is already assigned), choose the AFS Gateway configuration, and save.
Create or update Checkout packages in **BHD**, **USD**, **AED**, **SAR**, or **QAR**. Other currencies cannot be used with AFS.
Publish the packages and run a complete buyer journey using the simulator before you switch the event to a live AFS configuration.
Replacing the assigned gateway while Checkout is live pauses Checkout first. Confirm the new configuration and package currency before you publish it again.
## Verify the Setup
| Check | What to confirm |
| ---------------------- | ----------------------------------------------------------------------------------------------- |
| **Correct mode** | Test events use a Merchant ID beginning with `TEST`; public checkout uses the live Merchant ID. |
| **Payment page opens** | A buyer can continue from 9Pic to the AFS hosted payment page. |
| **Payment completes** | A successful test payment returns to 9Pic and marks the order paid. |
| **Price is correct** | The amount shown by AFS matches the package price, including three decimal places for BHD. |
| **Cancellation works** | Cancelling returns the buyer to 9Pic without marking the order paid. |
## Troubleshooting
Edit the AFS Gateway configuration and confirm that both required fields have values. The Merchant ID and AFS API Password are separate fields.
A Merchant ID beginning with `TEST` is only for the simulator and cannot be used for public checkout. Add or update the configuration with the live Merchant ID supplied by AFS.
Confirm that the configuration was created for the same organisation as the event, then save the selection from the event's **Payment gateway** card.
AFS supports BHD, USD, AED, SAR, and QAR in 9Pic Checkout. Select one of those currencies or assign a gateway that supports the currency you need.
## Next Steps
Manage the payment gateways saved for your organisation.
Assign a gateway, publish packages, and enable Checkout for an event.