> ## Documentation Index
> Fetch the complete documentation index at: https://docs.9pic.ai/llms.txt
> Use this file to discover all available pages before exploring further.
# Developer Zone
> Create and manage API tokens for your Enterprise organisation.
## Overview
**Developer Zone** is where Enterprise organisations create and manage API tokens for the 9Pic API. Each token lets an external service (your website, a partner app, an internal tool) read your organisation's data through the API.
**Enterprise plan only.** Developer Zone is available on the Enterprise plan. On Trial, Pay As You Go, and Pro, the sidebar item is faded with a **lock** icon — clicking it shows an **Enterprise Plan Required** message instead of opening the page. Contact 9Pic to upgrade.
 ## Open Developer Zone
Log in to [admin.9pic.ai](https://admin.9pic.ai).
Use the organisation selector in the sidebar. If your active organisation is not on Enterprise, Developer Zone shows an upgrade message instead.
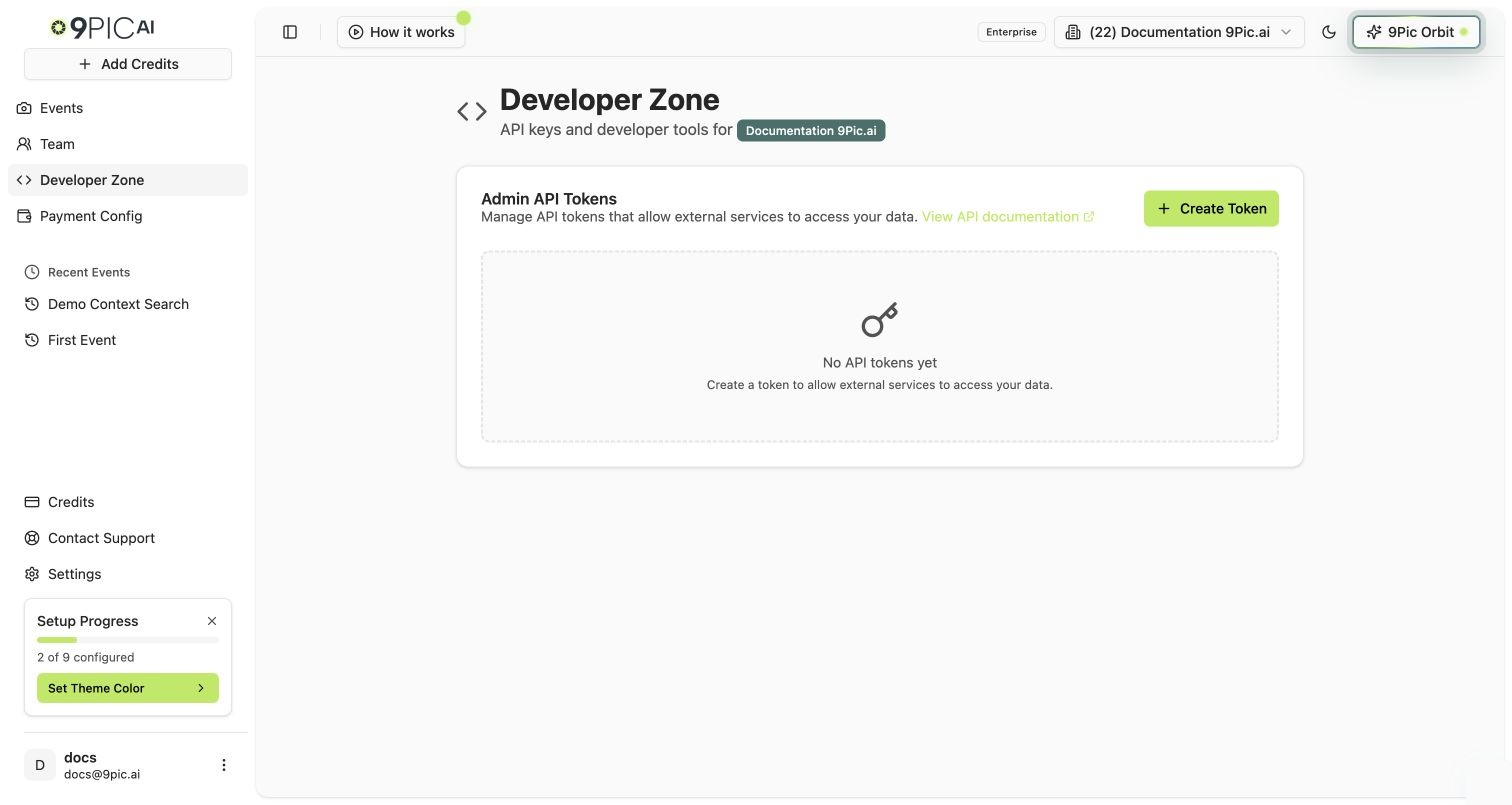
Click **Developer Zone** in the sidebar. The Admin API Tokens panel opens.
If no organisation is selected, the page asks you to choose one from the sidebar first.
## Admin API Tokens
The Admin API Tokens panel lists every token your organisation has created. Each row shows:
| Column | What it means |
| :------------- | :------------------------------------------------------------------------------------------------------------ |
| **Token** | The first five characters of the token followed by `***`. The full token is never shown again after creation. |
| **Status** | **Active** (the token can be used) or **Inactive** (the token is paused and cannot be used). |
| **Created By** | The email of the team member who created the token. |
| **Created At** | The date the token was created. |
| **Actions** | An **Active/Inactive** toggle and a **Delete** button. |
The card header links to the **API documentation** in a new tab so developers can jump straight to authentication and endpoint details.
Each organisation can have up to **10 tokens** at a time. When you reach the limit, the **Create Token** button is disabled and a message tells you to delete an existing token first.
## Create a Token
In the Admin API Tokens card, click **Create Token** in the top right.
A confirmation dialog explains that the full token will be shown only once. Click **Create Token** to continue, or **Cancel** to go back.
A second dialog shows the full token in a read-only field. Click the copy icon next to it to copy the token to your clipboard. Store it somewhere safe.
Click **Done** to close the dialog. The new token now appears in the table with its masked preview and an **Active** status.
The full token value is shown **only once**, right after it is created. After you close the dialog, only the masked preview is visible. If you lose a token, delete it and create a new one — there is no way to view the full value again.
Use a separate token for each integration. That way you can deactivate or delete one without breaking the others.
## Activate or Deactivate a Token
Use the **Active/Inactive** switch in the token row to pause or resume a token without deleting it.
* Turn the switch **off** to deactivate the token. Any service using it loses access immediately.
* Turn the switch **on** to reactivate the token. The original token value continues to work.
Deactivating is reversible. If you only need to temporarily block a token (for example while you investigate a leak), deactivate it instead of deleting it.
## Delete a Token
Open Developer Zone and find the token row in the Admin API Tokens table.
Click the red trash icon in the **Actions** column for that row.
Read the confirmation dialog. Click **Delete** to confirm, or **Cancel** to go back.
Deletion is permanent. Any service still using the deleted token will immediately lose access to the API and cannot be recovered — you must create a new token and update those services.
## Use the Token with the API
Once you have a token, use it as a bearer credential when calling the 9Pic API. Endpoint details, request examples, and response shapes live in the **API Reference** tab of these docs.
How to send your token with each API request.
Endpoints, conventions, errors, and response models.
## Common Questions
On Trial, Pay As You Go, and Pro plans the Developer Zone sidebar item stays visible but faded, with a **lock** icon and an "Enterprise plan required" tooltip. Clicking it shows an **Enterprise Plan Required** message instead of opening the page. Contact 9Pic to upgrade.
Each Enterprise organisation can have up to **10 active or inactive tokens** at a time. Delete an existing token if you need to create a new one beyond that limit.
No. The full token value is shown only once, right after creation. If you lose it, delete the token from the table and create a new one, then update any service that was using the old token.
Calls using a deactivated token fail with an authentication error. Reactivate the token to restore access — the original token value continues to work.
Anyone who can open Developer Zone for the selected Enterprise organisation. The **Created By** column records the email of the team member who created each token.
## Next Steps
Use your new token to call the 9Pic API.
Review your Enterprise plan, credits, and subscription details.
## Open Developer Zone
Log in to [admin.9pic.ai](https://admin.9pic.ai).
Use the organisation selector in the sidebar. If your active organisation is not on Enterprise, Developer Zone shows an upgrade message instead.
Click **Developer Zone** in the sidebar. The Admin API Tokens panel opens.
If no organisation is selected, the page asks you to choose one from the sidebar first.
## Admin API Tokens
The Admin API Tokens panel lists every token your organisation has created. Each row shows:
| Column | What it means |
| :------------- | :------------------------------------------------------------------------------------------------------------ |
| **Token** | The first five characters of the token followed by `***`. The full token is never shown again after creation. |
| **Status** | **Active** (the token can be used) or **Inactive** (the token is paused and cannot be used). |
| **Created By** | The email of the team member who created the token. |
| **Created At** | The date the token was created. |
| **Actions** | An **Active/Inactive** toggle and a **Delete** button. |
The card header links to the **API documentation** in a new tab so developers can jump straight to authentication and endpoint details.
Each organisation can have up to **10 tokens** at a time. When you reach the limit, the **Create Token** button is disabled and a message tells you to delete an existing token first.
## Create a Token
In the Admin API Tokens card, click **Create Token** in the top right.
A confirmation dialog explains that the full token will be shown only once. Click **Create Token** to continue, or **Cancel** to go back.
A second dialog shows the full token in a read-only field. Click the copy icon next to it to copy the token to your clipboard. Store it somewhere safe.
Click **Done** to close the dialog. The new token now appears in the table with its masked preview and an **Active** status.
The full token value is shown **only once**, right after it is created. After you close the dialog, only the masked preview is visible. If you lose a token, delete it and create a new one — there is no way to view the full value again.
Use a separate token for each integration. That way you can deactivate or delete one without breaking the others.
## Activate or Deactivate a Token
Use the **Active/Inactive** switch in the token row to pause or resume a token without deleting it.
* Turn the switch **off** to deactivate the token. Any service using it loses access immediately.
* Turn the switch **on** to reactivate the token. The original token value continues to work.
Deactivating is reversible. If you only need to temporarily block a token (for example while you investigate a leak), deactivate it instead of deleting it.
## Delete a Token
Open Developer Zone and find the token row in the Admin API Tokens table.
Click the red trash icon in the **Actions** column for that row.
Read the confirmation dialog. Click **Delete** to confirm, or **Cancel** to go back.
Deletion is permanent. Any service still using the deleted token will immediately lose access to the API and cannot be recovered — you must create a new token and update those services.
## Use the Token with the API
Once you have a token, use it as a bearer credential when calling the 9Pic API. Endpoint details, request examples, and response shapes live in the **API Reference** tab of these docs.
How to send your token with each API request.
Endpoints, conventions, errors, and response models.
## Common Questions
On Trial, Pay As You Go, and Pro plans the Developer Zone sidebar item stays visible but faded, with a **lock** icon and an "Enterprise plan required" tooltip. Clicking it shows an **Enterprise Plan Required** message instead of opening the page. Contact 9Pic to upgrade.
Each Enterprise organisation can have up to **10 active or inactive tokens** at a time. Delete an existing token if you need to create a new one beyond that limit.
No. The full token value is shown only once, right after creation. If you lose it, delete the token from the table and create a new one, then update any service that was using the old token.
Calls using a deactivated token fail with an authentication error. Reactivate the token to restore access — the original token value continues to work.
Anyone who can open Developer Zone for the selected Enterprise organisation. The **Created By** column records the email of the team member who created each token.
## Next Steps
Use your new token to call the 9Pic API.
Review your Enterprise plan, credits, and subscription details.