> ## Documentation Index
> Fetch the complete documentation index at: https://docs.9pic.ai/llms.txt
> Use this file to discover all available pages before exploring further.
# Credits
> Check your credit balance, buy credits, manage billing details, review payments, and check your subscription.
## Overview
Credits are used for photo processing operations in your organisation. The Credits area shows your available balance, recent usage, payment records, billing details, and subscription status.
Credits belong to the selected organisation, not to a single event. If you manage more than one organisation, check that the correct organisation is selected in the sidebar before purchasing or reviewing credits.
 ## The Credits Area
The Credits area has **three sub-tabs**:
| Tab | URL | What it covers |
| :------------------------- | :---------------------- | :---------------------------------------------------------------- |
| **Credits** | `/credits` | Balance, monthly usage summary, credit usage and purchase tables. |
| **Billing & Transactions** | `/credits/billing` | Billing details, payment history, invoice downloads. |
| **Subscription** | `/credits/subscription` | Current plan label, expiry date, plan status. |
The **Purchase Credits** flow opens at `/credits/purchase` and is described below.
You can click **Credits** in the sidebar to land on the Credits tab, or click **Add Credit** / **Upgrade** in the sidebar to go directly to the purchase flow.
***
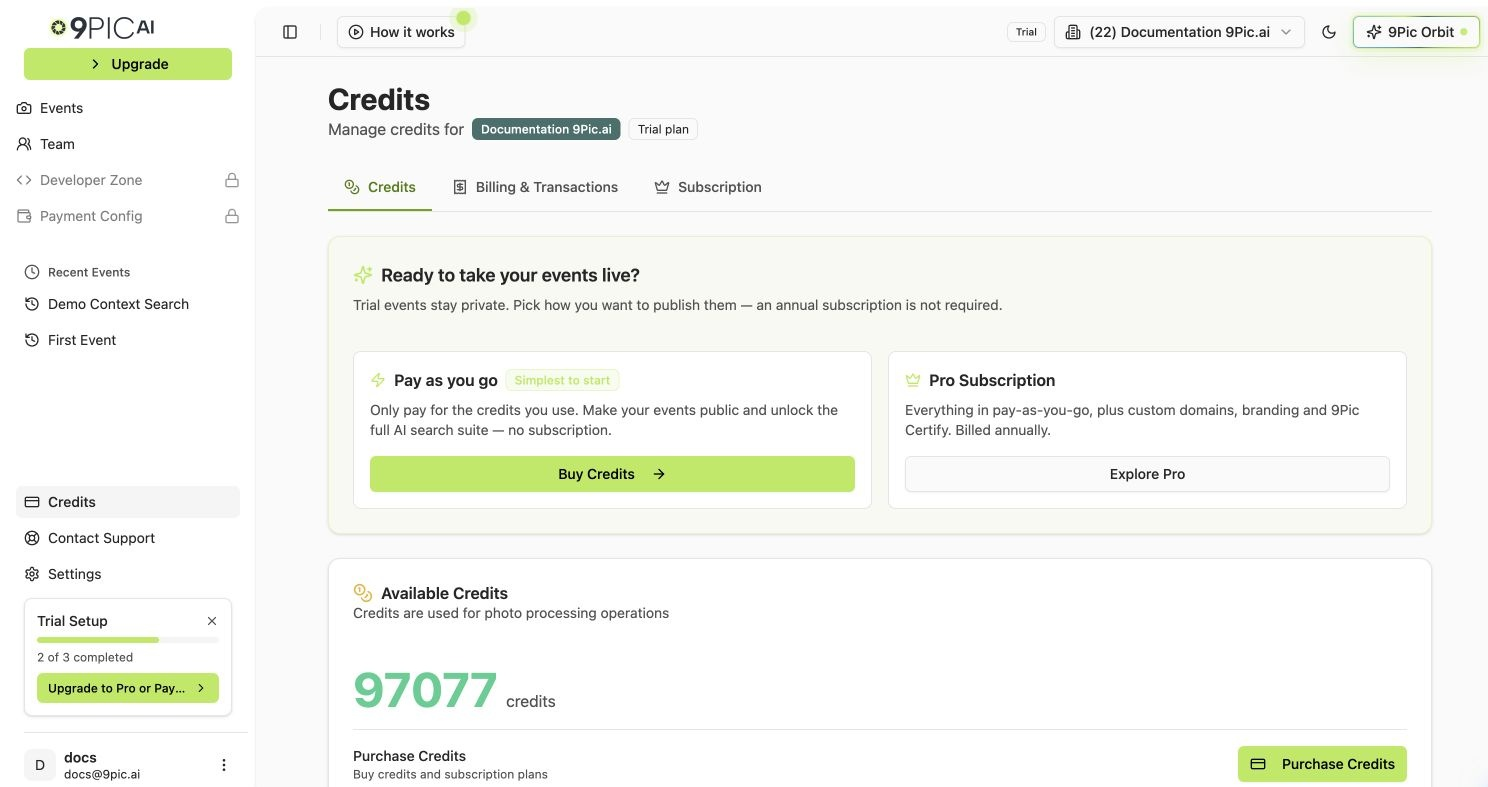
## Credits Tab
The **Credits** tab is the main overview page. From top to bottom you'll see:
* **Available Credits** — your current balance.
* **Cost per Credit** — only shown when pricing is configured for your organisation (the dashboard shows the value when `cost_per_credit` is set and greater than zero). Click **Show** to reveal it and **Hide** to mask it again.
* **Purchase Credits** — opens the purchase flow.
* **Billing & Transactions** — opens the Billing & Transactions tab.
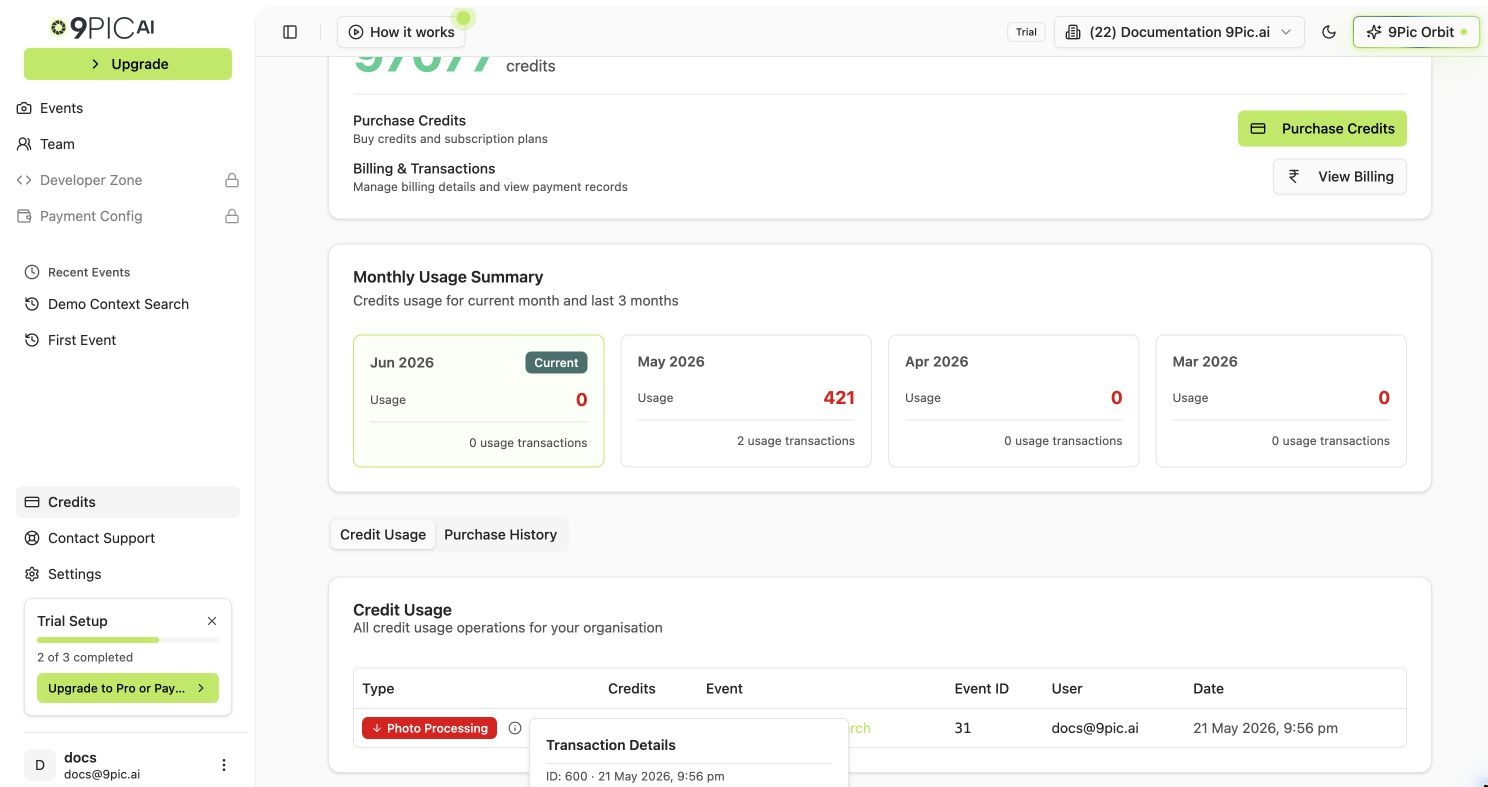
* **Monthly Usage Summary** — credit usage for the current month and the previous three months. The numbers come from the backend monthly aggregation when available, with a client-side fallback that sums usage transactions per month.
* **Credit Usage** — usage transactions (negative deltas). Columns include the transaction type badge, the credit change, event name (linked to the event when present), event ID, user email (or **System**), and date.
* **Purchase History** — credit additions (positive deltas) such as purchases, free credits, admin grants, or refunds.
The **Add Credits** button shown next to Available Credits is for **9Pic staff only**. Customers should use **Purchase Credits** to buy credits or update a subscription.
### Transaction Types
The transaction type badge on each row is one of:
| Type | When it appears |
| :--------------- | :----------------------------------------------------------------------------------------------------------------------------------------------------------------------------------- |
| **Usage** | Credits were spent on a processing operation. The label is replaced by **Photo Processing** for `event_photo_indexing` usage or **AI Image Rotation** for `ai_image_rotation` usage. |
| **Purchase** | Credits were bought through the purchase flow. |
| **Admin Grant** | 9Pic staff manually added credits to your organisation. |
| **Free Credits** | Credits granted as part of a trial or promotion. |
| **Refund** | Credits were reversed after a refund. |
A small info icon next to the badge opens a **Transaction Details** popover with description, payment ID, gateway, order ID, plan, and amount when those fields are present on the transaction.
## The Credits Area
The Credits area has **three sub-tabs**:
| Tab | URL | What it covers |
| :------------------------- | :---------------------- | :---------------------------------------------------------------- |
| **Credits** | `/credits` | Balance, monthly usage summary, credit usage and purchase tables. |
| **Billing & Transactions** | `/credits/billing` | Billing details, payment history, invoice downloads. |
| **Subscription** | `/credits/subscription` | Current plan label, expiry date, plan status. |
The **Purchase Credits** flow opens at `/credits/purchase` and is described below.
You can click **Credits** in the sidebar to land on the Credits tab, or click **Add Credit** / **Upgrade** in the sidebar to go directly to the purchase flow.
***
## Credits Tab
The **Credits** tab is the main overview page. From top to bottom you'll see:
* **Available Credits** — your current balance.
* **Cost per Credit** — only shown when pricing is configured for your organisation (the dashboard shows the value when `cost_per_credit` is set and greater than zero). Click **Show** to reveal it and **Hide** to mask it again.
* **Purchase Credits** — opens the purchase flow.
* **Billing & Transactions** — opens the Billing & Transactions tab.
* **Monthly Usage Summary** — credit usage for the current month and the previous three months. The numbers come from the backend monthly aggregation when available, with a client-side fallback that sums usage transactions per month.
* **Credit Usage** — usage transactions (negative deltas). Columns include the transaction type badge, the credit change, event name (linked to the event when present), event ID, user email (or **System**), and date.
* **Purchase History** — credit additions (positive deltas) such as purchases, free credits, admin grants, or refunds.
The **Add Credits** button shown next to Available Credits is for **9Pic staff only**. Customers should use **Purchase Credits** to buy credits or update a subscription.
### Transaction Types
The transaction type badge on each row is one of:
| Type | When it appears |
| :--------------- | :----------------------------------------------------------------------------------------------------------------------------------------------------------------------------------- |
| **Usage** | Credits were spent on a processing operation. The label is replaced by **Photo Processing** for `event_photo_indexing` usage or **AI Image Rotation** for `ai_image_rotation` usage. |
| **Purchase** | Credits were bought through the purchase flow. |
| **Admin Grant** | 9Pic staff manually added credits to your organisation. |
| **Free Credits** | Credits granted as part of a trial or promotion. |
| **Refund** | Credits were reversed after a refund. |
A small info icon next to the badge opens a **Transaction Details** popover with description, payment ID, gateway, order ID, plan, and amount when those fields are present on the transaction.
 ### Cross-link
How 9Pic applies usage limits to credits and photo processing. Read this before buying large credit packs.
***
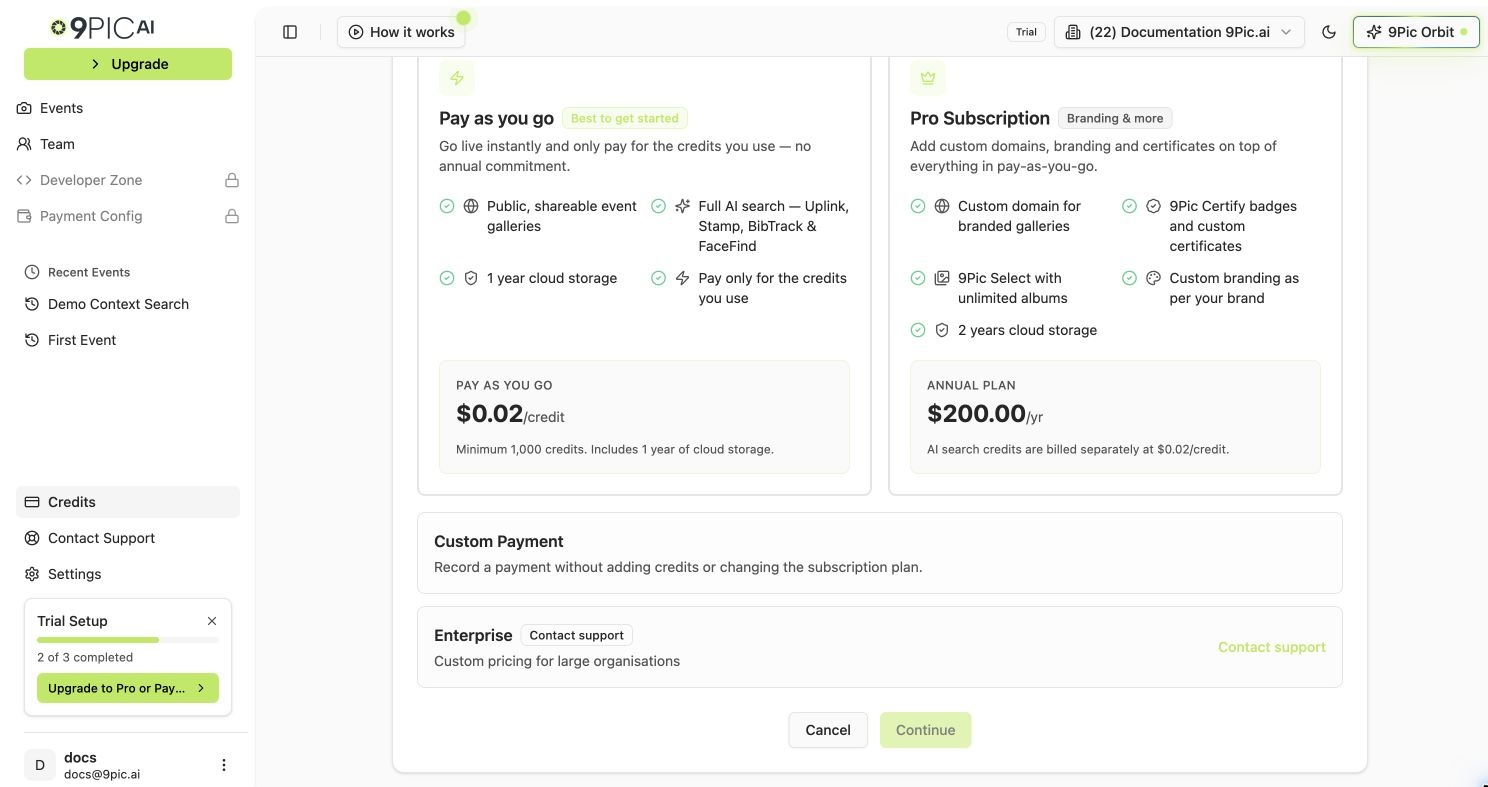
## Buy Credits or Upgrade
The purchase flow opens at `/credits/purchase` and is a **four-step wizard**: **Plan → Credits → Review → Payment**.
On the Credits tab, click **Purchase Credits**. The wizard opens.
Pick one of the plan options below. The options shown depend on whether your organisation already has a subscription.
For credit purchases, enter the number of credits. For pay-as-you-go credit purchases the minimum is **1,000 credits**. Pro subscription purchases allow **0 additional credits** if you only need the included plan credits.
Check the plan, credit quantity, cost per credit, taxes, and total amount.
Tick the **Refund Policy** checkbox. The link points at [9pic.ai/refund-policy](https://9pic.ai/refund-policy/). The payment button stays disabled until you accept.
Pay through Razorpay or PayGlocal depending on your currency and account setup. The dashboard shows the order summary again on the payment step.
### Plan Options
| Option | Use it for |
| :------------------- | :------------------------------------------------------------------------------------------------------------------------------------------------------------- |
| **Pro Subscription** | Annual subscription that includes credits. Shown when your organisation is **not** already subscribed. |
| **Add Credits** | Buy credits without changing your plan. Shown to already-subscribed organisations and as the credit-only option to others. |
| **Custom Payment** | Record a payment without adding credits or changing the subscription. Use only when instructed by the 9Pic team. |
| **Enterprise** | Custom pricing for large organisations. The option is disabled inline and opens the [contact page](https://9pic.ai/contact/) instead of a self-serve checkout. |
If you pay in INR, the order summary applies GST at **18%**. The final review step shows the full amount before payment.
### Cross-link
How 9Pic applies usage limits to credits and photo processing. Read this before buying large credit packs.
***
## Buy Credits or Upgrade
The purchase flow opens at `/credits/purchase` and is a **four-step wizard**: **Plan → Credits → Review → Payment**.
On the Credits tab, click **Purchase Credits**. The wizard opens.
Pick one of the plan options below. The options shown depend on whether your organisation already has a subscription.
For credit purchases, enter the number of credits. For pay-as-you-go credit purchases the minimum is **1,000 credits**. Pro subscription purchases allow **0 additional credits** if you only need the included plan credits.
Check the plan, credit quantity, cost per credit, taxes, and total amount.
Tick the **Refund Policy** checkbox. The link points at [9pic.ai/refund-policy](https://9pic.ai/refund-policy/). The payment button stays disabled until you accept.
Pay through Razorpay or PayGlocal depending on your currency and account setup. The dashboard shows the order summary again on the payment step.
### Plan Options
| Option | Use it for |
| :------------------- | :------------------------------------------------------------------------------------------------------------------------------------------------------------- |
| **Pro Subscription** | Annual subscription that includes credits. Shown when your organisation is **not** already subscribed. |
| **Add Credits** | Buy credits without changing your plan. Shown to already-subscribed organisations and as the credit-only option to others. |
| **Custom Payment** | Record a payment without adding credits or changing the subscription. Use only when instructed by the 9Pic team. |
| **Enterprise** | Custom pricing for large organisations. The option is disabled inline and opens the [contact page](https://9pic.ai/contact/) instead of a self-serve checkout. |
If you pay in INR, the order summary applies GST at **18%**. The final review step shows the full amount before payment.
 ***
## Billing & Transactions Tab
Open **Credits → Billing & Transactions** to manage invoice details and review payment history.
### Billing Details
Click the **Billing & Transactions** tab.
Click **Add Billing Details** or **Edit** on the existing card.
Enter the company or business name, billing email, address, phone, and tax details. Add a shipping address if it differs from the billing address.
Click **Save & Sync**. The dashboard asks for confirmation before saving.
If you see **Billing country not configured** at the top of the Billing & Transactions page, open [Settings → Domain & Region](/dashboard-guide/settings/domain) and set your country first. Billing details cannot be saved until the country is configured.
For Indian billing the editor supports **GSTIN** entry. A valid GSTIN can auto-set the state and fetch company details when available. Indian pincodes must be **6 digits**.
### Payment Transactions and Invoices
The Billing & Transactions page lists payment records with payment ID, status, gateway, amount, date, and actions.
| Status | Meaning |
| :------------ | :------------------------------------- |
| **Completed** | Payment was confirmed. |
| **Pending** | Payment is still being checked. |
| **Failed** | Payment did not complete. |
| **Abandoned** | Checkout was opened but not completed. |
Available actions depend on the payment row:
| Action | When it appears |
| :-------------------- | :-------------------------------------------------------------------- |
| **Details** | Always — opens a side sheet with the full payment record. |
| **Recheck** | Pending or abandoned payments — re-checks the gateway. |
| **Invoice** | Completed payments with an invoice ready — downloads the invoice PDF. |
| **Configure Billing** | Invoice generation is waiting for billing details. |
| **Generate Invoice** | Invoice is waiting to be generated for the first time. |
| **Retry Invoice** | A previous invoice attempt failed. |
Invoice generation may take a short time after payment. If the invoice is still generating, wait a moment and check again.
***
## Subscription Tab
Open **Credits → Subscription** to review your current plan and expiry date.
### Plan Labels
| Label | What it means |
| :---------------- | :------------------------------------------------------------------------------------------------- |
| **Trial** | Free trial with limited credits to explore 9Pic. Upgrade anytime to unlock public events and more. |
| **Pro** | Annual subscription with custom domain, 9Pic Certify, race videos, and priority support. |
| **Enterprise** | Custom plan with dedicated support and SLAs. |
| **Pay As You Go** | Flexible usage-based pricing with no commitment. |
### Expiry Date
The Subscription card shows the expiry date when one is set. The dashboard adds badges based on how close it is:
* **Expired** — the expiry date has passed.
* **Expires in N day(s)** — there are **30 or fewer days** until expiry.
* Otherwise, a plain "N days remaining" line.
If your plan has no fixed expiry, the card shows **No expiry date set**.
Plan type and subscription dates are managed by the 9Pic team. Email [support@9pic.ai](mailto:support@9pic.ai) for upgrades, renewals, or plan corrections.
***
## Common Questions
Credits are spent on photo processing operations. The Credit Usage table shows each entry, with the related event linked when an event is available.
The Cost per Credit row only appears when pricing is configured for your organisation. If it is not visible, contact 9Pic support for pricing details.
Add billing details first, then use **Generate Invoice** or **Retry Invoice** on the payment row if the action is shown. If you only see **Configure Billing**, fill in the billing details before trying again.
Open **Billing & Transactions** and click **Recheck** on the payment row. If the status still does not update, contact 9Pic support with the payment ID.
Pay-as-you-go credit purchases require a minimum of **1,000 credits**. Pro subscription purchases allow 0 additional credits if you only need the included plan credits.
The **Credit Usage** table on the Credits tab lists each usage entry with the event name and event ID when available. Click the event name to open the event.
## Next Steps
Read the limits that apply to credits and photo processing.
Set your country before saving billing details.
Get help with credits, billing, invoices, payments, or plan changes.
***
## Billing & Transactions Tab
Open **Credits → Billing & Transactions** to manage invoice details and review payment history.
### Billing Details
Click the **Billing & Transactions** tab.
Click **Add Billing Details** or **Edit** on the existing card.
Enter the company or business name, billing email, address, phone, and tax details. Add a shipping address if it differs from the billing address.
Click **Save & Sync**. The dashboard asks for confirmation before saving.
If you see **Billing country not configured** at the top of the Billing & Transactions page, open [Settings → Domain & Region](/dashboard-guide/settings/domain) and set your country first. Billing details cannot be saved until the country is configured.
For Indian billing the editor supports **GSTIN** entry. A valid GSTIN can auto-set the state and fetch company details when available. Indian pincodes must be **6 digits**.
### Payment Transactions and Invoices
The Billing & Transactions page lists payment records with payment ID, status, gateway, amount, date, and actions.
| Status | Meaning |
| :------------ | :------------------------------------- |
| **Completed** | Payment was confirmed. |
| **Pending** | Payment is still being checked. |
| **Failed** | Payment did not complete. |
| **Abandoned** | Checkout was opened but not completed. |
Available actions depend on the payment row:
| Action | When it appears |
| :-------------------- | :-------------------------------------------------------------------- |
| **Details** | Always — opens a side sheet with the full payment record. |
| **Recheck** | Pending or abandoned payments — re-checks the gateway. |
| **Invoice** | Completed payments with an invoice ready — downloads the invoice PDF. |
| **Configure Billing** | Invoice generation is waiting for billing details. |
| **Generate Invoice** | Invoice is waiting to be generated for the first time. |
| **Retry Invoice** | A previous invoice attempt failed. |
Invoice generation may take a short time after payment. If the invoice is still generating, wait a moment and check again.
***
## Subscription Tab
Open **Credits → Subscription** to review your current plan and expiry date.
### Plan Labels
| Label | What it means |
| :---------------- | :------------------------------------------------------------------------------------------------- |
| **Trial** | Free trial with limited credits to explore 9Pic. Upgrade anytime to unlock public events and more. |
| **Pro** | Annual subscription with custom domain, 9Pic Certify, race videos, and priority support. |
| **Enterprise** | Custom plan with dedicated support and SLAs. |
| **Pay As You Go** | Flexible usage-based pricing with no commitment. |
### Expiry Date
The Subscription card shows the expiry date when one is set. The dashboard adds badges based on how close it is:
* **Expired** — the expiry date has passed.
* **Expires in N day(s)** — there are **30 or fewer days** until expiry.
* Otherwise, a plain "N days remaining" line.
If your plan has no fixed expiry, the card shows **No expiry date set**.
Plan type and subscription dates are managed by the 9Pic team. Email [support@9pic.ai](mailto:support@9pic.ai) for upgrades, renewals, or plan corrections.
***
## Common Questions
Credits are spent on photo processing operations. The Credit Usage table shows each entry, with the related event linked when an event is available.
The Cost per Credit row only appears when pricing is configured for your organisation. If it is not visible, contact 9Pic support for pricing details.
Add billing details first, then use **Generate Invoice** or **Retry Invoice** on the payment row if the action is shown. If you only see **Configure Billing**, fill in the billing details before trying again.
Open **Billing & Transactions** and click **Recheck** on the payment row. If the status still does not update, contact 9Pic support with the payment ID.
Pay-as-you-go credit purchases require a minimum of **1,000 credits**. Pro subscription purchases allow 0 additional credits if you only need the included plan credits.
The **Credit Usage** table on the Credits tab lists each usage entry with the event name and event ID when available. Click the event name to open the event.
## Next Steps
Read the limits that apply to credits and photo processing.
Set your country before saving billing details.
Get help with credits, billing, invoices, payments, or plan changes.